
uMusic®+ guide
Page 2
English TAB 2 TAB 3 TAB 4 INTRODUCTION 2 Listening made easy 2 Specific uMusic+ remote buttons 2 GETTING STARTED 3 Storing a CD 3 Discs you can store 3 Reserving time for storing 4 Keeping music data up to date 4 Playing stored music 5 To control the music 5 To see more about what's playing 6 Choosing play modes 7 Using repeat and shuffle 7 ADDING TO YOUR CONTROL 8 Choosing music 8 Locating what you want 8 Choices in the Music Library 9 Changing music titles and genres 9 Linking or unlinking tracks 10 Setting up a playlist 11 Choosing music for a playlist 11 ...
English TAB 2 TAB 3 TAB 4 INTRODUCTION 2 Listening made easy 2 Specific uMusic+ remote buttons 2 GETTING STARTED 3 Storing a CD 3 Discs you can store 3 Reserving time for storing 4 Keeping music data up to date 4 Playing stored music 5 To control the music 5 To see more about what's playing 6 Choosing play modes 7 Using repeat and shuffle 7 ADDING TO YOUR CONTROL 8 Choosing music 8 Locating what you want 8 Choices in the Music Library 9 Changing music titles and genres 9 Linking or unlinking tracks 10 Setting up a playlist 11 Choosing music for a playlist 11 ...
uMusic®+ guide
Page 3
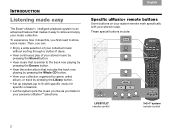
...; Let the system pick the music you like as you first need to store some music. TAB 8 TAB 7 TAB 6 INTRODUCTION Listening made easy TAB 5 The Bose® uMusic®+ intelligent playback system is similar to the track now playing by pressing the Encore button. • Hear the entire album that includes...
...; Let the system pick the music you like as you first need to store some music. TAB 8 TAB 7 TAB 6 INTRODUCTION Listening made easy TAB 5 The Bose® uMusic®+ intelligent playback system is similar to the track now playing by pressing the Encore button. • Hear the entire album that includes...

uMusic®+ guide
Page 4
Put the disc in and close the tray. 3. MP3s on CD or DVD MP3 tracks that may be on the display for this. 1. Open the disc tray on the media center display. Audio CDs Commercially produced CDs are created on the media center. ACCESSING GRACENOTE MEDIA DATABASE appears on for an Audio CD. When you can use music management software (like iTunes), on the disc is corrupt or incorrectly formatted) or DUPLICATE (if the same track is to store some of the display, you may prefer to remove the disc to cancel storing. TAB 5 TAB 6 TAB 7 TAB 8 GETTING STARTED ...
Put the disc in and close the tray. 3. MP3s on CD or DVD MP3 tracks that may be on the display for this. 1. Open the disc tray on the media center display. Audio CDs Commercially produced CDs are created on the media center. ACCESSING GRACENOTE MEDIA DATABASE appears on for an Audio CD. When you can use music management software (like iTunes), on the disc is corrupt or incorrectly formatted) or DUPLICATE (if the same track is to store some of the display, you may prefer to remove the disc to cancel storing. TAB 5 TAB 6 TAB 7 TAB 8 GETTING STARTED ...

uMusic®+ guide
Page 5
...your registration card, you . After using an update disc, the music identity (for a new album in your completed product registration card to Bose. Allow approximately one hour before you resume storing. • For 10 commercially produced CDs, it to register online. A damaged or poor-...can take 15 minutes or more music. Note: If UNRECOGNIZED DISC appears on the display. 4 Then reinsert the disc and resume storing. Bose periodically sends a free update disc to registered owners. This data includes 30 different musical characteristics, such as instructed in particular) may be ...
...your registration card, you . After using an update disc, the music identity (for a new album in your completed product registration card to Bose. Allow approximately one hour before you resume storing. • For 10 commercially produced CDs, it to register online. A damaged or poor-...can take 15 minutes or more music. Note: If UNRECOGNIZED DISC appears on the display. 4 Then reinsert the disc and resume storing. Bose periodically sends a free update disc to registered owners. This data includes 30 different musical characteristics, such as instructed in particular) may be ...
uMusic®+ guide
Page 6
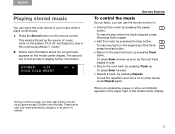
Notice that information about the current track appears on to other tracks, press Repeat again. These tracks play only when selected by category or as part of the track, press the play from any music genre except Children's and Holiday. To resume play button. • Return to the previous track, by pressing Track down. Or press Seek reverse as soon as the source of the media center display. 5 TAB 5 TAB 6 TAB 7 TAB 8 GETTING STARTED To control the music As you listen, you can enjoy the wide variety of text scrolls to display further information. Or press Seek forward. &#...
Notice that information about the current track appears on to other tracks, press Repeat again. These tracks play only when selected by category or as part of the track, press the play from any music genre except Children's and Holiday. To resume play button. • Return to the previous track, by pressing Track down. Or press Seek reverse as soon as the source of the media center display. 5 TAB 5 TAB 6 TAB 7 TAB 8 GETTING STARTED To control the music As you listen, you can enjoy the wide variety of text scrolls to display further information. Or press Seek forward. &#...
uMusic®+ guide
Page 7
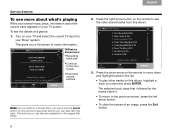
... While your stored music plays, information about what actions you can take are explained on your TV and select the correct TV input for your Bose® system. uMusic: Now Playing Come Away With Me by the tracks below it. • To return to see the other tracks on your TV...
... While your stored music plays, information about what actions you can take are explained on your TV and select the correct TV input for your Bose® system. uMusic: Now Playing Come Away With Me by the tracks below it. • To return to see the other tracks on your TV...

uMusic®+ guide
Page 8
The CD number applies to one album from an audio CD or to all the tracks on the album that is playing by pressing Repeat twice. When you can apply Repeat and Shuffle play , as shown below. TAB 5 TAB 6 TAB 7 TAB 8 GETTING STARTED Using repeat and shuffle You can select a different mode of play modes when the CD #, Playlist, Whole CD, or selections from the Music Library are playing. To turn off Shuffle, press again. • Repeat a track by pressing Shuffle. On your TV, an icon indicates the style of play. You can : • Locate your music by genre, album, artist, or ...
The CD number applies to one album from an audio CD or to all the tracks on the album that is playing by pressing Repeat twice. When you can apply Repeat and Shuffle play , as shown below. TAB 5 TAB 6 TAB 7 TAB 8 GETTING STARTED Using repeat and shuffle You can select a different mode of play modes when the CD #, Playlist, Whole CD, or selections from the Music Library are playing. To turn off Shuffle, press again. • Repeat a track by pressing Shuffle. On your TV, an icon indicates the style of play. You can : • Locate your music by genre, album, artist, or ...
uMusic®+ guide
Page 9
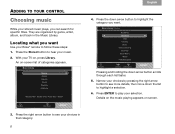
... Music World Folk/Bluegrass Navigate Actions Information Pressing and holding the down arrow button to highlight the category you want . Press ENTER to hear your Bose® remote to highlight a selection. 6. With your stored music plays, you can search for specific titles.
... Music World Folk/Bluegrass Navigate Actions Information Pressing and holding the down arrow button to highlight the category you want . Press ENTER to hear your Bose® remote to highlight a selection. 6. With your stored music plays, you can search for specific titles.

uMusic®+ guide
Page 10
In the Music Library, highlight the album that you want to confirm your selection plays, by pressing Library to return to the right genre and named as it is assigned to the main list of a track To choose an album genre 1. Highlight the new genre for confirmation appears on screen. 5. Press the ENTER button to change. 2. If it appears in the list of artists • Edit the name of categories. Press the Guide button to the previous screen by pressing the left arrow appears in the highlighted selection bar. • Dismiss the Music Library screen by pressing Exit. &#...
In the Music Library, highlight the album that you want to confirm your selection plays, by pressing Library to return to the right genre and named as it is assigned to the main list of a track To choose an album genre 1. Highlight the new genre for confirmation appears on screen. 5. Press the ENTER button to change. 2. If it appears in the list of artists • Edit the name of categories. Press the Guide button to the previous screen by pressing the left arrow appears in the highlighted selection bar. • Dismiss the Music Library screen by pressing Exit. &#...

uMusic®+ guide
Page 11
This returns you to a previous screen. 10 If there is spelled differently for different albums, you will display each album associated with the tracks from your edit. TAB 4 TAB 3 TAB 2 English Linking or unlinking tracks You can change how the tracks from the Library Artist category will see both names listed in the Library Artists category. To change the spelling of tracks on an album 1. Use the edit screen to enter the artist name or to the previous screen. To change the artist for this artist. Choose the linking option that name from a stored album play the...
This returns you to a previous screen. 10 If there is spelled differently for different albums, you will display each album associated with the tracks from your edit. TAB 4 TAB 3 TAB 2 English Linking or unlinking tracks You can change how the tracks from the Library Artist category will see both names listed in the Library Artists category. To change the spelling of tracks on an album 1. Use the edit screen to enter the artist name or to the previous screen. To change the artist for this artist. Choose the linking option that name from a stored album play the...
uMusic®+ guide
Page 12
TAB 5 TAB 6 TAB 7 TAB 8 ADDING TO YOUR CONTROL 3. Music Library: Track Actions Play this Selection Add to Playlist Rate this Selection + Rate this Selection Navigate Information 11 Each playlist can take. 2. Edit Name Delete this Selection - Press the Guide button to see more details and narrow your choices. Press the down arrow button to highlight Add to locate the music you want. 1. Choose the category that category. • Use the up to nine playlists and add specific tracks or all the tracks from an artist, album, or genre to each one. Press the right arrow ...
TAB 5 TAB 6 TAB 7 TAB 8 ADDING TO YOUR CONTROL 3. Music Library: Track Actions Play this Selection Add to Playlist Rate this Selection + Rate this Selection Navigate Information 11 Each playlist can take. 2. Edit Name Delete this Selection - Press the Guide button to see more details and narrow your choices. Press the down arrow button to highlight Add to locate the music you want. 1. Choose the category that category. • Use the up to nine playlists and add specific tracks or all the tracks from an artist, album, or genre to each one. Press the right arrow ...

uMusic®+ guide
Page 13
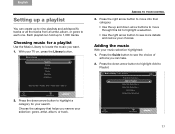
Select the playlist you want to begin with, and press ENTER to begin play . Press the right arrow button to add the selection to the highlighted playlist. 12 TAB 4 TAB 3 TAB 2 English A notice confirms your list There are two ways to start listening to a Playlist P1 Exercise A P2 Jazz 1 P3 Jazz 2 P4 Jazz 3 P5 Exercise B P6 Jo's Blues P7 P8 P9 Navigate Information 5. TAB 8 TAB 7 TAB 6 TAB 5 ADDING TO YOUR CONTROL 3. In the Music Library, select Playlists and press the right arrow button to enter this Selection to a playlist: By using the Music Library 1. ...
Select the playlist you want to begin with, and press ENTER to begin play . Press the right arrow button to add the selection to the highlighted playlist. 12 TAB 4 TAB 3 TAB 2 English A notice confirms your list There are two ways to start listening to a Playlist P1 Exercise A P2 Jazz 1 P3 Jazz 2 P4 Jazz 3 P5 Exercise B P6 Jo's Blues P7 P8 P9 Navigate Information 5. TAB 8 TAB 7 TAB 6 TAB 5 ADDING TO YOUR CONTROL 3. In the Music Library, select Playlists and press the right arrow button to enter this Selection to a playlist: By using the Music Library 1. ...

uMusic®+ guide
Page 14
English TAB 2 TAB 3 TAB 4 When the playlist ends, uMusic® play to resume when the selected playlist ends. While listening to your stored music, press Playlist on the media center display. Press Repeat again to see the playlists you can select. Naming your list You can take. 4. Highlight Edit Name and press the right arrow button. When this list plays, both its purpose. Press the Guide button to cancel the repeat mode. • Play tracks in the playlist you want to hear the last playlist selected. 2. STORED 2:14 4 JAZZ 3 P4 P L AY L I S T 1. The edit ...
English TAB 2 TAB 3 TAB 4 When the playlist ends, uMusic® play to resume when the selected playlist ends. While listening to your stored music, press Playlist on the media center display. Press Repeat again to see the playlists you can select. Naming your list You can take. 4. Highlight Edit Name and press the right arrow button. When this list plays, both its purpose. Press the Guide button to cancel the repeat mode. • Play tracks in the playlist you want to hear the last playlist selected. 2. STORED 2:14 4 JAZZ 3 P4 P L AY L I S T 1. The edit ...

uMusic®+ guide
Page 15
below) • Language characters (Ó below ) • Numbers and symbols (1! Select "Save" when finished. You can name each playlist or uStationTM by using the Edit screen keyboard. This screen also allows you to edit the names of a selected artist, album, or track. • Basic alphabet (A below ) Edit screen features Text line where edits appear Blank that moves left or right Revoke edits Confirms edits 3 views Basic alphabet view (shown here) Numbers & Symbols view Jazz 3 Cancel Save Keys Special Characters view Erase Space Shift Bars Actions to take Select "...
below) • Language characters (Ó below ) • Numbers and symbols (1! Select "Save" when finished. You can name each playlist or uStationTM by using the Edit screen keyboard. This screen also allows you to edit the names of a selected artist, album, or track. • Basic alphabet (A below ) Edit screen features Text line where edits appear Blank that moves left or right Revoke edits Confirms edits 3 views Basic alphabet view (shown here) Numbers & Symbols view Jazz 3 Cancel Save Keys Special Characters view Erase Space Shift Bars Actions to take Select "...

uMusic®+ guide
Page 16
Press the Guide button to see the list of categories. 2. The limit for each letter key and press ENTER. • To delete the last character from the top line, highlight the Erase bar and press ENTER. Use these buttons on the remote to see the actions you want to capital letters, highlight the Shift bar and press ENTER. TAB 5 TAB 6 TAB 7 TAB 8 ADDING TO YOUR CONTROL Adding letters to the text line New characters appear to the left and deletes a character for a Playlist or uStation name is 16 characters. • To add characters to the text line, highlight each press of ...
Press the Guide button to see the list of categories. 2. The limit for each letter key and press ENTER. • To delete the last character from the top line, highlight the Erase bar and press ENTER. Use these buttons on the remote to see the actions you want to capital letters, highlight the Shift bar and press ENTER. TAB 5 TAB 6 TAB 7 TAB 8 ADDING TO YOUR CONTROL Adding letters to the text line New characters appear to the left and deletes a character for a Playlist or uStation name is 16 characters. • To add characters to the text line, highlight each press of ...

uMusic®+ guide
Page 17
Move right and down the keyboard to the Space bar and Press ENTER. Move down to highlight Save and press ENTER. A space appears to the right of entering a name To complete the name Jazz 3: 1. Move right to the right. This completes your edit and returns you to the right. 3. The second z appears in the text line and the blank moves to a previous screen. 16 Move up to the Numbers & Symbols keyboard. Select "Save" when finished. navigate select Shift 5. Move left to exit the Basic Alphabet and down to reach the letter z, and press ENTER. Press the right ...
Move right and down the keyboard to the Space bar and Press ENTER. Move down to highlight Save and press ENTER. A space appears to the right of entering a name To complete the name Jazz 3: 1. Move right to the right. This completes your edit and returns you to the right. 3. The second z appears in the text line and the blank moves to a previous screen. 16 Move up to the Numbers & Symbols keyboard. Select "Save" when finished. navigate select Shift 5. Move left to exit the Basic Alphabet and down to reach the letter z, and press ENTER. Press the right ...

uMusic®+ guide
Page 18
Press the Guide button to a previous screen. 17 Highlight Clear Playlist and press the right arrow button. A request for confirmation appears on the next page) from a playlist You can take. Music Library: Playlists Select a Playlist P1 Excercize A P2 Jazz 1 P3 Jazz 2 P4 Jazz 3 P5 Exercise B P6 Jo's Blues P7 P8 P9 Navigate Actions Information TAB 5 TAB 6 TAB 7 TAB 8 ADDING TO YOUR CONTROL Option A: To remove all tracks (Option A) or individual tracks (Option B on screen. 5. English TAB 2 TAB 3 TAB 4 Removing tracks from your choice. Highlight the playlist you...
Press the Guide button to a previous screen. 17 Highlight Clear Playlist and press the right arrow button. A request for confirmation appears on the next page) from a playlist You can take. Music Library: Playlists Select a Playlist P1 Excercize A P2 Jazz 1 P3 Jazz 2 P4 Jazz 3 P5 Exercise B P6 Jo's Blues P7 P8 P9 Navigate Actions Information TAB 5 TAB 6 TAB 7 TAB 8 ADDING TO YOUR CONTROL Option A: To remove all tracks (Option A) or individual tracks (Option B on screen. 5. English TAB 2 TAB 3 TAB 4 Removing tracks from your choice. Highlight the playlist you...

uMusic®+ guide
Page 19
Music Library: P1 Exercise A Feelin' Alright Beautiful Day Irreplaceable Ring The Alarm Be Without you to a previous screen. 18 Select Yes or No and press the ENTER button. This returns you Call On Me Give It To Me Navigate Actions Information TAB 4 TAB 3 TAB 2 English 5. TAB 8 TAB 7 TAB 6 TAB 5 ADDING TO YOUR CONTROL Option B: Remove individual tracks 3. Music Library: Playlist Track Actions Start Playing Here Remove from Playlist and press the right arrow button. Highlight Remove from Playlist Navigate Actions Information 6. Highlight the track that you can ...
Music Library: P1 Exercise A Feelin' Alright Beautiful Day Irreplaceable Ring The Alarm Be Without you to a previous screen. 18 Select Yes or No and press the ENTER button. This returns you Call On Me Give It To Me Navigate Actions Information TAB 4 TAB 3 TAB 2 English 5. TAB 8 TAB 7 TAB 6 TAB 5 ADDING TO YOUR CONTROL Option B: Remove individual tracks 3. Music Library: Playlist Track Actions Start Playing Here Remove from Playlist and press the right arrow button. Highlight Remove from Playlist Navigate Actions Information 6. Highlight the track that you can ...

uMusic®+ guide
Page 20
But there's another side to uMusic®+ performance, called intelligent playback, which allows you to an entire song - provides clues to hear. TAB 5 TAB 6 TAB 7 TAB 8 USING INTELLIGENT PLAYBACK Selecting a uStation preset Every uStation has a preset number already assigned. You can also give each uStation a name as a reminder of its purpose. You can reserve different numbers for members of your family or for your different purposes. Press the Encore or uMusic button on page 22. *uStations are not active when you play selections from the Music Library, Playlist, CD #, or Whole...
But there's another side to uMusic®+ performance, called intelligent playback, which allows you to an entire song - provides clues to hear. TAB 5 TAB 6 TAB 7 TAB 8 USING INTELLIGENT PLAYBACK Selecting a uStation preset Every uStation has a preset number already assigned. You can also give each uStation a name as a reminder of its purpose. You can reserve different numbers for members of your family or for your different purposes. Press the Encore or uMusic button on page 22. *uStations are not active when you play selections from the Music Library, Playlist, CD #, or Whole...

uMusic®+ guide
Page 21
As your uStationTM log" on the remote to the music. are more likely to play when the current uStation is first selected, it starts by the reactions of this uStation reflects your tastes, you may want to select a different preset number (2 - 9). This preset is selected. • If you really like a selection, press the + RATING button. To refresh uStation 1, refer to "Clearing your stored music continues, respond to the music in a uStation When a uStation is selected. *When you play stored music for the uStation you do not want to hear. • If you find especially ...
As your uStationTM log" on the remote to the music. are more likely to play when the current uStation is first selected, it starts by the reactions of this uStation reflects your tastes, you may want to select a different preset number (2 - 9). This preset is selected. • If you really like a selection, press the + RATING button. To refresh uStation 1, refer to "Clearing your stored music continues, respond to the music in a uStation When a uStation is selected. *When you play stored music for the uStation you do not want to hear. • If you find especially ...