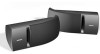
Owners Guide
Page 3
... located on the label on a wall 6 Reference 7 Cleaning your speakers 7 Troubleshooting 7 Technical information 7 Before you begin Thank you begin 3 For your records 3 Setup 4 Unpacking 4 Placing your Bose 161™ speakers 4 Choosing speaker cord 4 Preparing speaker cord 5 Connecting speaker cord to the speakers 5 Connecting speaker cord to provide quality Bose speaker performance from a simple, elegant design. Where to provide long-term...
... located on the label on a wall 6 Reference 7 Cleaning your speakers 7 Troubleshooting 7 Technical information 7 Before you begin Thank you begin 3 For your records 3 Setup 4 Unpacking 4 Placing your Bose 161™ speakers 4 Choosing speaker cord 4 Preparing speaker cord 5 Connecting speaker cord to the speakers 5 Connecting speaker cord to provide quality Bose speaker performance from a simple, elegant design. Where to provide long-term...
Owners Guide
Page 4
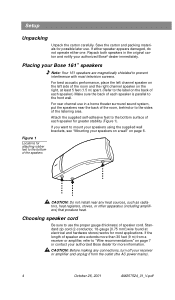
... your receiver or amplifier and unplug it from a receiver or amplifier, refer to mount your speakers using the supplied wall brackets, see "Mounting your authorized Bose dealer for more than 30 feet (9 m) from the outlet (the AC power mains). 4 October 26, 2001 ... carton and packing materials for most television screens. Placing your authorized Bose® dealer immediately. For best acoustic performance, place the left channel speaker on the left side of the room and the right channel speaker on the right, at electrical and hardware stores) works for possible...
... your receiver or amplifier and unplug it from a receiver or amplifier, refer to mount your speakers using the supplied wall brackets, see "Mounting your authorized Bose dealer for more than 30 feet (9 m) from the outlet (the AC power mains). 4 October 26, 2001 ... carton and packing materials for most television screens. Placing your authorized Bose® dealer immediately. For best acoustic performance, place the left channel speaker on the left side of the room and the right channel speaker on the right, at electrical and hardware stores) works for possible...
Owners Guide
Page 5
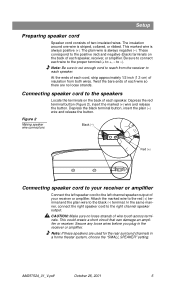
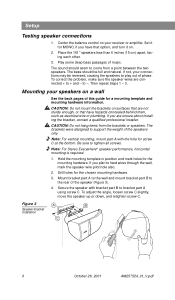
...: Be sure to cut enough cord to reach from both wires. In the same manner, connect the right speaker cord to each speaker. Setup Preparing speaker cord Speaker cord consists of each speaker, receiver, or amplifier. This marked wire is striped, collared, or ribbed. to +, - Twist the bare ends ...of each wire so there are used for the rear surround channels in the receiver or amplifier. These correspond to the speakers Locate the terminals on the back of two insulated wires. Depress the red terminal button (Figure 2), insert the marked (+) wire and release...
...: Be sure to cut enough cord to reach from both wires. In the same manner, connect the right speaker cord to each speaker. Setup Preparing speaker cord Speaker cord consists of each speaker, receiver, or amplifier. This marked wire is striped, collared, or ribbed. to +, - Twist the bare ends ...of each wire so there are used for the rear surround channels in the receiver or amplifier. These correspond to the speakers Locate the terminals on the back of two insulated wires. Depress the red terminal button (Figure 2), insert the marked (+) wire and release...
Owners Guide
Page 6
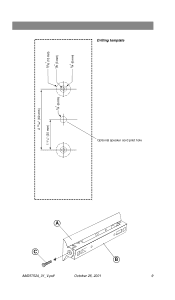
...mounting template in position and mark holes for the chosen mounting hardware. 3. Secure the speaker with the hole for screw C at the bottom. The sound should be reversed, causing the speakers to play out of the speaker (Figure 3). 4. The bass should seem to support the weight of music. Mounting ...your receiver or amplifier. CAUTION: Do not hang items from a point between the two speakers. Be sure to -. Drill holes for the mounting hardware. Center the balance control on your speakers on . 2. Set it on a wall See the back pages of this guide for MONO, if...
...mounting template in position and mark holes for the chosen mounting hardware. 3. Secure the speaker with the hole for screw C at the bottom. The sound should be reversed, causing the speakers to play out of the speaker (Figure 3). 4. The bass should seem to support the weight of music. Mounting ...your receiver or amplifier. CAUTION: Do not hang items from a point between the two speakers. Be sure to -. Drill holes for the mounting hardware. Center the balance control on your speakers on . 2. Set it on a wall See the back pages of this guide for MONO, if...
Owners Guide
Page 7
... or amplifier. Problem What to do so carefully. Make sure the wires are in the speaker. Troubleshooting If you need additional help . Disconnect the other outputs on your authorized Bose® dealer, or contact Bose directly. Technical information Quality standard: Syncom® computer quality control Driver complement: Two (2) 2.5" (6.3 cm) wide-range...
... or amplifier. Problem What to do so carefully. Make sure the wires are in the speaker. Troubleshooting If you need additional help . Disconnect the other outputs on your authorized Bose® dealer, or contact Bose directly. Technical information Quality standard: Syncom® computer quality control Driver complement: Two (2) 2.5" (6.3 cm) wide-range...
Owners Guide
Page 9
Drilling template 9/16" (13 mm) 1/8" (3 mm) 1/4" (6 mm) 2 23/64" (60 mm) 1 3/16" (30 mm) 1/4" (6 mm) Optional speaker cord pilot hole A C B AM257524_01_V.pdf October 26, 2001 9
Drilling template 9/16" (13 mm) 1/8" (3 mm) 1/4" (6 mm) 2 23/64" (60 mm) 1 3/16" (30 mm) 1/4" (6 mm) Optional speaker cord pilot hole A C B AM257524_01_V.pdf October 26, 2001 9


