
Owners Guide
Page 4
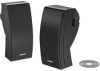
...speakers. Figure 1 Packaging contents: • Two 251 speakers • Two mounting brackets • Mounting hardware (8 screws and 8 plastic anchors) • Six rubber feet • Four knobs • One owner's guide Tools required You need the following bits: - so you for purchasing Bose® 251TM environmental speakers. Instead, notify Bose Corporation or your speakers... nature's elements - The 251 environmental speakers are unsure of your speakers if any part of them appears damaged. Unpacking the carton Carefully unpack your authorized Bose dealer immediately. For concrete...
...speakers. Figure 1 Packaging contents: • Two 251 speakers • Two mounting brackets • Mounting hardware (8 screws and 8 plastic anchors) • Six rubber feet • Four knobs • One owner's guide Tools required You need the following bits: - so you for purchasing Bose® 251TM environmental speakers. Instead, notify Bose Corporation or your speakers... nature's elements - The 251 environmental speakers are unsure of your speakers if any part of them appears damaged. Unpacking the carton Carefully unpack your authorized Bose dealer immediately. For concrete...
Owners Guide
Page 5
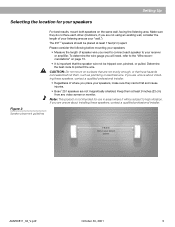
Make sure they cannot fall and cause injuries. • Bose® 251 speakers are not magnetically shielded. CAUTION: Do not mount on surfaces that are not sturdy enough, or that the speaker wire not be tripped over, pinched, or pulled. To determine the wire gauge you are not using an existing ... area. Keep them , such as your receiver or amplifier. Note: This product is not intended for your speakers, make sure they do not face each speaker to your "wall.") The 251TM speakers should be placed at least 9 inches (23 cm) from any video screen or monitor. Please consider the...
Make sure they cannot fall and cause injuries. • Bose® 251 speakers are not magnetically shielded. CAUTION: Do not mount on surfaces that are not sturdy enough, or that the speaker wire not be tripped over, pinched, or pulled. To determine the wire gauge you are not using an existing ... area. Keep them , such as your receiver or amplifier. Note: This product is not intended for your speakers, make sure they do not face each speaker to your "wall.") The 251TM speakers should be placed at least 9 inches (23 cm) from any video screen or monitor. Please consider the...

Owners Guide
Page 6
.... CAUTION: If you decide to run the speaker wire through a wall or underground, check your authorized Bose® dealer. Installing the brackets onto the exterior of a house or onto a deck railing or table. Figure 3 251 environmental speaker mounted onto the exterior of a house Figure ... the supplied brackets. Installing the mounting brackets The 251TM speakers should be mounted using the speakers on page 13. Figure 3 illustrates how the mounted speaker will be mounted onto the exterior of a house The 251 speakers should be mounted in a vertical position to achieve the...
.... CAUTION: If you decide to run the speaker wire through a wall or underground, check your authorized Bose® dealer. Installing the brackets onto the exterior of a house or onto a deck railing or table. Figure 3 251 environmental speaker mounted onto the exterior of a house Figure ... the supplied brackets. Installing the mounting brackets The 251TM speakers should be mounted using the speakers on page 13. Figure 3 illustrates how the mounted speaker will be mounted onto the exterior of a house The 251 speakers should be mounted in a vertical position to achieve the...

Owners Guide
Page 7
...on a deck railing or table Figure 9 Drilling four holes on a deck railing or table AM250811_04_V.pdf October 30, 2001 7 Wood B. Installing Your 251TM Speakers Installing the mounting brackets (cont.) Installing the brackets onto the exterior of a house (cont.) For mounting onto wood, install the supplied screws using a ...) 1 1⁄2 inch (2.25 mm) 3⁄32 inch (2.25 mm) 1 1⁄2 inch (2.25 mm) 1⁄4 inch (6.35 mm) 1 1⁄2 inch (2.25 mm) Figure 7 251 environmental speaker mounted onto a deck railing or t Installing the brackets onto a deck railing or table The 251TM...
...on a deck railing or table Figure 9 Drilling four holes on a deck railing or table AM250811_04_V.pdf October 30, 2001 7 Wood B. Installing Your 251TM Speakers Installing the mounting brackets (cont.) Installing the brackets onto the exterior of a house (cont.) For mounting onto wood, install the supplied screws using a ...) 1 1⁄2 inch (2.25 mm) 3⁄32 inch (2.25 mm) 1 1⁄2 inch (2.25 mm) 1⁄4 inch (6.35 mm) 1 1⁄2 inch (2.25 mm) Figure 7 251 environmental speaker mounted onto a deck railing or t Installing the brackets onto a deck railing or table The 251TM...
Owners Guide
Page 8
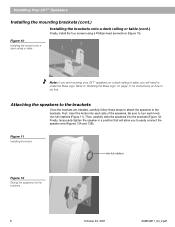
... 251™ Speakers Figure 11 Installing the knobs two full rotations Figure 12 Sliding the speakers into the brackets (Figure 12). Attaching the speakers to the brackets Once the brackets are mounting your 251TM speakers on how to turn each side of the speakers. Finally, temporarily tighten the speaker...Be sure to do this. Figure 10 Installing the bracket onto a deck railing or table Note: If you to rotate the Bose logo. Installing Your 251TM Speakers Installing the mounting brackets (cont.) Installing the brackets onto a deck railing or table (cont.) Finally, install the four screws...
... 251™ Speakers Figure 11 Installing the knobs two full rotations Figure 12 Sliding the speakers into the brackets (Figure 12). Attaching the speakers to the brackets Once the brackets are mounting your 251TM speakers on how to turn each side of the speakers. Finally, temporarily tighten the speaker...Be sure to do this. Figure 10 Installing the bracket onto a deck railing or table Note: If you to rotate the Bose logo. Installing Your 251TM Speakers Installing the mounting brackets (cont.) Installing the brackets onto a deck railing or table (cont.) Finally, install the four screws...
Owners Guide
Page 11
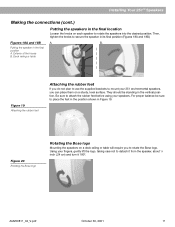
... 180º. Be sure to attach the rubber feet before using your fingers, gently lift the logo, taking care not to secure the speaker in the final location Loosen the knobs on a sturdy, level surface. For proper balance be standing in the final position A. Using your... the rubber feet If you do not plan to use the supplied brackets to mount your 251 environmental speakers, you to rotate the speakers into the desired position. Figure 20 Rotating the Bose logo Rotating the Bose logo Mounting the speakers on a deck railing or table will require you can place them on each...
... 180º. Be sure to attach the rubber feet before using your fingers, gently lift the logo, taking care not to secure the speaker in the final location Loosen the knobs on a sturdy, level surface. For proper balance be standing in the final position A. Using your... the rubber feet If you do not plan to use the supplied brackets to mount your 251 environmental speakers, you to rotate the speakers into the desired position. Figure 20 Rotating the Bose logo Rotating the Bose logo Mounting the speakers on a deck railing or table will require you can place them on each...
Owners Guide
Page 12
Or, contact Bose customer service. Or use caulking, apply it only after the wires are firmly connected. If you do • Check the settings on your 251 speakers. Make sure the wires are in the original speaker cord. - If there is commonly available at hardware stores. See ... or amplifier. • Check the balance control on your authorized Bose® dealer, who will arrange for offices and phone numbers. Warranty period Bose 251 environmental speakers are on the warranty card that the "B" speakers are selected to force water behind the grille and into the drivers...
Or, contact Bose customer service. Or use caulking, apply it only after the wires are firmly connected. If you do • Check the settings on your 251 speakers. Make sure the wires are in the original speaker cord. - If there is commonly available at hardware stores. See ... or amplifier. • Check the balance control on your authorized Bose® dealer, who will arrange for offices and phone numbers. Warranty period Bose 251 environmental speakers are on the warranty card that the "B" speakers are selected to force water behind the grille and into the drivers...


