Owner's guide
Page 3
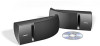
... cord 4 Preparing speaker cord 5 Connecting speaker cord to the speakers 5 Connecting speaker cord to provide quality Bose speaker performance from a simple, elegant design. Your 161 speakers are located on the label on a wall 6 Reference 7 Cleaning your speakers 7 Troubleshooting 7 Technical ...speaker connections 6 Mounting your speakers on the back of this owner's guide. ©2001 Bose Corporation. Serial numbers and Dealer name Dealer phone Purchase date We suggest you for purchasing Bose 161 speakers. No part of each 161 speaker. Unique Bose technologies, including ...
... cord 4 Preparing speaker cord 5 Connecting speaker cord to the speakers 5 Connecting speaker cord to provide quality Bose speaker performance from a simple, elegant design. Your 161 speakers are located on the label on a wall 6 Reference 7 Cleaning your speakers 7 Troubleshooting 7 Technical ...speaker connections 6 Mounting your speakers on the back of this owner's guide. ©2001 Bose Corporation. Serial numbers and Dealer name Dealer phone Purchase date We suggest you for purchasing Bose 161 speakers. No part of each 161 speaker. Unique Bose technologies, including ...
Owner's guide
Page 4
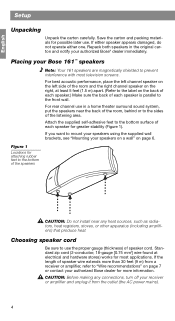
For rear channel use in the original carton and notify your Bose 161™ speakers Note: Your 161 speakers are magnetically shielded to use . Choosing speaker cord Be sure to prevent interference with most applications. Figure 1 Locations for possible later use the ... to the bottom of each speaker for greater stability (Figure 1). Save the carton and packing materials for attaching rubber feet to mount your speakers using the supplied wall brackets, see "Mounting your speakers on a wall" on page 7 or contact your receiver or amplifier and unplug it from a receiver ...
For rear channel use in the original carton and notify your Bose 161™ speakers Note: Your 161 speakers are magnetically shielded to use . Choosing speaker cord Be sure to prevent interference with most applications. Figure 1 Locations for possible later use the ... to the bottom of each speaker for greater stability (Figure 1). Save the carton and packing materials for attaching rubber feet to mount your speakers using the supplied wall brackets, see "Mounting your speakers on a wall" on page 7 or contact your receiver or amplifier and unplug it from a receiver ...
Owner's guide
Page 6
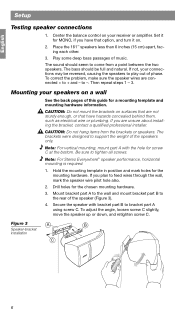
... contact a qualified professional installer. Be sure to come from the brackets or speakers. English Setup Testing speaker connections 1. Place the 161™ speakers less than 6 inches (15 cm) apart, facing each other. 3. The bass should seem to tighten all screws. CAUTION:... Do not hang items from a point between the two speakers. Play some deep bass passages of this guide for a mounting template and mounting hardware information. Mounting your receiver or amplifier. To adjust the angle, loosen screw C slightly, move the speaker up or down, and...
... contact a qualified professional installer. Be sure to come from the brackets or speakers. English Setup Testing speaker connections 1. Place the 161™ speakers less than 6 inches (15 cm) apart, facing each other. 3. The bass should seem to tighten all screws. CAUTION:... Do not hang items from a point between the two speakers. Play some deep bass passages of this guide for a mounting template and mounting hardware information. Mounting your receiver or amplifier. To adjust the angle, loosen screw C slightly, move the speaker up or down, and...


