User Guide
Page 2
... to reduce energy usage by a qualified installer, service agency or the gas supplier. 2 EcoActiont This option gives you cannot reach your gas supplier, call your damp laundry to ensure proper drying. Only Bosch Vision can be followed to minimize the risk of fabrics. you the most efficient dryers in the Bosch Vision dryer for the gentlest of the most...
... to reduce energy usage by a qualified installer, service agency or the gas supplier. 2 EcoActiont This option gives you cannot reach your gas supplier, call your damp laundry to ensure proper drying. Only Bosch Vision can be followed to minimize the risk of fabrics. you the most efficient dryers in the Bosch Vision dryer for the gentlest of the most...
User Guide
Page 3
... 6 INSTALLATION INSTRUCTIONS 7 Introduction 7 Information concerning waste disposal 7 Before installing the dryer 7 Checklist for Installation 8 Installation Location 8 Dryer Dimensions 8 Door Hinge Reversal 9 Installation Types 11 Electrical connection 14 Gas connection 15 Exhaust air connection 16 Accessories 18 Preparing to transport the dryer ć...LCD Menu 24 Operation 26 Using the dryer 26 Cleaning the lint filter 27 Using the dryer rack (Option 28 Cleaning and care 29 Cleaning the dryer 29 Cleaning the exhaust duct 29 Cleaning...
... 6 INSTALLATION INSTRUCTIONS 7 Introduction 7 Information concerning waste disposal 7 Before installing the dryer 7 Checklist for Installation 8 Installation Location 8 Dryer Dimensions 8 Door Hinge Reversal 9 Installation Types 11 Electrical connection 14 Gas connection 15 Exhaust air connection 16 Accessories 18 Preparing to transport the dryer ć...LCD Menu 24 Operation 26 Using the dryer 26 Cleaning the lint filter 27 Using the dryer rack (Option 28 Cleaning and care 29 Cleaning the dryer 29 Cleaning the exhaust duct 29 Cleaning...
User Guide
Page 4
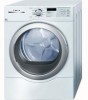
... consumption. I. Sensor-controlled auto cycles - Large stainless steel drum with the dryer. Timed cycles 300 and 500 Series Dryer: 20, 40 and 60 minute cycles 800 Series Dryer: 10 to 150 minutes (in your dryer is used to draw the user's attention to the appliance or property may occur... userĆfriendly assistant in increments of up to one hour following standard features: - Bosch dryers offer the following drying to assist you have any questions, especially concerning installation of our products can be found on our web site: www.boschappliances.com Information Please...
... consumption. I. Sensor-controlled auto cycles - Large stainless steel drum with the dryer. Timed cycles 300 and 500 Series Dryer: 20, 40 and 60 minute cycles 800 Series Dryer: 10 to 150 minutes (in your dryer is used to draw the user's attention to the appliance or property may occur... userĆfriendly assistant in increments of up to one hour following standard features: - Bosch dryers offer the following drying to assist you have any questions, especially concerning installation of our products can be found on our web site: www.boschappliances.com Information Please...
User Guide
Page 5
... contaminated with the controls. 16. Do not allow children to catch fire. 3. Store all cleaning products out of the reach of the dryer. 8. Do not install or store this or any part of lint, dust and dirt. Do not use fabric softeners or products to ensure that might reduce the... supply. 25. Keep area around the exhaust opening and adjacent surrounding areas free from the dryer. 12. Bosch dryers are instructed in cabinets or other non-manufacturer supplied electrical connector or cord, to connect the dryer to carry out. 17. Do not sit or stand on any part of any protruding...
... contaminated with the controls. 16. Do not allow children to catch fire. 3. Store all cleaning products out of the reach of the dryer. 8. Do not install or store this or any part of lint, dust and dirt. Do not use fabric softeners or products to ensure that might reduce the... supply. 25. Keep area around the exhaust opening and adjacent surrounding areas free from the dryer. 12. Bosch dryers are instructed in cabinets or other non-manufacturer supplied electrical connector or cord, to connect the dryer to carry out. 17. Do not sit or stand on any part of any protruding...
User Guide
Page 6
... the state, province or region where this dryer until you are tight and not leaking. Installation must not be a T" handle gas cock. 3. Do not bypass any problems or conditions that may result in compliance with all water connections to whether the dryer is loose. 27. Close the appliance water shut-off valve that all local...
... the state, province or region where this dryer until you are tight and not leaking. Installation must not be a T" handle gas cock. 3. Do not bypass any problems or conditions that may result in compliance with all water connections to whether the dryer is loose. 27. Close the appliance water shut-off valve that all local...

User Guide
Page 7
... these instructions the dryer must be installed in accordance with the National Fuel Gas Code, ANSI Z223.1/NFPA 54 or the Canadian Natural Gas and Propane Installation Code CAN/CSAĆB149.1 Note: This gas dryer has been UL and C-UL listed for natural gas. Clothes dryer installation must be performed by projecting components (e.g. Do not install a clothes dryer with the National...
... these instructions the dryer must be installed in accordance with the National Fuel Gas Code, ANSI Z223.1/NFPA 54 or the Canadian Natural Gas and Propane Installation Code CAN/CSAĆB149.1 Note: This gas dryer has been UL and C-UL listed for natural gas. Clothes dryer installation must be performed by projecting components (e.g. Do not install a clothes dryer with the National...
User Guide
Page 8
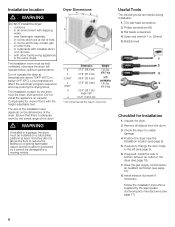
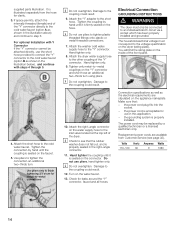
in an environment with dripping water, - The installation room must be damaged by a moving vehicle Dryer Dimensions a b c (min)* c (max)* d e Dimension 27.0" (68.6 cm) 31.8" (81.0 cm) 36.9" (93.6 cm) 37.8" (95.9 cm) 22.0" (59.7 cm) angle ...dryer. 2. Have the gas supply connected by the appropriate ductwork parts manufacturers (see page 17) 8 Do not operate the dryer at least 18 inches (46 cm) above 104°F (40°C) or below optimum performance. Do not install the appliance on the dimensions of the dryer. Check the dryer for Installation 1. If required, install...
in an environment with dripping water, - The installation room must be damaged by a moving vehicle Dryer Dimensions a b c (min)* c (max)* d e Dimension 27.0" (68.6 cm) 31.8" (81.0 cm) 36.9" (93.6 cm) 37.8" (95.9 cm) 22.0" (59.7 cm) angle ...dryer. 2. Have the gas supply connected by the appropriate ductwork parts manufacturers (see page 17) 8 Do not operate the dryer at least 18 inches (46 cm) above 104°F (40°C) or below optimum performance. Do not install the appliance on the dimensions of the dryer. Check the dryer for Installation 1. If required, install...
User Guide
Page 9
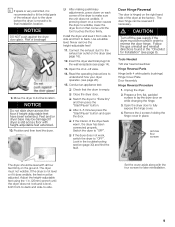
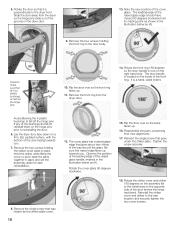
...;adjustable feet! 11. Open the shut-off the gas supply if the dryer must be adjusted. q Close the dryer door. Look in place. Feet and/or dryer base may be reversed if necessary. Position and then level the dryer. If the dryer is slid across the floor if heightĆadjustable... cover aside along with 4 white plastic bushings) Hinge Cover Plate Door Assembly Hinge Reversal Procedure 1. NOTICE DO NOT push against the dryer door glass. Install the dryer and level it does wobble, the feet must not wobble. Conduct an appliance test: q Check that the drum is hinged on ...
...;adjustable feet! 11. Open the shut-off the gas supply if the dryer must be adjusted. q Close the dryer door. Look in place. Feet and/or dryer base may be reversed if necessary. Position and then level the dryer. If the dryer is slid across the floor if heightĆadjustable... cover aside along with 4 white plastic bushings) Hinge Cover Plate Door Assembly Hinge Reversal Procedure 1. NOTICE DO NOT push against the dryer door glass. Install the dryer and level it does wobble, the feet must not wobble. Conduct an appliance test: q Check that the drum is hinged on ...
User Guide
Page 10
... of the bushings do fall off , reinstall them on the inside of the front ring. Remove the two screws holding the front ring to the dryer front. Be sure this raised edge faces up towards you . Reassemble the parts, preserving their new alignments. 17. The door handle is a hand-sized ... plate. Rotate the front ring 180 degrees so the door handle is perpendicular to the door body. Reinstall the striker cover and striker to the install area on a firm, flat, padded surface, with the bottom of the raised glass edge should have moved 90 degrees clockwise from its starting point ...
... of the bushings do fall off , reinstall them on the inside of the front ring. Remove the two screws holding the front ring to the dryer front. Be sure this raised edge faces up towards you . Reassemble the parts, preserving their new alignments. 17. The door handle is a hand-sized ... plate. Rotate the front ring 180 degrees so the door handle is perpendicular to the door body. Reinstall the striker cover and striker to the install area on a firm, flat, padded surface, with the bottom of the raised glass edge should have moved 90 degrees clockwise from its starting point ...
User Guide
Page 11
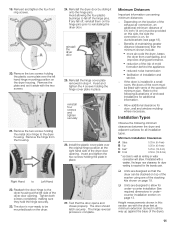
...brackets (see page 18). - Minimum Installation Clearances A Sides B Top C Rear* D Front 0.25 in. (6.4 mm) 0.25 in. (6.4 mm) 5.25 in. (13.4 cm) 0.50 in place. 27. Right Hand to the dryer housing. The door is installed in step 4. Reinstall the dryer door by sliding it aside with vents ...of the specified minimum size. Install the plastic cover plate over the left side of the dryer). 11 The door should latch securely. ...
...brackets (see page 18). - Minimum Installation Clearances A Sides B Top C Rear* D Front 0.25 in. (6.4 mm) 0.25 in. (6.4 mm) 5.25 in. (13.4 cm) 0.50 in place. 27. Right Hand to the dryer housing. The door is installed in step 4. Reinstall the dryer door by sliding it aside with vents ...of the specified minimum size. Install the plastic cover plate over the left side of the dryer). 11 The door should latch securely. ...
User Guide
Page 12
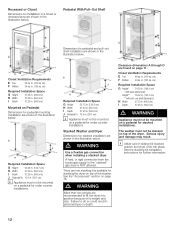
... . (155 sq. A hard, or rigid connection from the house gas supply to lift the dryer into place. Closet Ventilation Requirements E Top 48 sq. See the stacking kit installation instructions for stacking the dryer on page 18. J Required Installation Space G Height 52.25 in. (132.7 cm) H Width 27.50 in. (69.9 cm) I Depth 37.25 in . (310...
... . (155 sq. A hard, or rigid connection from the house gas supply to lift the dryer into place. Closet Ventilation Requirements E Top 48 sq. See the stacking kit installation instructions for stacking the dryer on page 18. J Required Installation Space G Height 52.25 in. (132.7 cm) H Width 27.50 in. (69.9 cm) I Depth 37.25 in . (310...
User Guide
Page 13
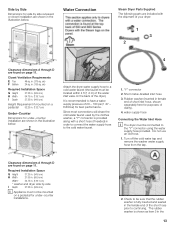
... side recessed or closet installation are found on a pedestal for under -counter installations. 2. water supply hose Connecting the Water Inlet Hose i The dryer must be connected to the cold water faucet. 1. Y" connector 2. Required Installation Space G Height 37.25 in. (94.6 cm) H Width 27.50 in. (69....9 cm) Width* 54.75 in. (139.1 cm) * washer and dryer side by side I Depth 37....
... side recessed or closet installation are found on a pedestal for under -counter installations. 2. water supply hose Connecting the Water Inlet Hose i The dryer must be connected to the cold water faucet. 1. Y" connector 2. Required Installation Space G Height 37.25 in. (94.6 cm) H Width 27.50 in. (69....9 cm) Width* 54.75 in. (139.1 cm) * washer and dryer side by side I Depth 37....
User Guide
Page 14
...provided to connect the Y" connector to -metal connections i Do not overtighten. Replacement power cords are stipulated on the inside of the dryer. Use pliers to tighten the connection an additional two-thirds turn for leaks around the Y" connector, faucet and all hoses. Hand ...B as shown in this application. - supplied parts illustration. Tighten only metal-to the cold water faucet. Damage to step 6 For optional Installation with Y Connector If the Y" connector cannot be replaced by hand until it is illustrated separately from Customer Service (see that : - It...
...provided to connect the Y" connector to -metal connections i Do not overtighten. Replacement power cords are stipulated on the inside of the dryer. Use pliers to tighten the connection an additional two-thirds turn for leaks around the Y" connector, faucet and all hoses. Hand ...B as shown in this application. - supplied parts illustration. Tighten only metal-to the cold water faucet. Damage to step 6 For optional Installation with Y Connector If the Y" connector cannot be replaced by hand until it is illustrated separately from Customer Service (see that : - It...
User Guide
Page 15
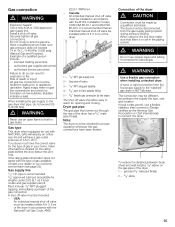
... valve for use copper pipes and tubing if connected to the stacked" gas dryer is no air in accordance with the National Fuel Gas Code, ANSI Z223.1/NFPA 54. - d WARNING Use a flexible gas connection when installing a stacked dryer. A hard, or rigid connection from the gas supply piping system during pressure testing. The connection may be made by...
... valve for use copper pipes and tubing if connected to the stacked" gas dryer is no air in accordance with the National Fuel Gas Code, ANSI Z223.1/NFPA 54. - d WARNING Use a flexible gas connection when installing a stacked dryer. A hard, or rigid connection from the gas supply piping system during pressure testing. The connection may be made by...
User Guide
Page 16
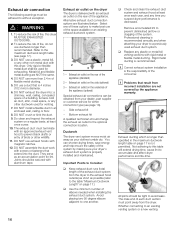
...hood at least once a year. 10. Rigid metal ducting is the responsibility of these options to make best use exhaust hoods with this dryer. DO NOT install a flexible duct in diameter. 6. DO NOT crush or kink the duct. 9. Do clean and inspect the exhaust system on the rear... of the system. Alternative exhaust duct connection options are NOT the same. 4. i Correct exhaust system installation is recommended. Not adhering to this dryer MUST BE EXHAUSTED OUTDOORS. 2. Refer to one of the consumer. DO NOT use a plastic, metal foil, or any plastic ...
...hood at least once a year. 10. Rigid metal ducting is the responsibility of these options to make best use exhaust hoods with this dryer. DO NOT install a flexible duct in diameter. 6. DO NOT crush or kink the duct. 9. Do clean and inspect the exhaust system on the rear... of the system. Alternative exhaust duct connection options are NOT the same. 4. i Correct exhaust system installation is recommended. Not adhering to this dryer MUST BE EXHAUSTED OUTDOORS. 2. Refer to one of the consumer. DO NOT use a plastic, metal foil, or any plastic ...
User Guide
Page 17
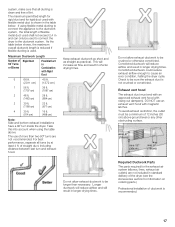
... flexible ducting is not crushed or constricted. The maximum permitted length for rigid duct and for information on ordering parts.) Professional installation of lint. Do not allow exhaust ductwork to the ductwork system. of flexible metal duct used with swing out damper(s). Constricted... reduce exhaust airflow enough to the ductwork system, the total length of straight duct, including distance between last turn inside the dryer. Longer ductwork will reduce airflow and will result in Combination with magnetic latches. To avoid exhaust restriction, the outlet must end...
... flexible ducting is not crushed or constricted. The maximum permitted length for rigid duct and for information on ordering parts.) Professional installation of lint. Do not allow exhaust ductwork to the ductwork system. of flexible metal duct used with swing out damper(s). Constricted... reduce exhaust airflow enough to the ductwork system, the total length of straight duct, including distance between last turn inside the dryer. Longer ductwork will reduce airflow and will result in Combination with magnetic latches. To avoid exhaust restriction, the outlet must end...
User Guide
Page 18
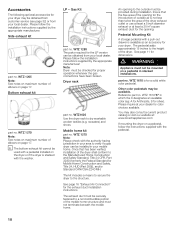
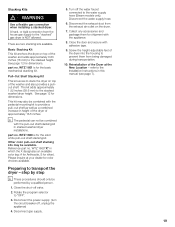
.... sweaters) and shoes. Once that the free area of the opening for the introduction of the dryer shall conform to verify if a gas dryer can be obtained from your local dealer. See page 11 for the exhaust duct installation instructions. Other color pedestals may be available. WTZ 1265 Note: See notes on page 17...
.... sweaters) and shoes. Once that the free area of the opening for the introduction of the dryer shall conform to verify if a gas dryer can be obtained from your local dealer. See page 11 for the exhaust duct installation instructions. Other color pedestals may be available. WTZ 1265 Note: See notes on page 17...
User Guide
Page 19
...kit in height of the dryer of the washer and also provides a pullout shelf. Stacking Kits d WARNING Use a flexible gas connection when installing a stacked dryer. A hard, or rigid connection from the house gas supply to prevent them for... color choices available. See page 12 for dimensions. WTZ 1600"X" in this manual (see page 7). 19 Close the shut-off , unplug the appliance) 4. Reinstallation of the dryer into the housing to the stacked" gas dryer...
...kit in height of the dryer of the washer and also provides a pullout shelf. Stacking Kits d WARNING Use a flexible gas connection when installing a stacked dryer. A hard, or rigid connection from the house gas supply to prevent them for... color choices available. See page 12 for dimensions. WTZ 1600"X" in this manual (see page 7). 19 Close the shut-off , unplug the appliance) 4. Reinstallation of the dryer into the housing to the stacked" gas dryer...
User Guide
Page 20
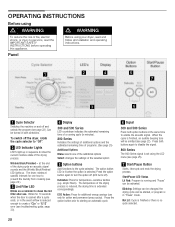
...drying process. A B D E G C F A Cycle Selector Switches the machine on and off and selects the program (see page 22). D Display 300 and 500 Series LED countdown indicates the estimated remaining time of the drying process is reduced, the drying time is no cycle selected. 20 acrylic fibers). F Signal...to turn the option off (LED turns off the dryer, rotate the cycle selector to prevent the laundry from creasing (see page 23 ). Press both directions. at the same time to persons, read and follow all installation and operating instructions. Blinks for one of the ...
...drying process. A B D E G C F A Cycle Selector Switches the machine on and off and selects the program (see page 22). D Display 300 and 500 Series LED countdown indicates the estimated remaining time of the drying process is reduced, the drying time is no cycle selected. 20 acrylic fibers). F Signal...to turn the option off (LED turns off the dryer, rotate the cycle selector to prevent the laundry from creasing (see page 23 ). Press both directions. at the same time to persons, read and follow all installation and operating instructions. Blinks for one of the ...
User Guide
Page 31
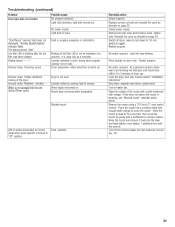
... nozzle tip gently with the wrench. Light bulb defective, light bulb burned out. Unusual noise: Steady vibrationd, rocking of the dryer Unusual noise: Rhythmic vibration Water is not level. Laundry balled up causing load to 3 minutes of a problem. Reinstall the... nozzle" remedial action below. Restart program. No power supply. Restart program. Turn off dryer, leave to spraying, see user manual section Installation Instructons" Stop dryer, separate load items, restart dryer. Troubleshooting (continued) Problem Drum light does not function. Check power supply. No action ...
... nozzle tip gently with the wrench. Light bulb defective, light bulb burned out. Unusual noise: Steady vibrationd, rocking of the dryer Unusual noise: Rhythmic vibration Water is not level. Laundry balled up causing load to 3 minutes of a problem. Reinstall the... nozzle" remedial action below. Restart program. No power supply. Restart program. Turn off dryer, leave to spraying, see user manual section Installation Instructons" Stop dryer, separate load items, restart dryer. Troubleshooting (continued) Problem Drum light does not function. Check power supply. No action ...
