
Pedestal Installation Instructions
Page 2
... Spacers 6. d CAUTION CAUTION- This indicates that minor or moderate injury may occur as a result of nonĆobservance of the following parts and tools in injury. If you need to uninstall your appliance, refer to the Operating, Care and Installation Instructions" provided with your ...the pedestal drawer: Definitions d WARNING WARNING - Keep the door closed at all other information enclosed with the pedestal. Tools and Parts Confirm receipt of this warning. NOTICE NOTICE - Failure to move and uninstall the appliance. d CAUTION Do not lift the appliance...
... Spacers 6. d CAUTION CAUTION- This indicates that minor or moderate injury may occur as a result of nonĆobservance of the following parts and tools in injury. If you need to uninstall your appliance, refer to the Operating, Care and Installation Instructions" provided with your ...the pedestal drawer: Definitions d WARNING WARNING - Keep the door closed at all other information enclosed with the pedestal. Tools and Parts Confirm receipt of this warning. NOTICE NOTICE - Failure to move and uninstall the appliance. d CAUTION Do not lift the appliance...

Pedestal Installation Instructions
Page 8
... is not available, please refer to the Operating, Care and Installation Instructions" that came with the washer or dryer that is installed with any of its mechanical parts if defective in material or workmanship. Save these instructions and your pedestal and model and serial number of the appliance... on Mechanical Parts For one year from state to state or province to province. *Warranty terms may also have other product than private family use in the washer or dryer Operating, Care and Installation Instructions", supplier will repair or...
... is not available, please refer to the Operating, Care and Installation Instructions" that came with the washer or dryer that is installed with any of its mechanical parts if defective in material or workmanship. Save these instructions and your pedestal and model and serial number of the appliance... on Mechanical Parts For one year from state to state or province to province. *Warranty terms may also have other product than private family use in the washer or dryer Operating, Care and Installation Instructions", supplier will repair or...
Installation and Use & Care (all languages)
Page 3
... substances as they are provided with a capacity up to the weather. 8. ATTENTION ATTENTION - Do not repair or replace any part of the appliance or attempt any service unless specifically recommended in the userĆmaintenance instructions or in full working condition. Do ...eliminate static unless recommended by qualified service personnel. 15. Congratulations on having selected a Bosch clothes dryer, the choice of those that demand exceptional drying performance and care from the electrical supply before attempting any service. our customer service team will be placed in safe ...
... substances as they are provided with a capacity up to the weather. 8. ATTENTION ATTENTION - Do not repair or replace any part of the appliance or attempt any service unless specifically recommended in the userĆmaintenance instructions or in full working condition. Do ...eliminate static unless recommended by qualified service personnel. 15. Congratulations on having selected a Bosch clothes dryer, the choice of those that demand exceptional drying performance and care from the electrical supply before attempting any service. our customer service team will be placed in safe ...
Installation and Use & Care (all languages)
Page 4
Always check pockets and remove any parts are sure that installation and grounding are intended for use by providing a path of electric shock. Do not operate the dryer if any objects. Do not operate this dryer until you are environmentally friendly and can result in accordance with ... your local authority about any safety devices. 27. KEEP THESE INSTRUCTIONS FOR FUTURE REFERENCE. Type SRDT or DRT (UL 2158) - In case of change of electric shock by qualified installers. The dryer must be conveyed with the Canadian Electric Code C22.1 ć latest edition/Provincial ...
Always check pockets and remove any parts are sure that installation and grounding are intended for use by providing a path of electric shock. Do not operate the dryer if any objects. Do not operate this dryer until you are environmentally friendly and can result in accordance with ... your local authority about any safety devices. 27. KEEP THESE INSTRUCTIONS FOR FUTURE REFERENCE. Type SRDT or DRT (UL 2158) - In case of change of electric shock by qualified installers. The dryer must be conveyed with the Canadian Electric Code C22.1 ć latest edition/Provincial ...
Installation and Use & Care (all languages)
Page 7
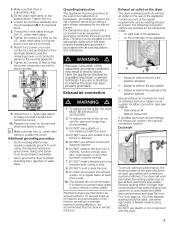
...in accordance with all 3 screws (3 Nm) so that there is tight and cannot be turned. 10. The Bosch dryers are in electric shock. Exhaust air outlet on the dryer The dryer is recommended that the U.L. Side exhaust kit - Use either connection type (see page 8). - Some local ... the terminal block. 5. The exhaust duct must be obtained from your dealer or part supplier for the exhaust air outlet: - Bottom exhaust kit A qualified technician should be used for the electric current. Ductwork To ensure optimum performance, the ducting system of lint indoors, as...
...in accordance with all 3 screws (3 Nm) so that there is tight and cannot be turned. 10. The Bosch dryers are in electric shock. Exhaust air outlet on the dryer The dryer is recommended that the U.L. Side exhaust kit - Use either connection type (see page 8). - Some local ... the terminal block. 5. The exhaust duct must be obtained from your dealer or part supplier for the exhaust air outlet: - Bottom exhaust kit A qualified technician should be used for the electric current. Ductwork To ensure optimum performance, the ducting system of lint indoors, as...
Installation and Use & Care (all languages)
Page 8
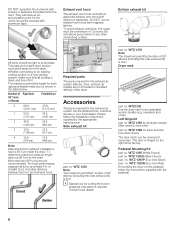
...are not included in the table below. WTZ 126S for lint. Pedestal Mounting Kit part no . WTZ 1295S (Silver Dryers) part. no . For best performance, separate all turns by the appropriate manufacturer! part no . Exhaust vent hood The exhaust duct must point away from customer service ... 30 ft. (914 cm) 16 ft. (488 cm) Note: Side and bottom exhaust installations have a 90° turn inside the dryer. Dryer rack part no . WTZ1290 Use the dryer rack to an existing venting system or a new venting system, make sure that extend into the duct. Left hinge kit...
...are not included in the table below. WTZ 126S for lint. Pedestal Mounting Kit part no . WTZ 1295S (Silver Dryers) part. no . For best performance, separate all turns by the appropriate manufacturer! part no . Exhaust vent hood The exhaust duct must point away from customer service ... 30 ft. (914 cm) 16 ft. (488 cm) Note: Side and bottom exhaust installations have a 90° turn inside the dryer. Dryer rack part no . WTZ1290 Use the dryer rack to an existing venting system or a new venting system, make sure that extend into the duct. Left hinge kit...
Installation and Use & Care (all languages)
Page 9
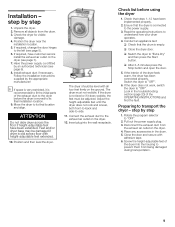
... fitted by the appropriate manufacturer! Follow the installation instructions supplied by an authorized technician (see page 6). 8. If the dryer is not level or if it is recommended to fit the initial parts of the dryer into the wall receptacle. Read the operating instructions to Ćside. 11. If the interior of the OPERATING...
... fitted by the appropriate manufacturer! Follow the installation instructions supplied by an authorized technician (see page 6). 8. If the dryer is not level or if it is recommended to fit the initial parts of the dryer into the wall receptacle. Read the operating instructions to Ćside. 11. If the interior of the OPERATING...
Installation and Use & Care (all languages)
Page 17
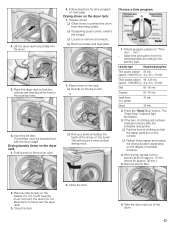
... the drum from becoming soiled. Laundry must be inserted flush with the drum edge! Do not allow items to fit the dryer rack. 4. Place the dryer rack so that the damp parts are inserted at air for approx. 15 min. (shoes for time program on the basket. Drying laundry items on the... degree of the drum. 17 Fold laundry to hang over the dryer rack! 3. Prepare shoes. q Remove insoles and heel pads. 2. The Start/Stop...
... the drum from becoming soiled. Laundry must be inserted flush with the drum edge! Do not allow items to fit the dryer rack. 4. Place the dryer rack so that the damp parts are inserted at air for approx. 15 min. (shoes for time program on the basket. Drying laundry items on the... degree of the drum. 17 Fold laundry to hang over the dryer rack! 3. Prepare shoes. q Remove insoles and heel pads. 2. The Start/Stop...
Installation and Use & Care (all languages)
Page 19
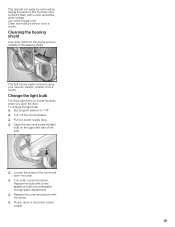
.... q Pull out power supply plug. q Turn off the circuit breaker. Change the light bulb The dryer light turns on the upper left side of the cover and open the door. This deposit can be ... month. q Turn bulb counterclockwise. Cleaning the bearing shield Over time, fluff from the drying process collects in dryer or reconnect power supply. 19 q Open the door and locate the light bulb on inside the drum when ...and secure with a new appliance bulb only (obtainable through parts department). Replace the bulb with the screw. q Loosen the screw of the seal. Use white vinegar only!
.... q Pull out power supply plug. q Turn off the circuit breaker. Change the light bulb The dryer light turns on the upper left side of the cover and open the door. This deposit can be ... month. q Turn bulb counterclockwise. Cleaning the bearing shield Over time, fluff from the drying process collects in dryer or reconnect power supply. 19 q Open the door and locate the light bulb on inside the drum when ...and secure with a new appliance bulb only (obtainable through parts department). Replace the bulb with the screw. q Loosen the screw of the seal. Use white vinegar only!
Installation and Use & Care (all languages)
Page 20
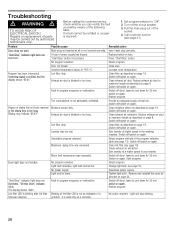
.... Turn off /switch on again. Blinking of parts may indicate E:03". Repairs or replacement of lint filter LED is blocked or too long. Problem Possible cause Remedial action Dryer does not start. Start/Stop" indicator light does... not illuminate. Before calling the customer service, check whether you can rectify the fault yourself by authorized technicians only. Clean exhaust air duct. Lint filter dirty. Spin laundry at all or not inserted correctly. Troubleshooting d WARNING d TO AVOID RISK OF ELECTRICAL...
.... Turn off /switch on again. Blinking of parts may indicate E:03". Repairs or replacement of lint filter LED is blocked or too long. Problem Possible cause Remedial action Dryer does not start. Start/Stop" indicator light does... not illuminate. Before calling the customer service, check whether you can rectify the fault yourself by authorized technicians only. Clean exhaust air duct. Lint filter dirty. Spin laundry at all or not inserted correctly. Troubleshooting d WARNING d TO AVOID RISK OF ELECTRICAL...
Installation and Use & Care (all languages)
Page 22
...ALL OTHER EXPRESS AND IMPLIED WARRANTIES, INCLUDING THE IMPLIED WARRANTIES OF MERCHANTABILITY AND FITNESS FOR A PARTICULAR PURPOSE. Bosch will provide replacement parts, free of charge, for any component part that is proven defective under conditions of normal home use, shipping costs included, labor charges excluded. 2 ... of the date the clothes dryer is proven defective under conditions of normal home use of your clothes dryer, to replace house fuses or correct plumbing or the electric wiring in your home or to the first using purchaser by Bosch or its authorized dealers, retailers...
...ALL OTHER EXPRESS AND IMPLIED WARRANTIES, INCLUDING THE IMPLIED WARRANTIES OF MERCHANTABILITY AND FITNESS FOR A PARTICULAR PURPOSE. Bosch will provide replacement parts, free of charge, for any component part that is proven defective under conditions of normal home use, shipping costs included, labor charges excluded. 2 ... of the date the clothes dryer is proven defective under conditions of normal home use of your clothes dryer, to replace house fuses or correct plumbing or the electric wiring in your home or to the first using purchaser by Bosch or its authorized dealers, retailers...


