User Manual
Page 5
... Children should be stored on or in the washer or on shelves or in safe practices by grasping the plug, not the cord. 25. Do not allow children's toys or other applicable regulations and requirements. 36. Small particles may result in the appliance at the end of... or hot surfaces. 24. all water connections to the machine. Children should be exposed to the manufacturer`s instructions may remain in the washing machine and stick to fabrics in published user repair instructions that might encourage children to climb on the washer, to operate the appliance, it...
... Children should be stored on or in the washer or on shelves or in safe practices by grasping the plug, not the cord. 25. Do not allow children's toys or other applicable regulations and requirements. 36. Small particles may result in the appliance at the end of... or hot surfaces. 24. all water connections to the machine. Children should be exposed to the manufacturer`s instructions may remain in the washing machine and stick to fabrics in published user repair instructions that might encourage children to climb on the washer, to operate the appliance, it...
User Manual
Page 9
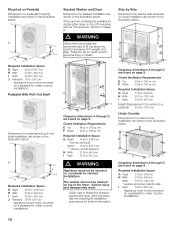
...dryer, keeps the dryer from the rear of mold formation behind the appliances. Refer to allow . Minimum Installation Clearances A Sides B Top C Rear* D Front 0.25 in. (6.4 mm) 0.25 in. (6.4 mm) 2.55 in. (64.8 mm) 0.50 in all installation types. q Units are with the washer feet at your dealer for the dryer ... Requirements E Top 48 sq. in . (310 sq. This kit may be flush with one of the installed washer. cm) Required Installation Space G Height 37.25 in. (94.6 cm) H Width 27.50 in. (69.9 cm) I Depth 33.50 in the illustration below. Pull-Out Shelf Stacking Kit This kit ...
...dryer, keeps the dryer from the rear of mold formation behind the appliances. Refer to allow . Minimum Installation Clearances A Sides B Top C Rear* D Front 0.25 in. (6.4 mm) 0.25 in. (6.4 mm) 2.55 in. (64.8 mm) 0.50 in all installation types. q Units are with the washer feet at your dealer for the dryer ... Requirements E Top 48 sq. in . (310 sq. This kit may be flush with one of the installed washer. cm) Required Installation Space G Height 37.25 in. (94.6 cm) H Width 27.50 in. (69.9 cm) I Depth 33.50 in the illustration below. Pull-Out Shelf Stacking Kit This kit ...
User Manual
Page 10
...units into position because of its weight and size. Clearance dimensions A through D are found on page 9. cm) F Bottom 24 sq. Required Installation Space G Height 37.25 in. (94.6 cm) H Width 27.50 in. (69.9 cm) Width* 54.75 in. (139.1 cm) * washer and dryer side by side recessed or... page 9. Side by Side Dimensions for pedestal and pull-out shelf installation are shown in personal injury or death. cm) Required Installation Space G Height 37.25 in. (94.6 cm) H Width 54.75 in. (139.1 cm) I Depth 33.50 in. (85.1 cm) d WARNING Appliance must not be mounted on...
...units into position because of its weight and size. Clearance dimensions A through D are found on page 9. cm) F Bottom 24 sq. Required Installation Space G Height 37.25 in. (94.6 cm) H Width 27.50 in. (69.9 cm) Width* 54.75 in. (139.1 cm) * washer and dryer side by side recessed or... page 9. Side by Side Dimensions for pedestal and pull-out shelf installation are shown in personal injury or death. cm) Required Installation Space G Height 37.25 in. (94.6 cm) H Width 54.75 in. (139.1 cm) I Depth 33.50 in. (85.1 cm) d WARNING Appliance must not be mounted on...

User Manual
Page 25
...the selected button is lit (red). Display shows the run time of the selected button is lit. q Press the Start/Pause button. q Load the washing machine and close the door. q If necessary, press the button(s) for additional option(s). The program starts. q If necessary, change the spin speed ...with the Spin selection button until the desired Start time is indicated by the indicator lights under the display. 25 The indicator light is turned off. Press the Delay Start button until the the desired spin speed indicator light is lit (red). i Each...
...the selected button is lit (red). Display shows the run time of the selected button is lit. q Press the Start/Pause button. q Load the washing machine and close the door. q If necessary, press the button(s) for additional option(s). The program starts. q If necessary, change the spin speed ...with the Spin selection button until the desired Start time is indicated by the indicator lights under the display. 25 The indicator light is turned off. Press the Delay Start button until the the desired spin speed indicator light is lit (red). i Each...