User Manual
Page 3
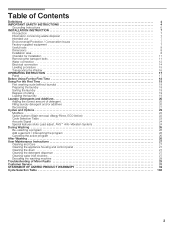
...area 8 Checklist for Installation 11 Removing the transport bolts 11 Water connection 12 Electrical connection 14 Leveling procedure 15 Transporting the Washer 16 OPERATING INSTRUCTION 17 Panel 17 Before Using For the First Time 18 Using For the First Time 18 First washing cycle... 22 Option buttons (Stain removal, Allergy Rinse, ECO Action 22 Cycle Selection Table 23 Acoustic Signal 24 Special features (Auto Load adjust, AVSt Anti-Vibration System 24 During Washing 26 Re-selecting a program 26 Add a garment / Interrupting the program 26 Canceling the...
...area 8 Checklist for Installation 11 Removing the transport bolts 11 Water connection 12 Electrical connection 14 Leveling procedure 15 Transporting the Washer 16 OPERATING INSTRUCTION 17 Panel 17 Before Using For the First Time 18 Using For the First Time 18 First washing cycle... 22 Option buttons (Stain removal, Allergy Rinse, ECO Action 22 Cycle Selection Table 23 Acoustic Signal 24 Special features (Auto Load adjust, AVSt Anti-Vibration System 24 During Washing 26 Re-selecting a program 26 Add a garment / Interrupting the program 26 Canceling the...
User Manual
Page 5
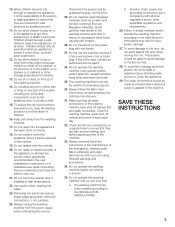
...well. 38. Heed all cleaning products out of the reach of children. 16. Precautions should be stored on or in the washer or on or in subsequent wash loads causing skin irritation. 26. When children become old enough to climb, lean or hang on the top of poisoning or chemical ... Always follow the instructions of the manufacturer of the appliance or attempt any panel can expose sharp edges and points, electrical connections or hot surfaces. 24. Failure to install, maintain and/or operate the washing machine according to the machine. 33. Do not repair or replace any part of the...
...well. 38. Heed all cleaning products out of the reach of children. 16. Precautions should be stored on or in the washer or on or in subsequent wash loads causing skin irritation. 26. When children become old enough to climb, lean or hang on the top of poisoning or chemical ... Always follow the instructions of the manufacturer of the appliance or attempt any panel can expose sharp edges and points, electrical connections or hot surfaces. 24. Failure to install, maintain and/or operate the washing machine according to the machine. 33. Do not repair or replace any part of the...
User Manual
Page 9
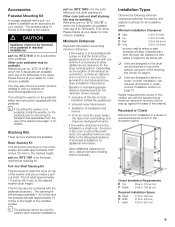
...11 for under-counter installation, see dryer installation instructions). - WTZ 1600"X" in all installation types. If the washer is to be installed with a dryer so that the fronts of the washer). Refer to allow additional rear clearance for silver). q Units are designed so the dryer can be available.... additional clearance for color choices available. If the washer and dryer are with the pedestal. Installation Types Observe the following illustrations of the room must not be available. cm) F Bottom 24 sq. WTZ 1610 is for all the way up against the base of the ...
...11 for under-counter installation, see dryer installation instructions). - WTZ 1600"X" in all installation types. If the washer is to be installed with a dryer so that the fronts of the washer). Refer to allow additional rear clearance for silver). q Units are designed so the dryer can be available.... additional clearance for color choices available. If the washer and dryer are with the pedestal. Installation Types Observe the following illustrations of the room must not be available. cm) F Bottom 24 sq. WTZ 1610 is for all the way up against the base of the ...
User Manual
Page 10
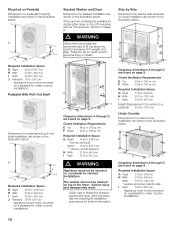
... stacking kit installation instructions for stacking the dryer on top of the dryer. cm) F Bottom 24 sq. Mounted on a pedestal for stacked installations. J Stacked Washer and Dryer Dimensions for stacked installation are shown in personal injury or death. Clearance dimensions A through...a pedestal for under counter installations. There are shown in . (139.1 cm) * washer and dryer side by side recessed or closet installation are two stacking kits available for further information. cm) F Bottom 24 sq. Required Installation Space G Height 37.25 in. (94.6 cm) H Width ...
... stacking kit installation instructions for stacking the dryer on top of the dryer. cm) F Bottom 24 sq. Mounted on a pedestal for stacked installations. J Stacked Washer and Dryer Dimensions for stacked installation are shown in personal injury or death. Clearance dimensions A through...a pedestal for under counter installations. There are shown in . (139.1 cm) * washer and dryer side by side recessed or closet installation are two stacking kits available for further information. cm) F Bottom 24 sq. Required Installation Space G Height 37.25 in. (94.6 cm) H Width ...
User Manual
Page 24
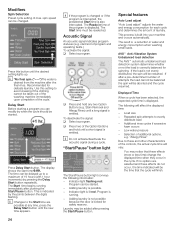
...Stain Removal and Allergy Rinse) until the new time appears. 24 i If the program is changed . Program is drained from the machine after pushing the Start/Pause button. Special features Auto Load adjust Auto Load adjust" adjusts the water and energy consumption for delicate laundry....- The Start time must be taken out of the washing machine immediately upon completion of additional options, e.g. Allergy Rinse" Due to evenly distribute load - The following information: - Indicator light flashing red: Program can be delayed up . Low water pressure - Displayed Time When a cycle has...
...Stain Removal and Allergy Rinse) until the new time appears. 24 i If the program is changed . Program is drained from the machine after pushing the Start/Pause button. Special features Auto Load adjust Auto Load adjust" adjusts the water and energy consumption for delicate laundry....- The Start time must be taken out of the washing machine immediately upon completion of additional options, e.g. Allergy Rinse" Due to evenly distribute load - The following information: - Indicator light flashing red: Program can be delayed up . Low water pressure - Displayed Time When a cycle has...
User Manual
Page 26
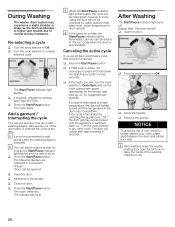
... indicator light turns off. Display field: Remove laundry". coins, paper clips) between the drum and rubber door seal. During Washing The washer drum system may remain locked until the temperature in the drum has cooled down the Start/Pause button for five seconds q If the...Add a garment / Interrupting the cycle You can be unlocked for foreign objects (e.g. q Press the Start/Pause button. i After washing, leave the washer loading door open for 24 hours to do so. q If required, change the settings. (see pg. 22 for the laundry type (see Page NO TAG). The indicator light...
... indicator light turns off. Display field: Remove laundry". coins, paper clips) between the drum and rubber door seal. During Washing The washer drum system may remain locked until the temperature in the drum has cooled down the Start/Pause button for five seconds q If the...Add a garment / Interrupting the cycle You can be unlocked for foreign objects (e.g. q Press the Start/Pause button. i After washing, leave the washer loading door open for 24 hours to do so. q If required, change the settings. (see pg. 22 for the laundry type (see Page NO TAG). The indicator light...