

Pedestal Installation Instructions
Page 6
... as necessary to finish installing or reinstalling your appliance (i.e., hoses, vents, etc.) 9. Leveling Procedure 1. Start with all 4 transport bolt assemblies (bolt, washer and bushings) by turning it clockwise. Otherwise, repeat the leveling procedure until the unit is leveled. q After leveling the unit from side to side,... appliance.) q Lay the bubble level across the unit worktop to check the level from side to prevent the appliance from wobbling. Figure 15 q Insert the covers until they snap in length) to check the leveling status of the appliance (be in that came with it ...
... as necessary to finish installing or reinstalling your appliance (i.e., hoses, vents, etc.) 9. Leveling Procedure 1. Start with all 4 transport bolt assemblies (bolt, washer and bushings) by turning it clockwise. Otherwise, repeat the leveling procedure until the unit is leveled. q After leveling the unit from side to side,... appliance.) q Lay the bubble level across the unit worktop to check the level from side to prevent the appliance from wobbling. Figure 15 q Insert the covers until they snap in length) to check the leveling status of the appliance (be in that came with it ...
Installation and Use & Care (all languages)
Page 3
... OPERATING INSTRUCTION 12 Your new washer 12 Panel 13 Summary of Instructions 14 Before Using For the First Time 15 Using For the First Time 15 First washing cycle (without laundry 15 Preparing the laundry 15 Sorting the laundry 15 Degrees of soiling 15 Loading the laundry 16 Laundry ...20 Add a garment / Interrupting the program 20 Canceling active program 20 After Washing 21 Cleaning and Care 21 Cleaning the washer 21 Descaling the washing machine 22 Troubleshooting of Minor Faults 23 Customer Service 25 STATEMENT OF LIMITED PRODUCT WARRANTY 25 STATEMENT OF WARRANTIES...
... OPERATING INSTRUCTION 12 Your new washer 12 Panel 13 Summary of Instructions 14 Before Using For the First Time 15 Using For the First Time 15 First washing cycle (without laundry 15 Preparing the laundry 15 Sorting the laundry 15 Degrees of soiling 15 Loading the laundry 16 Laundry ...20 Add a garment / Interrupting the program 20 Canceling active program 20 After Washing 21 Cleaning and Care 21 Cleaning the washer 21 Descaling the washing machine 22 Troubleshooting of Minor Faults 23 Customer Service 25 STATEMENT OF LIMITED PRODUCT WARRANTY 25 STATEMENT OF WARRANTIES...

Installation and Use & Care (all languages)
Page 5
...or operating the washing machine. B. In the event of least resistance for its intended purpose. 23. DO NOT modify the plug provided with the washer. Use caution when draining hot water. 19. Do not operate the washing machine if any panel, including the round service panel in a cool ...or breakdown, grounding will not fit the outlet have a proper outlet installed by qualified persons. 14. The plug must only be used near children. 15. Do not allow children to play on a regular basis to ensure that are tight and not leaking. 27. If this washing machine until you...
...or operating the washing machine. B. In the event of least resistance for its intended purpose. 23. DO NOT modify the plug provided with the washer. Use caution when draining hot water. 19. Do not operate the washing machine if any panel, including the round service panel in a cool ...or breakdown, grounding will not fit the outlet have a proper outlet installed by qualified persons. 14. The plug must only be used near children. 15. Do not allow children to play on a regular basis to ensure that are tight and not leaking. 27. If this washing machine until you...
Installation and Use & Care (all languages)
Page 7
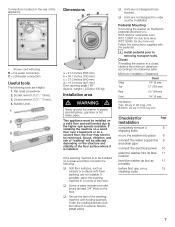
...pipe connect the electrical power 10 slide the washer into its final 11 location level the washer as low as carpets or surfaces with plug. cm) Checklist for duo tone red Follow the instructions supplied with holding brackets (set) from Bosch Customer Service (WMZ 2200). Flat head screwdriver... on a weak wood floor consider the following: q Soft floor surfaces, such as 11 possible before first use, run a 15 cleaning cycle 7 Closet If installing the washer in a corner of the washing machine with the pedestal. Closed wrench (1/2" / 13 mm). 4. q Units are not designed...
...pipe connect the electrical power 10 slide the washer into its final 11 location level the washer as low as carpets or surfaces with plug. cm) Checklist for duo tone red Follow the instructions supplied with holding brackets (set) from Bosch Customer Service (WMZ 2200). Flat head screwdriver... on a weak wood floor consider the following: q Soft floor surfaces, such as 11 possible before first use, run a 15 cleaning cycle 7 Closet If installing the washer in a corner of the washing machine with the pedestal. Closed wrench (1/2" / 13 mm). 4. q Units are not designed...
Installation and Use & Care (all languages)
Page 10
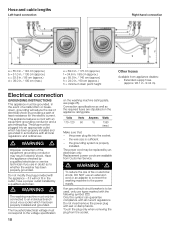
...GROUNDING INSTRUCTIONS This appliance must only be used, only use an extension cord or an adapter to connect the washing machine to whether the washer has been properly grounded. d WARNING d Improper connection of a malfunction or breakĆ down, grounding will not fit in the outlet,...by a qualified electrician. Do not modify the plug provided with an equipmentĆgrounding conductor and a grounding plug. Volts 110-120 Hertz 60 Amperes 15 Watts 1350 (max.) Make sure that: - d WARNING d The washing machine must be plugged into the socket. - Hose and cable lengths ...
...GROUNDING INSTRUCTIONS This appliance must only be used, only use an extension cord or an adapter to connect the washing machine to whether the washer has been properly grounded. d WARNING d Improper connection of a malfunction or breakĆ down, grounding will not fit in the outlet,...by a qualified electrician. Do not modify the plug provided with an equipmentĆgrounding conductor and a grounding plug. Volts 110-120 Hertz 60 Amperes 15 Watts 1350 (max.) Make sure that: - d WARNING d The washing machine must be plugged into the socket. - Hose and cable lengths ...

Installation and Use & Care (all languages)
Page 15
...wash with other items. White items may become discolored. q Open the flap of the detergent dispenser. q Close the door. i The display shows the run the washer a complete cycle, without smoke staining) that have been used for delicates or wool (this will cause excessive sudsing). q Close zippers, button up in a net... the stain. Sheer curtains (without clothes, in advance. Before using your initial load of clothes, run time of clothing using the appropriate program. 15 Bed linen and guest towels that have been conĆ nected correctly and are still fresh.
...wash with other items. White items may become discolored. q Open the flap of the detergent dispenser. q Close the door. i The display shows the run the washer a complete cycle, without smoke staining) that have been used for delicates or wool (this will cause excessive sudsing). q Close zippers, button up in a net... the stain. Sheer curtains (without clothes, in advance. Before using your initial load of clothes, run time of clothing using the appropriate program. 15 Bed linen and guest towels that have been conĆ nected correctly and are still fresh.

Installation and Use & Care (all languages)
Page 16
... or may calcify. For best results it is on stains. This information can damage the laundry. Grayish brown spots (fat globules) may appear on Page 15. - The water hardness. Information on soiling can be rinsed thoroughly by force. Filling laundry detergent and/or additives q Open the flap of varying size will...
... or may calcify. For best results it is on stains. This information can damage the laundry. Grayish brown spots (fat globules) may appear on Page 15. - The water hardness. Information on soiling can be rinsed thoroughly by force. Filling laundry detergent and/or additives q Open the flap of varying size will...

Installation and Use & Care (all languages)
Page 88
... Very delicate easy care items ÍÈË Hand Wash 75 (27) 26 Woolens ÍÏÈÎ Wool 80 (25) 33 +30 +16 Ć 15 2/3 load +40 +10 Ć 16 full load +40 +10 +17 Ć 10 1/2 load +10 +16 Ć 8 1/2 load Ć 8 +10 +7 Ć 3 1/3 load Ć 3 ... the indicated values depending on water supply and quality, type and amount of laundry Check care labels on article! 88 Program selection table Nexxt 500 Plus Series Please read and observe Operating, Care and Installation Instructions carefully before using the washing machine!
... Very delicate easy care items ÍÈË Hand Wash 75 (27) 26 Woolens ÍÏÈÎ Wool 80 (25) 33 +30 +16 Ć 15 2/3 load +40 +10 Ć 16 full load +40 +10 +17 Ć 10 1/2 load +10 +16 Ć 8 1/2 load Ć 8 +10 +7 Ć 3 1/3 load Ć 3 ... the indicated values depending on water supply and quality, type and amount of laundry Check care labels on article! 88 Program selection table Nexxt 500 Plus Series Please read and observe Operating, Care and Installation Instructions carefully before using the washing machine!
