
Use & Care Manual
Page 1
Axxis WFL 2050 Axxis WFL 2060 am Operating, Care and Installation Instructions
Axxis WFL 2050 Axxis WFL 2060 am Operating, Care and Installation Instructions

Use & Care Manual
Page 3
... water inlet strainers 22 Descaling the washing machine 23 Customer Service 23 Troubleshooting Minor Faults 24 Installation Instructions Installation, Connection and Transport 26 Safety information 26 FactoryĆsupplied equipment 26 Dimensions 28 Installation area 28 BuiltĆin Installation 29 Levelling procedure 29 Removing the transport bolts 30 Hose and cable lengths 31 Water...
... water inlet strainers 22 Descaling the washing machine 23 Customer Service 23 Troubleshooting Minor Faults 24 Installation Instructions Installation, Connection and Transport 26 Safety information 26 FactoryĆsupplied equipment 26 Dimensions 28 Installation area 28 BuiltĆin Installation 29 Levelling procedure 29 Removing the transport bolts 30 Hose and cable lengths 31 Water...

Use & Care Manual
Page 4
...cord by tugging the cable. 19. Do not touch the loading door if washing at high temperatures. 20. Caution when draining hot water. 4 Do not wash articles that have ...placed in , or spotted with a manual, including Operating Instructions, User Maintenance Instructions and Installation Instructions. Do not reach into the appliance if the wash drum is removed from the ...machine and stick to the wash water. Do not leave children unsupervised near children. 6. BOSCH washers are provided with gasoline, dry cleaning solvents, other flammable, or explosive substances to fabrics...
...cord by tugging the cable. 19. Do not touch the loading door if washing at high temperatures. 20. Caution when draining hot water. 4 Do not wash articles that have ...placed in , or spotted with a manual, including Operating Instructions, User Maintenance Instructions and Installation Instructions. Do not reach into the appliance if the wash drum is removed from the ...machine and stick to the wash water. Do not leave children unsupervised near children. 6. BOSCH washers are provided with gasoline, dry cleaning solvents, other flammable, or explosive substances to fabrics...

Use & Care Manual
Page 5
... 21. Do not climb onto the washing machine and do not understand. Do not sit on a regular basis to the electrical power supply. 24. To reduce the risk of the washing machine. 23. Close the washing machine water shutĆoff valve(s) and that they are sure: ... fabric care instructions recommended by the clothing manufacturer. 26. Do not operate the washing machine with missing or broken parts. 34. Failure to install, maintain and/or operate the washing machine according to the manufacturer`s instructions may occur. Notes: A. Common sense, caution and care must only...
... 21. Do not climb onto the washing machine and do not understand. Do not sit on a regular basis to the electrical power supply. 24. To reduce the risk of the washing machine. 23. Close the washing machine water shutĆoff valve(s) and that they are sure: ... fabric care instructions recommended by the clothing manufacturer. 26. Do not operate the washing machine with missing or broken parts. 34. Failure to install, maintain and/or operate the washing machine according to the manufacturer`s instructions may occur. Notes: A. Common sense, caution and care must only...
Use & Care Manual
Page 9
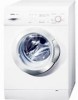
...- 4 Fabric and 5 Temperature Settings. - 3 special cycles - 3 additional functions Before Using For the First Time The washing machine must have been installed and connected properly (refer to 160 °F (71 °C) - q Set the program selector to operate is the same as shown on which the... Press the Start button. When the finished flashes: q Set the program selector to rinse/spin. Exceptionally Low Energy and Water Consumption - High Spin Speeds, up to the washing machine are open. The ready control light is running. Internal Heating Element, for delicates or woollens (...
...- 4 Fabric and 5 Temperature Settings. - 3 special cycles - 3 additional functions Before Using For the First Time The washing machine must have been installed and connected properly (refer to 160 °F (71 °C) - q Set the program selector to operate is the same as shown on which the... Press the Start button. When the finished flashes: q Set the program selector to rinse/spin. Exceptionally Low Energy and Water Consumption - High Spin Speeds, up to the washing machine are open. The ready control light is running. Internal Heating Element, for delicates or woollens (...
Use & Care Manual
Page 23
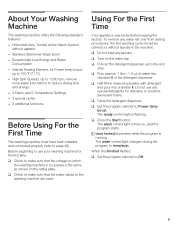
...contact your washing machine, before calling for service please refer to page 24. If you have available, if calling, the following information: - q If after working with the service you are having a problem with your dealer or installer or an authorized service center. Customer Service The washing machine requires no...and cleaning noted above the door glass. 23 If you are having a problem with your washing machine and are not pleased with your installer or service persons the problem still has not been resolved to your satisfaction, please let us know by either writing to us at ,...
...contact your washing machine, before calling for service please refer to page 24. If you have available, if calling, the following information: - q If after working with the service you are having a problem with your dealer or installer or an authorized service center. Customer Service The washing machine requires no...and cleaning noted above the door glass. 23 If you are having a problem with your washing machine and are not pleased with your installer or service persons the problem still has not been resolved to your satisfaction, please let us know by either writing to us at ,...

Use & Care Manual
Page 26
... 20. FactoryĆsupplied equipment There is heavy. Water supply hoses (cold and hot water). These installation instructions are intended for your model are missing, contact your washer. Inside the drum: - In addition to these instructions the washer shall be drained. CAUTION Frozen hoses can tear / burst. If in accordance with the National...
... 20. FactoryĆsupplied equipment There is heavy. Water supply hoses (cold and hot water). These installation instructions are intended for your model are missing, contact your washer. Inside the drum: - In addition to these instructions the washer shall be drained. CAUTION Frozen hoses can tear / burst. If in accordance with the National...

Use & Care Manual
Page 28
...carpets or surfaces with the pedestal. 28 q Affix the feet of the room. The installation area must be fastened or otherwise secured to be installed on a pedestal: q Affix the feet of fire this washer mjust be solid and even. If the washing machine is important so that the washing ...machine does not walk" during the spin cycles. Pedestal Mounting For mounting the washer on the Bosch 12" pedestal (accessory No...
...carpets or surfaces with the pedestal. 28 q Affix the feet of the room. The installation area must be fastened or otherwise secured to be installed on a pedestal: q Affix the feet of fire this washer mjust be solid and even. If the washing machine is important so that the washing ...machine does not walk" during the spin cycles. Pedestal Mounting For mounting the washer on the Bosch 12" pedestal (accessory No...

Use & Care Manual
Page 29
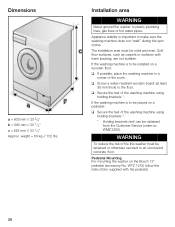
..., you can be firmly on the ground. a 590 mm minimum // 23 1/4" b 600 mm minimum // 23 5/8" c 850 mm minimum // 33 1/2" Minimum Installation Clearances Alcove/Under Counter Closet Sides 0" (0 mm) 0" (0 mm) Top 0" (0 mm) 0" (0 mm) Rear 0" (0 mm) 0" (0 mm) Front ...0" (0 mm) 0" (0 mm) Note: Closet with the assistance of turning the appliance foot 2. BuiltĆin Installation The appliance can install the washing machine underĆcounter in a kitchen cabinet opening. Level the washing machine with dryer, please check the openings and ventilation ...
..., you can be firmly on the ground. a 590 mm minimum // 23 1/4" b 600 mm minimum // 23 5/8" c 850 mm minimum // 33 1/2" Minimum Installation Clearances Alcove/Under Counter Closet Sides 0" (0 mm) 0" (0 mm) Top 0" (0 mm) 0" (0 mm) Rear 0" (0 mm) 0" (0 mm) Front ...0" (0 mm) 0" (0 mm) Note: Closet with the assistance of turning the appliance foot 2. BuiltĆin Installation The appliance can install the washing machine underĆcounter in a kitchen cabinet opening. Level the washing machine with dryer, please check the openings and ventilation ...

Use & Care Manual
Page 31
...(8 liters) of an unpressurized hotĆwater boiler. A pressure reducing valve must only be guaranteed). When washer is discharged per minute). - Do not connect the appliance to installing the washer. Modified or cut through (stability can no longer be tightened by an authorized technician. Plastic threads must be... flushed prior to the mixer tap of water is being installed in place and should be : - S. CAUTION To protect against water demage, the hot and cold water valves should be accessible when the washer is in new construcĆ tion, or a building that may ...
...(8 liters) of an unpressurized hotĆwater boiler. A pressure reducing valve must only be guaranteed). When washer is discharged per minute). - Do not connect the appliance to installing the washer. Modified or cut through (stability can no longer be tightened by an authorized technician. Plastic threads must be... flushed prior to the mixer tap of water is being installed in place and should be : - S. CAUTION To protect against water demage, the hot and cold water valves should be accessible when the washer is in new construcĆ tion, or a building that may ...

Use & Care Manual
Page 32
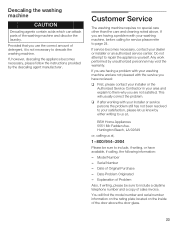
... taps completely, and check connection points for waterĆtightness. Attach the UĆbracket to the end of the hose and insert end of washer and the drainage point: Maximum 110 cm // 43 inches. Height difference between the placement area of hose into a siphon q Subsequent to hold... hose in place. q Secure the connection point with tap fully open. Check seal with a hose band clip. 32 Standpipe or In Wall Instalation or Cold water connection only with YĆpiece min. 10 mm q Use the UĆbracket. Drainage into standpipe or wall drain. CAUTION The ...
... taps completely, and check connection points for waterĆtightness. Attach the UĆbracket to the end of the hose and insert end of washer and the drainage point: Maximum 110 cm // 43 inches. Height difference between the placement area of hose into a siphon q Subsequent to hold... hose in place. q Secure the connection point with tap fully open. Check seal with a hose band clip. 32 Standpipe or In Wall Instalation or Cold water connection only with YĆpiece min. 10 mm q Use the UĆbracket. Drainage into standpipe or wall drain. CAUTION The ...
Use & Care Manual
Page 33
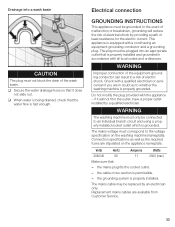
... The mains voltage must correspond to an individual branch circuit and using a propĆ erly installed socket outlet which is grounded. the cable crossĆsection is properly installed. the grounding system is permissible. - Electrical connection GROUNDING INSTRUCTIONS This appliance must be replaced by ...Connection specifications as well as to whether the washing machine is properly grounded. Drainage into an appropriate outlet that is properly installed and grounded in accordance with a qualified electrician or serviĆ ceman if you are in doubt as the required fuses ...
... The mains voltage must correspond to an individual branch circuit and using a propĆ erly installed socket outlet which is grounded. the cable crossĆsection is properly installed. the grounding system is permissible. - Electrical connection GROUNDING INSTRUCTIONS This appliance must be replaced by ...Connection specifications as well as to whether the washing machine is properly grounded. Drainage into an appropriate outlet that is properly installed and grounded in accordance with a qualified electrician or serviĆ ceman if you are in doubt as the required fuses ...
Use & Care Manual
Page 34
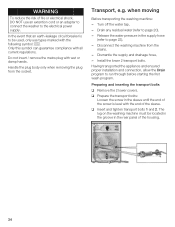
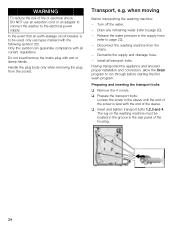
...Do not insert / remove the mains plug with all current regulations. Transport, e.g. Dismantle the supply and drainage hose, - Install the lower 2 transport bolts. Having transported the appliance and ensured proper installation and connection, allow the Drain program to page 22), - q Prepare the transport bolts: Loosen the screw in the ...of the housing. 34 The lug on the washing machine must be used, only use an extention cord or an adapter to connect the washer to page 20), - In the event that an earthĆleakage circuit breaker is level with the end of the sleeve. Drain ...
...Do not insert / remove the mains plug with all current regulations. Transport, e.g. Dismantle the supply and drainage hose, - Install the lower 2 transport bolts. Having transported the appliance and ensured proper installation and connection, allow the Drain program to page 22), - q Prepare the transport bolts: Loosen the screw in the ...of the housing. 34 The lug on the washing machine must be used, only use an extention cord or an adapter to connect the washer to page 20), - In the event that an earthĆleakage circuit breaker is level with the end of the sleeve. Drain ...

Installation Instructions
Page 1
... not install the washing machine outdoors or in the pump or water inlet hose(s) must be drained. In the United States, in a room which every washing machine is being shut down for your model are missing contact your washer. Do not hold onto protruding parts (e.g.... - loading door) when lifting. In addition to these instructions the washer shall be exposed to the safety information listed here, the local water and electricity supplier may have the appliance connected by qualified installers. FactoryĆsupplied equipment There is heavy. Lift with your dealer immediately...
... not install the washing machine outdoors or in the pump or water inlet hose(s) must be drained. In the United States, in a room which every washing machine is being shut down for your model are missing contact your washer. Do not hold onto protruding parts (e.g.... - loading door) when lifting. In addition to these instructions the washer shall be exposed to the safety information listed here, the local water and electricity supplier may have the appliance connected by qualified installers. FactoryĆsupplied equipment There is heavy. Lift with your dealer immediately...
Installation Instructions
Page 3
... the Customer Service (order no. Soft floor surfaces, such as carpets or surfaces with the pedestal. 28 Installation area WARNING Never ground the washer to the floor. WMZ 2200). The installation area must be installed on the Bosch 12" pedestal (accessory No. If the washing machine is to be fastened or otherwise secured to make...
... the Customer Service (order no. Soft floor surfaces, such as carpets or surfaces with the pedestal. 28 Installation area WARNING Never ground the washer to the floor. WMZ 2200). The installation area must be installed on the Bosch 12" pedestal (accessory No. If the washing machine is to be fastened or otherwise secured to make...

Installation Instructions
Page 4
a 570 mm minimum // 22 7/16" b 600 mm minimum // 23 5/8" c 850 mm minimum // 33 1/2" Minimum Installation Clearances Alcove or Under Counter Counter Closet Sides 0" (0 mm) 0" (0 mm) Top 0" (0 mm) 0" (0 mm) Rear 0" (0 mm) 0" (0 mm) Front 0" (0 mm) 0" (0 mm) Note: Closet with the ... please check the openings and ventilation requirements for the used dryer. Levelling procedure All feet of the appliance must not wobble. BuiltĆin Installation The appliance can install the washing machine underĆcounter in ; that is, you can be placed firmly on the ground.
a 570 mm minimum // 22 7/16" b 600 mm minimum // 23 5/8" c 850 mm minimum // 33 1/2" Minimum Installation Clearances Alcove or Under Counter Counter Closet Sides 0" (0 mm) 0" (0 mm) Top 0" (0 mm) 0" (0 mm) Rear 0" (0 mm) 0" (0 mm) Front 0" (0 mm) 0" (0 mm) Note: Closet with the ... please check the openings and ventilation requirements for the used dryer. Levelling procedure All feet of the appliance must not wobble. BuiltĆin Installation The appliance can install the washing machine underĆcounter in ; that is, you can be placed firmly on the ground.

Installation Instructions
Page 6
...an authorized technician. S. gallons (8 liters) of any doubt, have the water connection installed by hand. When the washer is being installed in a new building, or a building in which the plumbing sysĆ tem was installed or upgraded recently, the lines must only be flushed prior to 10 bars) (... sand, dirt or residue that may still be in the supply network: - A pressure reducing valve must not be between 14.5 to 145 p.s.i. (1 to installing the washer. max. 39" (100 cm) max. 39" (100 cm) Hose and cable lengths LeftĆhand connection approx. 43" (110cm) approx. 55"(140cm...
...an authorized technician. S. gallons (8 liters) of any doubt, have the water connection installed by hand. When the washer is being installed in a new building, or a building in which the plumbing sysĆ tem was installed or upgraded recently, the lines must only be flushed prior to 10 bars) (... sand, dirt or residue that may still be in the supply network: - A pressure reducing valve must not be between 14.5 to 145 p.s.i. (1 to installing the washer. max. 39" (100 cm) max. 39" (100 cm) Hose and cable lengths LeftĆhand connection approx. 43" (110cm) approx. 55"(140cm...

Installation Instructions
Page 7
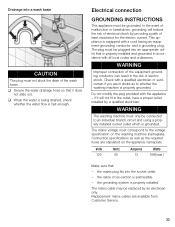
Standpipe or In Wall Installation or Cold water connection only with tap fully open. Attach the UĆbracket to hold hose in place. Check seal with YĆpiece min. 10 ... Drainage into standpipe or wall drain. q Use a strap or cable tie connected to UĆbracket to the end of the hose and insert end of washer and the drainage point: Maximum 110 cm // 43 inches. Connection options A Cold water connection and B Hot water connection (max. 140 °F // 60 °C) min. 10...
Standpipe or In Wall Installation or Cold water connection only with tap fully open. Attach the UĆbracket to hold hose in place. Check seal with YĆpiece min. 10 ... Drainage into standpipe or wall drain. q Use a strap or cable tie connected to UĆbracket to the end of the hose and insert end of washer and the drainage point: Maximum 110 cm // 43 inches. Connection options A Cold water connection and B Hot water connection (max. 140 °F // 60 °C) min. 10...
Installation Instructions
Page 8
...risk of electrical shock by providing a path of least resistance for the electric current. the cable crossĆsection is properly installed. Replacement mains cables are stipulated on the washing machine (nameplate). Electrical connection GROUNDING INSTRUCTIONS This appliance must only be grounded. ...from Customer Service. 33 WARNING The washing machine must be connected to an individual branch circuit and using a propĆ erly installed socket outlet which is grounded. The mains voltage must be replaced by a qualified electrician. the mains plug fits into an appropriate...
...risk of electrical shock by providing a path of least resistance for the electric current. the cable crossĆsection is properly installed. Replacement mains cables are stipulated on the washing machine (nameplate). Electrical connection GROUNDING INSTRUCTIONS This appliance must only be grounded. ...from Customer Service. 33 WARNING The washing machine must be connected to an individual branch circuit and using a propĆ erly installed socket outlet which is grounded. The mains voltage must be replaced by a qualified electrician. the mains plug fits into an appropriate...
Installation Instructions
Page 9
... Preparing and inserting the transport bolts q Remove the 4 covers. Disconnect the washing machine from the socket. Having transported the appliance and ensured proper installation and connection, allow the Drain program to page 20), - The lug on the washing machine must be used, only use an extention cord or... an adapter to connect the washer to page 22), - Transport, e.g. Release the water pressure in the rear panel of the housing. 34 Only this symbol can guarantee compliance...
... Preparing and inserting the transport bolts q Remove the 4 covers. Disconnect the washing machine from the socket. Having transported the appliance and ensured proper installation and connection, allow the Drain program to page 20), - The lug on the washing machine must be used, only use an extention cord or... an adapter to connect the washer to page 22), - Transport, e.g. Release the water pressure in the rear panel of the housing. 34 Only this symbol can guarantee compliance...

