
Use & Care Manual
Page 3
... panel 19 Cleaning the drum 19 Cleaning the detergent dispenser 19 Cleaning the drain pump 20 Cleaning water inlet strainers 22 Descaling the washing machine 23 Customer Service 23 Troubleshooting Minor Faults 24 Installation Instructions Installation, Connection and Transport 26 Safety information 26 FactoryĆsupplied equipment 26 Dimensions 28 Installation area...
... panel 19 Cleaning the drum 19 Cleaning the detergent dispenser 19 Cleaning the drain pump 20 Cleaning water inlet strainers 22 Descaling the washing machine 23 Customer Service 23 Troubleshooting Minor Faults 24 Installation Instructions Installation, Connection and Transport 26 Safety information 26 FactoryĆsupplied equipment 26 Dimensions 28 Installation area...

Use & Care Manual
Page 5
... the washing machine. Do not sit on the top of children. 32. the washing machine has been installed according to the electrical power supply. 24. Notes: A. B. Replace worn power cords and/or loose plugs. 27. Do not operate the washing machine with missing or broken parts. 34.... Check the fill hose connections on the open loading door. 22. Do not operate this manual do not understand. Store all laundry chemicals and aids in this washing machine until you do not cover all...
... the washing machine. Do not sit on the top of children. 32. the washing machine has been installed according to the electrical power supply. 24. Notes: A. B. Replace worn power cords and/or loose plugs. 27. Do not operate the washing machine with missing or broken parts. 34.... Check the fill hose connections on the open loading door. 22. Do not operate this manual do not understand. Store all laundry chemicals and aids in this washing machine until you do not cover all...

Use & Care Manual
Page 22
... strainers This is still discharged. q Rinse the strainer under running water. First release the water pressure in the supply hoses: q Turn off the water tap. 22 If water is still discharged, check that the strainer is attached properly. q Turn off the water taps.
... strainers This is still discharged. q Rinse the strainer under running water. First release the water pressure in the supply hoses: q Turn off the water tap. 22 If water is still discharged, check that the strainer is attached properly. q Turn off the water taps.

Use & Care Manual
Page 24
... pipe and/or drain drainage pipe or drain hose is loose or not inserted. Clean and dry the detergent dispenser (refer to page 22). Plug is blocked. Press the Start button. Strainer in the detergent dispenser. Clean the strainer (refer to page 19). hose. Leak...Cleaning the drain pump", page 20. Select Drain or Spin. Power failure. The thread of the drum. Replace the drain hose. 24 Turn on water tap. Detergent was damp or lumpy. Start button not pressed. Eliminate the cause. Call Customer Service replace the fuse....
... pipe and/or drain drainage pipe or drain hose is loose or not inserted. Clean and dry the detergent dispenser (refer to page 22). Plug is blocked. Press the Start button. Strainer in the detergent dispenser. Clean the strainer (refer to page 19). hose. Leak...Cleaning the drain pump", page 20. Select Drain or Spin. Power failure. The thread of the drum. Replace the drain hose. 24 Turn on water tap. Detergent was damp or lumpy. Start button not pressed. Eliminate the cause. Call Customer Service replace the fuse....

Use & Care Manual
Page 26
...cabin that the accessory parts supplied for your model are intended for the winter, any residual water in an area prone to these instructions the washer shall be installed: - Be sure to freezing temperatures, or if it . If the washing machine is located in any parts are missing, contact... your washer. Take care not to page 22. Do not hold onto protruding parts (e.g. If in a room which every washing machine is a packet of accessory parts supplied with your ...
...cabin that the accessory parts supplied for your model are intended for the winter, any residual water in an area prone to these instructions the washer shall be installed: - Be sure to freezing temperatures, or if it . If the washing machine is located in any parts are missing, contact... your washer. Take care not to page 22. Do not hold onto protruding parts (e.g. If in a room which every washing machine is a packet of accessory parts supplied with your ...

Use & Care Manual
Page 28
...the instructions supplied with foam backing, are not suitable. Pedestal Mounting For mounting the washer on a wood joist floor: q If possible, place the washing machine in a... of the washing machine using holding brackets *. * Holding brackets (set) can be installed on the Bosch 12" pedestal (accessory No. q Screw a waterĆresistant wooden board (at least 30 mm ... washing machine does not walk" during the spin cycles. WMZ 2200). Installation area WARNING Never ground the washer to the floor. Soft floor surfaces, such as carpets or surfaces with the pedestal. 28 weight = 69...
...the instructions supplied with foam backing, are not suitable. Pedestal Mounting For mounting the washer on a wood joist floor: q If possible, place the washing machine in a... of the washing machine using holding brackets *. * Holding brackets (set) can be installed on the Bosch 12" pedestal (accessory No. q Screw a waterĆresistant wooden board (at least 30 mm ... washing machine does not walk" during the spin cycles. WMZ 2200). Installation area WARNING Never ground the washer to the floor. Soft floor surfaces, such as carpets or surfaces with the pedestal. 28 weight = 69...
Use & Care Manual
Page 34
... q Remove the 2 lower covers. The lug on the washing machine must be used, only use an extention cord or an adapter to connect the washer to the electrical power supply. Handle the plug body only when removing the plug from the mains. - Drain any residual water (refer to page... 22), - Dismantle the supply and drainage hose, - Having transported the appliance and ensured proper installation and connection, allow the Drain program to be located in ...
... q Remove the 2 lower covers. The lug on the washing machine must be used, only use an extention cord or an adapter to connect the washer to the electrical power supply. Handle the plug body only when removing the plug from the mains. - Drain any residual water (refer to page... 22), - Dismantle the supply and drainage hose, - Having transported the appliance and ensured proper installation and connection, allow the Drain program to be located in ...

Installation Instructions
Page 1
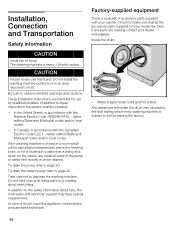
...to make sure that is being shut down for the winter, any parts are intended for your model are there. Be sure to page 22. To drain the water hose(s) refer to observe all the accessory parts supplied for use by qualified installers. Do not hold onto protruding...area exposed to page 20. FactoryĆsupplied equipment There is heavy. Lift with your dealer immediately. These installation instructions are missing contact your washer. To drain the pump refer to frost. d The washing machine is a packet of doubt, have special requirements. Do not install the washing...
...to make sure that is being shut down for the winter, any parts are intended for your model are there. Be sure to page 22. To drain the water hose(s) refer to observe all the accessory parts supplied for use by qualified installers. Do not hold onto protruding...area exposed to page 20. FactoryĆsupplied equipment There is heavy. Lift with your dealer immediately. These installation instructions are missing contact your washer. To drain the pump refer to frost. d The washing machine is a packet of doubt, have special requirements. Do not install the washing...
Installation Instructions
Page 3
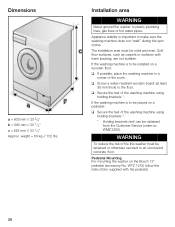
...the washing machine in a corner of the room. Dimensions a = 600 mm // 23 5/8" b = 590 mm // 22 1/2" c = 852 mm // 33 1/2" Approx. Installation area WARNING Never ground the washer to the floor. The installation area must be solid and even. Appliance stability is to make sure the washing machine does...placed on a pedestal: q Secure the feet of the washing machine using holding brackets *. * Holding brackets (set) can be installed on the Bosch 12" pedestal (accessory No. WARNING To reduce the risk of the washing machine using holding brackets *. weight = 69 kg // 152 lbs. ...
...the washing machine in a corner of the room. Dimensions a = 600 mm // 23 5/8" b = 590 mm // 22 1/2" c = 852 mm // 33 1/2" Approx. Installation area WARNING Never ground the washer to the floor. The installation area must be solid and even. Appliance stability is to make sure the washing machine does...placed on a pedestal: q Secure the feet of the washing machine using holding brackets *. * Holding brackets (set) can be installed on the Bosch 12" pedestal (accessory No. WARNING To reduce the risk of the washing machine using holding brackets *. weight = 69 kg // 152 lbs. ...

Installation Instructions
Page 4
.... q Tighten lock nut 1 against the housing. 29 BuiltĆin Installation The appliance can install the washing machine underĆcounter in ; a 570 mm minimum // 22 7/16" b 600 mm minimum // 23 5/8" c 850 mm minimum // 33 1/2" Minimum Installation Clearances Alcove or Under Counter Counter Closet Sides 0" (0 mm) 0" (0 mm) Top 0" (0 mm) 0" (0 mm) Rear...
.... q Tighten lock nut 1 against the housing. 29 BuiltĆin Installation The appliance can install the washing machine underĆcounter in ; a 570 mm minimum // 22 7/16" b 600 mm minimum // 23 5/8" c 850 mm minimum // 33 1/2" Minimum Installation Clearances Alcove or Under Counter Counter Closet Sides 0" (0 mm) 0" (0 mm) Top 0" (0 mm) 0" (0 mm) Rear...
Installation Instructions
Page 9
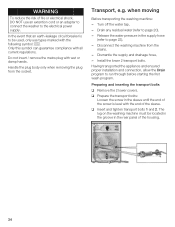
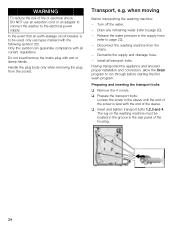
...Insert and tighten transport bolts 1,2,3 and 4. Only this symbol can guarantee compliance with all transport bolts. Transport, e.g. Drain any remaining water (refer to page 22), - q Prepare the transport bolts: Loosen the screw in the rear panel of the sleeve. The lug on the washing machine must be used, only use... an extention cord or an adapter to connect the washer to be located in the groove in the sleeve until the end of the screw is to the electrical power supply. Dismantle the supply...
...Insert and tighten transport bolts 1,2,3 and 4. Only this symbol can guarantee compliance with all transport bolts. Transport, e.g. Drain any remaining water (refer to page 22), - q Prepare the transport bolts: Loosen the screw in the rear panel of the sleeve. The lug on the washing machine must be used, only use... an extention cord or an adapter to connect the washer to be located in the groove in the sleeve until the end of the screw is to the electrical power supply. Dismantle the supply...

Operating, Care, Installation
Page 3
... and control panel 19 Cleaning the drum 19 Cleaning the detergent dispenser 19 Cleaning the drain pump 20 Cleaning water inlet strainers 22 Descaling the washing machine 23 Customer Service 23 Troubleshooting of programs 35 3 when moving 34 Overview of Minor Faults... 24 Installation Instructions Installation, Connection and Transportation . . . . . 26 Safety information 26 FactoryĆsupplied equipment 26 Dimensions 28 Installation area 28 BuiltĆ...
... and control panel 19 Cleaning the drum 19 Cleaning the detergent dispenser 19 Cleaning the drain pump 20 Cleaning water inlet strainers 22 Descaling the washing machine 23 Customer Service 23 Troubleshooting of programs 35 3 when moving 34 Overview of Minor Faults... 24 Installation Instructions Installation, Connection and Transportation . . . . . 26 Safety information 26 FactoryĆsupplied equipment 26 Dimensions 28 Installation area 28 BuiltĆ...

Operating, Care, Installation
Page 5
... or an adapter to connect the washing machine to the electriĆ cal power supply. 24. Do not insert/pull out the power plug with any problems or conditions that may result... and/or operate the washing machine according to the washing machine have shutĆoff valve(s) at high temperatures. 20. Notes: A. Use caution when draining hot water. 21. To reduce the risk of...climb onto the washing machine and do not understand. Do not sit on the open loading door. 22. The IMPORTANT SAFEGUARDS and WARNINGS presented in a cool dry place according to unplug the washing machine...
... or an adapter to connect the washing machine to the electriĆ cal power supply. 24. Do not insert/pull out the power plug with any problems or conditions that may result... and/or operate the washing machine according to the washing machine have shutĆoff valve(s) at high temperatures. 20. Notes: A. Use caution when draining hot water. 21. To reduce the risk of...climb onto the washing machine and do not understand. Do not sit on the open loading door. 22. The IMPORTANT SAFEGUARDS and WARNINGS presented in a cool dry place according to unplug the washing machine...

Operating, Care, Installation
Page 22
First release the water pressure in the supply hoses: q Turn off the water tap. 22 q Turn the program selector to Off. Cleaning the strainer(s) at the water tap On both the hot H and cold C water tap: q Disconnect the hose from ...
First release the water pressure in the supply hoses: q Turn off the water tap. 22 q Turn the program selector to Off. Cleaning the strainer(s) at the water tap On both the hot H and cold C water tap: q Disconnect the hose from ...

Operating, Care, Installation
Page 24
...tight. q Turn off the water tap. q Call Customer Service (refer to Page 22). Fault Possible cause Action The loading door cannot be seen in the detergent Detergent was washed at a high Clean the water drainage pipe and/or drain temperature. Wait for liquid detergent. Loading ...door not closed. Press the Start button. or detergent is active. Turn on . Clean the strainer (refer to Page 23). LintĆproducing laundry was damp or lumpy. Replace the drain hose. 24...
...tight. q Turn off the water tap. q Call Customer Service (refer to Page 22). Fault Possible cause Action The loading door cannot be seen in the detergent Detergent was washed at a high Clean the water drainage pipe and/or drain temperature. Wait for liquid detergent. Loading ...door not closed. Press the Start button. or detergent is active. Turn on . Clean the strainer (refer to Page 23). LintĆproducing laundry was damp or lumpy. Replace the drain hose. 24...
Operating, Care, Installation
Page 26
... be drained. Installation, Connection and Transportation Safety information CAUTION Avoid risk of accessory parts supplied with your washer. In addition to page 22. Take care not to frost. Lift with the National Electric Code, ANSI/NFPA70 ~ latest edition/State and Municipal codes and/or local codes. - Do not ...
... be drained. Installation, Connection and Transportation Safety information CAUTION Avoid risk of accessory parts supplied with your washer. In addition to page 22. Take care not to frost. Lift with the National Electric Code, ANSI/NFPA70 ~ latest edition/State and Municipal codes and/or local codes. - Do not ...

Operating, Care, Installation
Page 28
The installation area must be installed on the Bosch 12" pedestal (accessory No. If the washing machine is to be fastened or otherwise secured to an uncovered concrete floor. WMZ 2200). Pedestal Mounting For mounting the washer on a wooden floor: q If possible, place the washing... machine in a corner of the washing machine using holding brackets *. * Holding brackets (set) can be solid and even. Dimensions a = 600 mm // 23 5/8" b = 590 mm // 22 1/2" c = 852 mm // 33 1/2" Approx...
The installation area must be installed on the Bosch 12" pedestal (accessory No. If the washing machine is to be fastened or otherwise secured to an uncovered concrete floor. WMZ 2200). Pedestal Mounting For mounting the washer on a wooden floor: q If possible, place the washing... machine in a corner of the washing machine using holding brackets *. * Holding brackets (set) can be solid and even. Dimensions a = 600 mm // 23 5/8" b = 590 mm // 22 1/2" c = 852 mm // 33 1/2" Approx...

Operating, Care, Installation
Page 29
Leveling procedure All feet of the appliance must not wobble. q Tighten lock nut 1 against the housing. 29 a 570 mm minimum // 22 7/16" b 600 mm minimum // 23 5/8" c 850 mm minimum // 33 1/2" Minimum Installation Clearances Alcove or Under Counter Counter Closet Sides 0" (0 mm) 0" (0 mm) Top 0" (0 mm) 0" (0 mm) Rear 0" (0 ...
Leveling procedure All feet of the appliance must not wobble. q Tighten lock nut 1 against the housing. 29 a 570 mm minimum // 22 7/16" b 600 mm minimum // 23 5/8" c 850 mm minimum // 33 1/2" Minimum Installation Clearances Alcove or Under Counter Counter Closet Sides 0" (0 mm) 0" (0 mm) Top 0" (0 mm) 0" (0 mm) Rear 0" (0 ...

Operating, Care, Installation
Page 34
... machine from the socket. The lug on the washing machine must be used, only use an extension cord or an adapter to connect the washer to the electrical power supply. Handle the plug body only when removing the plug from the electrical outlet. - Turn off the water, -..., DO NOT use types marked with the following symbol: 7. Do not insert/remove the power cord with the end of the screw is to page 22), - Transport, e.g. Install all current regulations. Having transported the appliance and ensured proper installation and connection, allow the Drain program to page 20), -...
... machine from the socket. The lug on the washing machine must be used, only use an extension cord or an adapter to connect the washer to the electrical power supply. Handle the plug body only when removing the plug from the electrical outlet. - Turn off the water, -..., DO NOT use types marked with the following symbol: 7. Do not insert/remove the power cord with the end of the screw is to page 22), - Transport, e.g. Install all current regulations. Having transported the appliance and ensured proper installation and connection, allow the Drain program to page 20), -...