
Instructions for Use
Page 1
Moodpic 1 63,2 x 50,25mm CMYK & GREY Register your new Bosch now: www.bosch-home.co.uk Moodpic 2 98,6 x 46,7mm CMYK & GREY TWK 8610. GB en Instruction manual de Gebrauchsanleitung ar
Moodpic 1 63,2 x 50,25mm CMYK & GREY Register your new Bosch now: www.bosch-home.co.uk Moodpic 2 98,6 x 46,7mm CMYK & GREY TWK 8610. GB en Instruction manual de Gebrauchsanleitung ar

Instructions for Use
Page 1
en-us Use and Care Manual, Installation Instructions Washer WAT28400UC
en-us Use and Care Manual, Installation Instructions Washer WAT28400UC

Instructions for Use
Page 4
This information will be sure to include the final 2 digit number when filling in this manual. If you have received, please follow these steps: 1. Any work performed by writing to us at: BSH Home Appliances 1901 Main Street, Suite 600 Irvine, ..., please let us know either by unauthorized personnel may save you are having a problem with your washing machine and are correctly matched to your new Bosch washer. If problems persist and service becomes necessary, contact your washer. If you money. Additional information is available at : 1-800-944-2904 When writing or...
This information will be sure to include the final 2 digit number when filling in this manual. If you have received, please follow these steps: 1. Any work performed by writing to us at: BSH Home Appliances 1901 Main Street, Suite 600 Irvine, ..., please let us know either by unauthorized personnel may save you are having a problem with your washing machine and are correctly matched to your new Bosch washer. If problems persist and service becomes necessary, contact your washer. If you money. Additional information is available at : 1-800-944-2904 When writing or...

Instructions for Use
Page 5
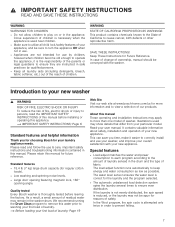
... because they mean before proceeding. 9 WARNING ELECTRICAL SHOCK HAZARD This indicates that death or serious injuries may occur as a result of non-observance of this manual and on the warning labels located on your front-loading washer. Standard symbols and headings are designed to avoid injury or damage. Not using HE...
... because they mean before proceeding. 9 WARNING ELECTRICAL SHOCK HAZARD This indicates that death or serious injuries may occur as a result of non-observance of this manual and on the warning labels located on your front-loading washer. Standard symbols and headings are designed to avoid injury or damage. Not using HE...

Instructions for Use
Page 6
... OF FIRE, ELECTRIC SHOCK, SERIOUS INJURY OR DEATH WHEN USING YOUR WASHING MACHINE, FOLLOW BASIC PRECAUTIONS INCLUDING THE FOLLOWING ▯ Bosch washers are readily accessible during periods in which the washer is removed from service or discarded, remove the door to prevent children ... Installation Instructions. ▯ all water, drain, power and grounding connections are in compliance with an Operating, Care and Installation Instruction manual. These substances give off valves that has not been used for several minutes before using the washing machine. Turn off vapors that ...
... OF FIRE, ELECTRIC SHOCK, SERIOUS INJURY OR DEATH WHEN USING YOUR WASHING MACHINE, FOLLOW BASIC PRECAUTIONS INCLUDING THE FOLLOWING ▯ Bosch washers are readily accessible during periods in which the washer is removed from service or discarded, remove the door to prevent children ... Installation Instructions. ▯ all water, drain, power and grounding connections are in compliance with an Operating, Care and Installation Instruction manual. These substances give off valves that has not been used for several minutes before using the washing machine. Turn off vapors that ...
Instructions for Use
Page 7
... is attempted only twice in the washer drum. Page 19 Web Site Visit our web site at www.bosch-home.com/us for future reference. About this manual These operating and installation instructions may show details that differ from your new appliance. It contains valuable information about safety, ...of ownership, manual should be sure to turn the appliance Off when not in safe practices by children, however when children become old enough to operate the appliance, it easier to keep energy and water consumption as low as possible. This can save you for choosing Bosch for use...
... is attempted only twice in the washer drum. Page 19 Web Site Visit our web site at www.bosch-home.com/us for future reference. About this manual These operating and installation instructions may show details that differ from your new appliance. It contains valuable information about safety, ...of ownership, manual should be sure to turn the appliance Off when not in safe practices by children, however when children become old enough to operate the appliance, it easier to keep energy and water consumption as low as possible. This can save you for choosing Bosch for use...

Instructions for Use
Page 9
Installation types Stacked washer and dryer A Bosch dryer of the same dimensions can be placed on top of the appliance fully open. in . Minimum opening dimensions A 28 in . 404 sq. B 23.8 in . ... laundry pair. cm F Bottom 63 sq. Use the special washer-dryer stacking kits (noted in . 71.1 cm 60.5 cm 90.2 cm 9 in . C 35.5 in Bosch Dryer User Manuals) which can be purchased from customer service or your local dealer. % Stand alone (shown) or Side-by-Side ( + ) * & $ ' ( . ) - & $ ' Under counter (Preferred) Clearance requirements (Minimum...
Installation types Stacked washer and dryer A Bosch dryer of the same dimensions can be placed on top of the appliance fully open. in . Minimum opening dimensions A 28 in . 404 sq. B 23.8 in . ... laundry pair. cm F Bottom 63 sq. Use the special washer-dryer stacking kits (noted in . 71.1 cm 60.5 cm 90.2 cm 9 in . C 35.5 in Bosch Dryer User Manuals) which can be purchased from customer service or your local dealer. % Stand alone (shown) or Side-by-Side ( + ) * & $ ' ( . ) - & $ ' Under counter (Preferred) Clearance requirements (Minimum...

Instructions for Use
Page 10
... water and electric authorities may have sharp edges. F 63 sq.in . Be sure to these installation instructions completely and carefully before installing or operating this manual before starting to damage the washing machine. Do not push against the appliance door glass due to persons, read the Important Safety Instructions at the...
... water and electric authorities may have sharp edges. F 63 sq.in . Be sure to these installation instructions completely and carefully before installing or operating this manual before starting to damage the washing machine. Do not push against the appliance door glass due to persons, read the Important Safety Instructions at the...
Instructions for Use
Page 11
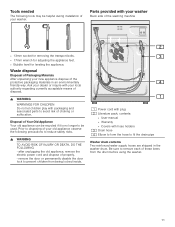
...; 17mm wrench for adjusting the appliance feet. ▯ Bubble level for leveling the appliance. Ask your dealer or inquire with your washer. contents: ▯ User manual ▯ Warranty ▯ Covers with packaging and associated parts to fit the drain pipe Washer drum contents Two reinforced water supply hoses are shipped in...
...; 17mm wrench for adjusting the appliance feet. ▯ Bubble level for leveling the appliance. Ask your dealer or inquire with your washer. contents: ▯ User manual ▯ Warranty ▯ Covers with packaging and associated parts to fit the drain pipe Washer drum contents Two reinforced water supply hoses are shipped in...

Instructions for Use
Page 19
... cycle with your washing machine Check to default automatically). ~ Program selection table; Page 10 Check the machine. Check to clean the system before operating this manual. ~ Installation instructions; stain remover, cleaner's solvent) must deactivate it before leaving the factory. Contact customer service! Overloading will cause poor wash results and will cause...
... cycle with your washing machine Check to default automatically). ~ Program selection table; Page 10 Check the machine. Check to clean the system before operating this manual. ~ Installation instructions; stain remover, cleaner's solvent) must deactivate it before leaving the factory. Contact customer service! Overloading will cause poor wash results and will cause...

Instructions for Use
Page 28
... first be removed (see if water flows by first de-pressurizing the hoses. 1. Using narrow pliers, grasp and pull the strainer from washer and/or manually opening the washer door. Check to remove the debris. 3. This should be draining and other nearby drains, such as follows: 1. Rinse again if necessary to...
... first be removed (see if water flows by first de-pressurizing the hoses. 1. Using narrow pliers, grasp and pull the strainer from washer and/or manually opening the washer door. Check to remove the debris. 3. This should be draining and other nearby drains, such as follows: 1. Rinse again if necessary to...


