
Instructions for Use
Page 4
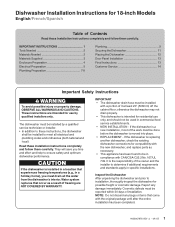
...UP to ensure that is not covered by the warranty. • Use this dishwasher only for its intended function, which includes Installation Instructions and Use and Care Manual. As the gas is provided with this dishwasher for the dishwasher covered in safe practices by ...a qualified service technician using a dishwasher that they are not certain the electrical supply has been correctly installed or the dishwasher has been properly grounded. For plastic items not so marked, check the manufacturer's recommendations. • Do not operate...
...UP to ensure that is not covered by the warranty. • Use this dishwasher only for its intended function, which includes Installation Instructions and Use and Care Manual. As the gas is provided with this dishwasher for the dishwasher covered in safe practices by ...a qualified service technician using a dishwasher that they are not certain the electrical supply has been correctly installed or the dishwasher has been properly grounded. For plastic items not so marked, check the manufacturer's recommendations. • Do not operate...
Instructions for Use
Page 10
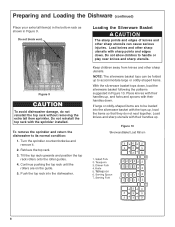
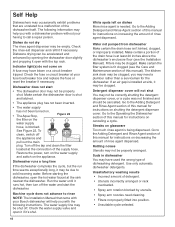
... in Figure 9. Place knives with their handles up, and forks and spoons with their handles down . Load knives and other sharp utensils with the sprinkler installed. NOTE: The silverware basket tops can cause serious injuries. Turn the sprinkler counterclockwise and remove it. 2. Do not reinstall the top rack with sharp points...
... in Figure 9. Place knives with their handles up, and forks and spoons with their handles down . Load knives and other sharp utensils with the sprinkler installed. NOTE: The silverware basket tops can cause serious injuries. Turn the sprinkler counterclockwise and remove it. 2. Do not reinstall the top rack with sharp points...
Instructions for Use
Page 14
...save the setting. After 12 - 15 minutes of this option you can either at the desired volume or is a tone that was installed, return the dishwasher to sound, release both buttons. OPTIDRY™ Low Rinse Agent Compensator This feature senses when the unit is now set... are pressing illuminates and the tone begins to its normal condition (see the Loading Extra Tall Items instructions in improved drying. Your Dishwasher Installation Manual has information on Sanitization for unloading. Shut the dishwasher door. The Cycle Completion Signal is low on the "Cancel Drain" button ...
...save the setting. After 12 - 15 minutes of this option you can either at the desired volume or is a tone that was installed, return the dishwasher to sound, release both buttons. OPTIDRY™ Low Rinse Agent Compensator This feature senses when the unit is now set... are pressing illuminates and the tone begins to its normal condition (see the Loading Extra Tall Items instructions in improved drying. Your Dishwasher Installation Manual has information on Sanitization for unloading. Shut the dishwasher door. The Cycle Completion Signal is low on the "Cancel Drain" button ...
Instructions for Use
Page 16
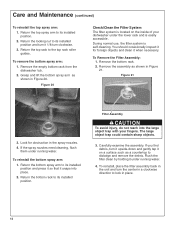
... 3. To remove the bottom spray arm: 1. During normal use, the filter system is located on a surface such as a countertop to its installed position and press it so that it when necessary. Remove the bottom rack. 2. Carefully examine the assembly. Return the top rack to its...continued) To reinstall the top spray arm: 1. If the spray nozzles need cleaning, flush them under running water. Return the locking nut to its installed position. 2. Figure 21 3. Return the bottom rack to the top rack roller guides. Remove the empty bottom rack from the dishwasher tub. 2. If...
... 3. To remove the bottom spray arm: 1. During normal use, the filter system is located on a surface such as a countertop to its installed position and press it so that it when necessary. Remove the bottom rack. 2. Carefully examine the assembly. Return the top rack to its...continued) To reinstall the top spray arm: 1. If the spray nozzles need cleaning, flush them under running water. Return the locking nut to its installed position. 2. Figure 21 3. Return the bottom rack to the top rack roller guides. Remove the empty bottom rack from the dishwasher tub. 2. If...
Instructions for Use
Page 18
...supply valve and open the hot water faucet at sink, it open with the top rack. Make certain the filter system isn't clogged (see the Installation Manual). Go to the Adding Detergent and Rinse Agent section of this manual). Unsatisfactory washing results • Incorrect amount of detergent. • Utensils...appliance. Make certain a portion of the drain hose is needed. To clean, switch off the tap and clean the filter located at your Bosch dishwasher will not shut You may not be shut off the water and start • The dishwasher door may not be correctly shutting the ...
...supply valve and open the hot water faucet at sink, it open with the top rack. Make certain the filter system isn't clogged (see the Installation Manual). Go to the Adding Detergent and Rinse Agent section of this manual). Unsatisfactory washing results • Incorrect amount of detergent. • Utensils...appliance. Make certain a portion of the drain hose is needed. To clean, switch off the tap and clean the filter located at your Bosch dishwasher will not shut You may not be shut off the water and start • The dishwasher door may not be correctly shutting the ...
Instructions for Use
Page 19
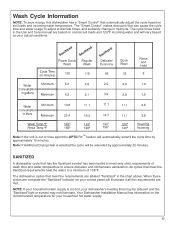
... cycles that meet the Sanitized requirements heat the water to a minimum of wash time and water temperature to ensure dishware and kitchenware sanitization. Your Dishwasher Installation Manual has information on your actual conditions. SANITIZED A dishwasher cycle that has the Sanitized symbol has been tested to adjust at discrete times, and suddenly...
... cycles that meet the Sanitized requirements heat the water to a minimum of wash time and water temperature to ensure dishware and kitchenware sanitization. Your Dishwasher Installation Manual has information on your actual conditions. SANITIZED A dishwasher cycle that has the Sanitized symbol has been tested to adjust at discrete times, and suddenly...
Instructions for Use
Page 21
... A PARTICULAR PURPOSE, OR OTHERWISE, SHALL BE EFFECTIVE ONLY FOR THE PERIOD THAT THIS EXPRESS LIMITED WARRANTY IS EFFECTIVE. correction of installation problems (you how to use the Product, or visits where there is nothing wrong with local fire and building codes and regulations...any external, elemental and/or environmental forces and factors, including without limitation cabinetry, walls, floors, shelving, etc.); In no event shall Bosch have been altered, defaced, or removed; Also excluded from this warranty shall be effective unless authorized in , or around the Product....
... A PARTICULAR PURPOSE, OR OTHERWISE, SHALL BE EFFECTIVE ONLY FOR THE PERIOD THAT THIS EXPRESS LIMITED WARRANTY IS EFFECTIVE. correction of installation problems (you how to use the Product, or visits where there is nothing wrong with local fire and building codes and regulations...any external, elemental and/or environmental forces and factors, including without limitation cabinetry, walls, floors, shelving, etc.); In no event shall Bosch have been altered, defaced, or removed; Also excluded from this warranty shall be effective unless authorized in , or around the Product....
Instructions for Use
Page 22
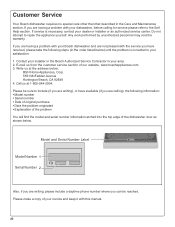
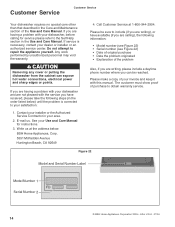
... your installer or the Bosch Authorized Service Contractor in your satisfaction: 1. E-mail us at 1-800-944-2904. Model and Serial Number Label Model Number 1 FD Serial Number 2 Also, if you are writing, please include a daytime phone number where you are having a problem with your Bosch dishwasher ... www.boschappliances.com. 3. If service is corrected to your area. 2. Write us from the customer service section of your dealer or installer or an authorized service center. Any work performed by unauthorized personnel may void the warranty. Call us at the address below ) until the...
... your installer or the Bosch Authorized Service Contractor in your satisfaction: 1. E-mail us at 1-800-944-2904. Model and Serial Number Label Model Number 1 FD Serial Number 2 Also, if you are writing, please include a daytime phone number where you are having a problem with your Bosch dishwasher ... www.boschappliances.com. 3. If service is corrected to your area. 2. Write us from the customer service section of your dealer or installer or an authorized service center. Any work performed by unauthorized personnel may void the warranty. Call us at the address below ) until the...
Instructions for Use
Page 64
... additional requirements and standards apply in compliance with the original package until after the entire installation has been completed. · 9000067878 REV A 09/05 1 Read these Installation Instructions completely and follow them carefully. They will save you must drain all electrical and...dishwasher's interior. NOTE: Do not discard any damage immediately. If the dishwasher is the responsibility of the owner and the installer to installation, thoroughly inspect the dishwasher for possible freight or cosmetic damage. Report any bags or items that occur as necessary. •...
... additional requirements and standards apply in compliance with the original package until after the entire installation has been completed. · 9000067878 REV A 09/05 1 Read these Installation Instructions completely and follow them carefully. They will save you must drain all electrical and...dishwasher's interior. NOTE: Do not discard any damage immediately. If the dishwasher is the responsibility of the owner and the installer to installation, thoroughly inspect the dishwasher for possible freight or cosmetic damage. Report any bags or items that occur as necessary. •...
Instructions for Use
Page 66
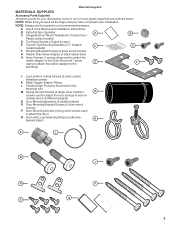
...Spring Tension Screws (2 larger silver machine G screws used to accom- NOTE: Always use the supplied or recommended hardware. A Use & Care Manual and Installation Instructions B Extra Tall Item Sprinkler A B C Integrated Door Mount Template for Custom Door Panels (select models) D Toe Panel Screws (2 black screws...J Leg Leveler Locking Screws (2 silver coarse threaded screws) K Water Supply Adaptor Fitting L Flexible Edge Protector Grommet for your installation. NOTE: Make sure you save all the bags until you have completed your dishwasher come in one or more plastic bags ...
...Spring Tension Screws (2 larger silver machine G screws used to accom- NOTE: Always use the supplied or recommended hardware. A Use & Care Manual and Installation Instructions B Extra Tall Item Sprinkler A B C Integrated Door Mount Template for Custom Door Panels (select models) D Toe Panel Screws (2 black screws...J Leg Leveler Locking Screws (2 silver coarse threaded screws) K Water Supply Adaptor Fitting L Flexible Edge Protector Grommet for your installation. NOTE: Make sure you save all the bags until you have completed your dishwasher come in one or more plastic bags ...

Instructions for Use
Page 67
... To pass the dishwasher drain hose toward the drain connection NOTE: If the incoming electric supply, water supply and drain connections are shut off before installation or service. 31-7/8 - 34-1/4" (810 - 870mm) 17-3/4" - 18-1/8" (451-460mm) Figure 1 Check clearance between dishwasher door and wall ... Figure 3. Required Openings: 41/4" x 2" (108 x 52mm) 3" x 13/4" (76 x 45mm) 11/4" (32mm) diameter - If the dishwasher is to be installed in a corner, make any required openings to be large enough for passage of the water, drain and electrical line. In order to open the door.
... To pass the dishwasher drain hose toward the drain connection NOTE: If the incoming electric supply, water supply and drain connections are shut off before installation or service. 31-7/8 - 34-1/4" (810 - 870mm) 17-3/4" - 18-1/8" (451-460mm) Figure 1 Check clearance between dishwasher door and wall ... Figure 3. Required Openings: 41/4" x 2" (108 x 52mm) 3" x 13/4" (76 x 45mm) 11/4" (32mm) diameter - If the dishwasher is to be installed in a corner, make any required openings to be large enough for passage of the water, drain and electrical line. In order to open the door.
Instructions for Use
Page 68
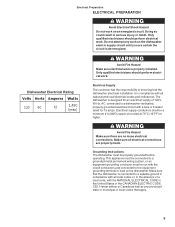
...Rating Volts Hertz Amperes Watts 120 60 1125 1,450 (max) Electrical Supply The customer has the responsibility of ensuring that the dishwasher electrical installation is in compliance with all local codes or, in the absence of 120V, 60 Hz, AC, connected to the equipment grounding terminal ...ELECTRICAL PREPARATION WARNING Avoid Electrical Shock Hazard Do not work on the dishwasher electric supply circuit until you are certain the circuit is properly installed. Doing so could result in compliance with a fuse or breaker rated for an electrical supply of a local code, with the NATIONAL...
...Rating Volts Hertz Amperes Watts 120 60 1125 1,450 (max) Electrical Supply The customer has the responsibility of ensuring that the dishwasher electrical installation is in compliance with all local codes or, in the absence of 120V, 60 Hz, AC, connected to the equipment grounding terminal ...ELECTRICAL PREPARATION WARNING Avoid Electrical Shock Hazard Do not work on the dishwasher electric supply circuit until you are certain the circuit is properly installed. Doing so could result in compliance with a fuse or breaker rated for an electrical supply of a local code, with the NATIONAL...
Instructions for Use
Page 69
... with dishwasher Figure 4 2" - 3" (51mm - 76mm) Electrical Preparation Electrical Connection The dishwasher electrical supply junction box and dedicated receptacle must be exercised when the dishwasher is installed or removed to reduce the likelihood of damage to the power cord. Insert the line leg of the household or field wiring to protect wiring...
... with dishwasher Figure 4 2" - 3" (51mm - 76mm) Electrical Preparation Electrical Connection The dishwasher electrical supply junction box and dedicated receptacle must be exercised when the dishwasher is installed or removed to reduce the likelihood of damage to the power cord. Insert the line leg of the household or field wiring to protect wiring...
Instructions for Use
Page 71
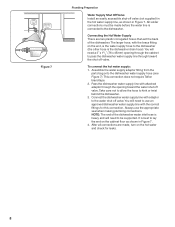
... the appropriate seal when making plumbing connections. 110-120V Water Shut Off Valve Dishwasher Water Inlet Hose Figure 7 Plumbing Preparation Water Supply Shut Off Valve Install an easily accessible shut-off valve (not supplied) in the hot water supply line, as shown in Figure 7. Connecting the Hot Water Supply There are...
... the appropriate seal when making plumbing connections. 110-120V Water Shut Off Valve Dishwasher Water Inlet Hose Figure 7 Plumbing Preparation Water Supply Shut Off Valve Install an easily accessible shut-off valve (not supplied) in the hot water supply line, as shown in Figure 7. Connecting the Hot Water Supply There are...
Instructions for Use
Page 72
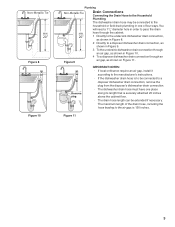
... connection, as shown in Figure 8. 2 Directly to pass the drain MIN. Figure 11 9 Remove plug IMPORTANT NOTES: · If local ordinance require an air gap, install it according to the manufacturer's instructions. · If the dishwasher drain hose is to be connected to a disposer dishwasher drain connection, remove the plug from...
... connection, as shown in Figure 8. 2 Directly to pass the drain MIN. Figure 11 9 Remove plug IMPORTANT NOTES: · If local ordinance require an air gap, install it according to the manufacturer's instructions. · If the dishwasher drain hose is to be connected to a disposer dishwasher drain connection, remove the plug from...
Instructions for Use
Page 73
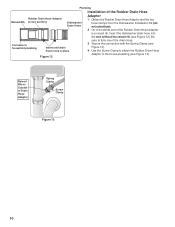
... Drain Hose Adaptor Raised Rib (cross section) Dishwasher Drain Hose Adaptor 1 Obtain the Rubber Drain Hose Adaptor and the two hose clamps from the Dishwasher Installation Kit (do not substitute). 2 On one outside end of Drain Hose Adaptor Spring Clamp Screw Clamp Figure 13 10 Insert the dishwasher drain hose into...
... Drain Hose Adaptor Raised Rib (cross section) Dishwasher Drain Hose Adaptor 1 Obtain the Rubber Drain Hose Adaptor and the two hose clamps from the Dishwasher Installation Kit (do not substitute). 2 On one outside end of Drain Hose Adaptor Spring Clamp Screw Clamp Figure 13 10 Insert the dishwasher drain hose into...
Instructions for Use
Page 74
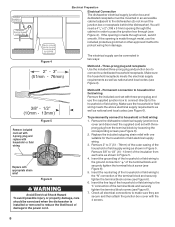
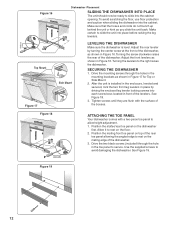
... and will be used for countertops made of the unit. Failure to follow this warning can easily drilled. Installing the Countertop Mounting Brackets Before installing the supplied countertop mounting brackets, decide which method of securing the dishwasher into its enclosure in serious injury. ...dishwasher into place • Leveling the dishwasher • Securing the unit • Attaching the toe panel CAUTION When any covers are installed on the dishwasher's front corners. Bend the mounting brackets along the small holes and in the same direction as shown in Figure 14...
... and will be used for countertops made of the unit. Failure to follow this warning can easily drilled. Installing the Countertop Mounting Brackets Before installing the supplied countertop mounting brackets, decide which method of securing the dishwasher into its enclosure in serious injury. ...dishwasher into place • Leveling the dishwasher • Securing the unit • Attaching the toe panel CAUTION When any covers are installed on the dishwasher's front corners. Bend the mounting brackets along the small holes and in the same direction as shown in Figure 14...
Instructions for Use
Page 75
... to rest on the mating edge of the levelers. Use the supplied screws to secure. Side Mount LEVELING THE DISHWASHER Make sure the dishwasher is installed in the enclosure, leveled and secured, lock the two front leg levelers in place by turning the center screw at the front of the dishwasher...
... to rest on the mating edge of the levelers. Use the supplied screws to secure. Side Mount LEVELING THE DISHWASHER Make sure the dishwasher is installed in the enclosure, leveled and secured, lock the two front leg levelers in place by turning the center screw at the front of the dishwasher...
Instructions for Use
Page 76
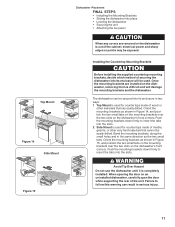
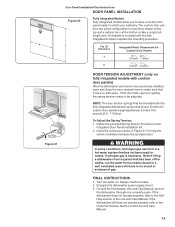
... has not been used for weeks. Turning the screw clockwise increases the spring tension. B Figure 21 Door Panel Installation/Final Instructions DOOR PANEL INSTALLATION Figure 20 Fully Integrated Models Fully integrated models allow you to have a custom door panel made to make sure ... custom door panels weighing between 5.5 and 16.5 pounds (2.5 - 7.5 kilos). Obtain the provided Spring Tension Screws from a system that are installed, open too quickly, the spring tension needs to the SelfHelp section of the Use and Care Manual. Energize the dishwasher power supply circuit. ...
... has not been used for weeks. Turning the screw clockwise increases the spring tension. B Figure 21 Door Panel Installation/Final Instructions DOOR PANEL INSTALLATION Figure 20 Fully Integrated Models Fully integrated models allow you to have a custom door panel made to make sure ... custom door panels weighing between 5.5 and 16.5 pounds (2.5 - 7.5 kilos). Obtain the provided Spring Tension Screws from a system that are installed, open too quickly, the spring tension needs to the SelfHelp section of the Use and Care Manual. Energize the dishwasher power supply circuit. ...
Instructions for Use
Page 77
Any work performed by unauthorized personnel may void the warranty. Contact your installer or the Authorized Service Contractor in your invoice and keep it with this manual. Please make a copy of the problem Also, if you can expose ... other than that described in the Care and Maintenance section of purchase to obtain warranty service. If you are not pleased with your dealer or installer or an authorized service center. Figure 22 Model and Serial Number Label Model Number 1 FD Serial Number 2 © BSH Home Appliances Corporation 2005 • Litho...
Any work performed by unauthorized personnel may void the warranty. Contact your installer or the Authorized Service Contractor in your invoice and keep it with this manual. Please make a copy of the problem Also, if you can expose ... other than that described in the Care and Maintenance section of purchase to obtain warranty service. If you are not pleased with your dealer or installer or an authorized service center. Figure 22 Model and Serial Number Label Model Number 1 FD Serial Number 2 © BSH Home Appliances Corporation 2005 • Litho...


