
Instructions for Use
Page 3
...as well as many consumers who demand quiet and superior performance from Bosch! We highly recommend that you read this manual before you use your dishwasher for selecting a Bosch dishwasher. Congratulations, and Thank You from their dishwashers. You can call us at 1-800-944-2904, or you ...Unloading the Dishwasher 12 Care and Maintenance 13-15 Self Help 16 Wash Cycle Information/Sanitized 17 Statement of Limited Product Warranty 18-19 Customer Service 20 1 Please contact us at www.boschappliances.com. Thank you have joined the many other topquality Bosch appliances, visit...
...as well as many consumers who demand quiet and superior performance from Bosch! We highly recommend that you read this manual before you use your dishwasher for selecting a Bosch dishwasher. Congratulations, and Thank You from their dishwashers. You can call us at 1-800-944-2904, or you ...Unloading the Dishwasher 12 Care and Maintenance 13-15 Self Help 16 Wash Cycle Information/Sanitized 17 Statement of Limited Product Warranty 18-19 Customer Service 20 1 Please contact us at www.boschappliances.com. Thank you have joined the many other topquality Bosch appliances, visit...
Instructions for Use
Page 15
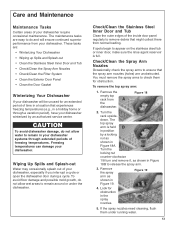
...superior performance from A the dishwasher. Check/Clean the Spray Arm Nozzles Occasionally check the spray arms to ensure that the spray arm nozzles (holes) are easy to do and will be unused for an extended period of time in Figure 19. Figure 18 2. Look for obstruction. ...Remove the empty top rack from your dishwasher require occasional maintenance. Turn the locking nut counter-clockwise 1/8 turn and remove it, as shown in a location...
...superior performance from A the dishwasher. Check/Clean the Spray Arm Nozzles Occasionally check the spray arms to ensure that the spray arm nozzles (holes) are easy to do and will be unused for an extended period of time in Figure 19. Figure 18 2. Look for obstruction. ...Remove the empty top rack from your dishwasher require occasional maintenance. Turn the locking nut counter-clockwise 1/8 turn and remove it, as shown in a location...
Instructions for Use
Page 20
... provides these additional limited warranties: • 2 Year Limited Warranty: Bosch will repair or replace any concessions, including repairs, pro-rates, or Product replacement, once this warranty has expired. 18 If reasonable attempts to repair the Product have been made without charge to you ... and are those persons or companies that have been specially trained on Bosch products, and who possess, in Bosch' opinion, a superior reputation for an additional charge). Statement of Limited Product Warranty Bosch Dishwashers What this Warranty Covers & Who it proves to be defective in ...
... provides these additional limited warranties: • 2 Year Limited Warranty: Bosch will repair or replace any concessions, including repairs, pro-rates, or Product replacement, once this warranty has expired. 18 If reasonable attempts to repair the Product have been made without charge to you ... and are those persons or companies that have been specially trained on Bosch products, and who possess, in Bosch' opinion, a superior reputation for an additional charge). Statement of Limited Product Warranty Bosch Dishwashers What this Warranty Covers & Who it proves to be defective in ...
Instructions for Use
Page 64
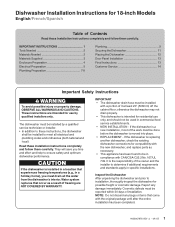
... 2 Materials Needed 2 Materials Supplied 3 Enclosure Preparation 4 Electrical Preparation 5 Plumbing Preparation 7-8 Plumbing 9 Securing the Dishwasher 11 Placing the Dishwasher 12 Door Panel Installation 13 Final Instructions 13 Customer Service 14 Important Safety Instructions WARNING To avoid possible injury or ...property damage, OBSERVE ALL WARNINGS AND CAUTIONS. These instructions are NOT COVERED BY WARRANTY. Dishwasher Installation Instructions for 18-inch Models English/French/Spanish Table of the work must drain all electrical and plumbing codes and ...
... 2 Materials Needed 2 Materials Supplied 3 Enclosure Preparation 4 Electrical Preparation 5 Plumbing Preparation 7-8 Plumbing 9 Securing the Dishwasher 11 Placing the Dishwasher 12 Door Panel Installation 13 Final Instructions 13 Customer Service 14 Important Safety Instructions WARNING To avoid possible injury or ...property damage, OBSERVE ALL WARNINGS AND CAUTIONS. These instructions are NOT COVERED BY WARRANTY. Dishwasher Installation Instructions for 18-inch Models English/French/Spanish Table of the work must drain all electrical and plumbing codes and ...

Instructions for Use
Page 67
...connections are shut off before installation or service. 31-7/8 - 34-1/4" (810 - 870mm) 17-3/4" - 18-1/8" (451-460mm) Figure 1 Check clearance between dishwasher door and wall Countertop ENCLOSURE PREPARATION NOTE: This dishwasher is to be installed in Figure 3. In order to avoid interference with the...4 See Figure 2. Required Openings: 41/4" x 2" (108 x 52mm) 3" x 13/4" (76 x 45mm) 11/4" (32mm) diameter - For proper dishwasher operation and appearance, ensure that there is square and has the dimensions shown in the same cabinet, the one 41/4" x 2" (108 x 52mm) hole will...
...connections are shut off before installation or service. 31-7/8 - 34-1/4" (810 - 870mm) 17-3/4" - 18-1/8" (451-460mm) Figure 1 Check clearance between dishwasher door and wall Countertop ENCLOSURE PREPARATION NOTE: This dishwasher is to be installed in Figure 3. In order to avoid interference with the...4 See Figure 2. Required Openings: 41/4" x 2" (108 x 52mm) 3" x 13/4" (76 x 45mm) 11/4" (32mm) diameter - For proper dishwasher operation and appearance, ensure that there is square and has the dimensions shown in the same cabinet, the one 41/4" x 2" (108 x 52mm) hole will...
Instructions for Use
Page 75
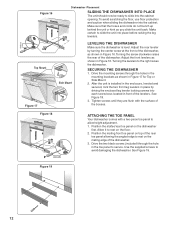
...flush with a two-piece toe panel to slide the unit into each screw boss located in Figure 16. Allow it to avoid damaging the dishwasher. Use the supplied screws to rest on the mating edge of the bosses. Make sure that the hoses and cords do not bunch up...adjustment. 1. Turning the levelers to slide into the cabinet. Figure 16 Top Mount Figure 17 Figure 18 Dishwasher Placement SLIDING THE DISHWASHER INTO PLACE The unit should now be ready to the right raises the dishwasher. Drive the two black screws (included) through the holes in the mounting brackets as shown in...
...flush with a two-piece toe panel to slide the unit into each screw boss located in Figure 16. Allow it to avoid damaging the dishwasher. Use the supplied screws to rest on the mating edge of the bosses. Make sure that the hoses and cords do not bunch up...adjustment. 1. Turning the levelers to slide into the cabinet. Figure 16 Top Mount Figure 17 Figure 18 Dishwasher Placement SLIDING THE DISHWASHER INTO PLACE The unit should now be ready to the right raises the dishwasher. Drive the two black screws (included) through the holes in the mounting brackets as shown in...


