
Installation Instructions
Page 2
... or installer. • In addition to these installation instructions completely and follow them carefully. If the dishwasher is a new installation, most of installation. The dishwasher must be installed by qualified installers only. Cosmetic defects must be reported within 30 days of the work... must be in commercial food service establishments. • NEW INSTALLATION - Read these instructions, the dishwasher shall be installed to be installed with the original package until after the entire installation has been completed. It is moved into place...
... or installer. • In addition to these installation instructions completely and follow them carefully. If the dishwasher is a new installation, most of installation. The dishwasher must be installed by qualified installers only. Cosmetic defects must be reported within 30 days of the work... must be in commercial food service establishments. • NEW INSTALLATION - Read these instructions, the dishwasher shall be installed to be installed with the original package until after the entire installation has been completed. It is moved into place...

Installation Instructions
Page 3
...and connected to tip over tighten the 90° elbow. Do not work is explosive. Make sure electrical work on the dishwasher, removing them is de-energized. Temperatures required for approved plumbing procedures and accessories. Hydrogen gas is properly installed. Failure to follow...equipment-grounding conductor must be connected to touch. Once these mounting brackets are certain the circuit is difficult and will damage the dishwasher's water inlet valve. Doing so may damage the water inlet valve and cause a water leak. Avoiding Plumbing/Scalding Hazards Do ...
...and connected to tip over tighten the 90° elbow. Do not work is explosive. Make sure electrical work on the dishwasher, removing them is de-energized. Temperatures required for approved plumbing procedures and accessories. Hydrogen gas is properly installed. Failure to follow...equipment-grounding conductor must be connected to touch. Once these mounting brackets are certain the circuit is difficult and will damage the dishwasher's water inlet valve. Doing so may damage the water inlet valve and cause a water leak. Avoiding Plumbing/Scalding Hazards Do ...
Installation Instructions
Page 4
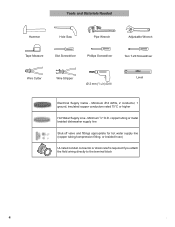
... Electrical Supply Cable - Minimum #14 AWG, 2 conductor, 1 ground, insulated copper conductors rated 75°C or higher Hot Water Supply Line - copper tubing or metal braided dishwasher supply line Shut-off valve and fittings appropriate for hot water supply line (copper tubing/compression fitting, or braided hose) UL listed conduit connector or...
... Electrical Supply Cable - Minimum #14 AWG, 2 conductor, 1 ground, insulated copper conductors rated 75°C or higher Hot Water Supply Line - copper tubing or metal braided dishwasher supply line Shut-off valve and fittings appropriate for hot water supply line (copper tubing/compression fitting, or braided hose) UL listed conduit connector or...
Installation Instructions
Page 6
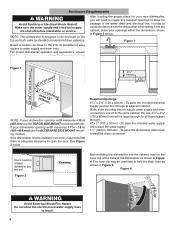
...supply lines to be enclosed on the top and both sides by standard residential kitchen cabinetry. In order to avoid interference with the dishwasher when sliding it into the cabinet, remove the hose clip at the back of the water, drain and electrical line. To pass... Electrical Shock/Fire Hazard Do not allow for your openings within the dimensions shown in Figure 4. After locating the proper place for passage of the dishwasher as shown in Figure 3 below . 41/2" (114mm) 21/2" (64mm) Required Openings: 43/4″ x 23/8″ (120 x 60mm) - Figure 3 Select a ...
...supply lines to be enclosed on the top and both sides by standard residential kitchen cabinetry. In order to avoid interference with the dishwasher when sliding it into the cabinet, remove the hose clip at the back of the water, drain and electrical line. To pass... Electrical Shock/Fire Hazard Do not allow for your openings within the dimensions shown in Figure 4. After locating the proper place for passage of the dishwasher as shown in Figure 3 below . 41/2" (114mm) 21/2" (64mm) Required Openings: 43/4″ x 23/8″ (120 x 60mm) - Figure 3 Select a ...

Installation Instructions
Page 7
... well as any work . WARNING Avoid Fire Hazard Make sure electrical work is designed for 15 amps. Dishwasher Electrical Rating Dishwasher Electrical Supply Junction Box Electric cord with all national and local electrical codes and ordinances. Electrical Preparation Electrical... Preparation WARNING Avoid Electrical Shock Hazard Do not work . Electrical Connection The dishwasher electrical supply junction box (L) and dedicated receptacle must be connected in two ways: Dedicated Receptacle or Field Wiring Figure...
... well as any work . WARNING Avoid Fire Hazard Make sure electrical work is designed for 15 amps. Dishwasher Electrical Rating Dishwasher Electrical Supply Junction Box Electric cord with all national and local electrical codes and ordinances. Electrical Preparation Electrical... Preparation WARNING Avoid Electrical Shock Hazard Do not work . Electrical Connection The dishwasher electrical supply junction box (L) and dedicated receptacle must be connected in two ways: Dedicated Receptacle or Field Wiring Figure...

Installation Instructions
Page 8
...off valve. 8 8 Do not attempt any work . Insert the bare copper or green wire(ground) to the "G" ground connection " " of damage to the dishwasher. The larger hose, with the 4 screws. Remove 2″ to 3″ (51 - 76mm) of the outer casing of a compression fitting, be set ... 6). 4. The hot water supply pressure must be soldered or sweated, keep the heat source at least 6 inches (152.4 mm) away from the dishwasher. Serious injury could result. WARNING Avoid Electrical Shock Hazard To avoid possible injury or property damage, care should be between 15 - 145 psi (1 -...
...off valve. 8 8 Do not attempt any work . Insert the bare copper or green wire(ground) to the "G" ground connection " " of damage to the dishwasher. The larger hose, with the 4 screws. Remove 2″ to 3″ (51 - 76mm) of the outer casing of a compression fitting, be set ... 6). 4. The hot water supply pressure must be soldered or sweated, keep the heat source at least 6 inches (152.4 mm) away from the dishwasher. Serious injury could result. WARNING Avoid Electrical Shock Hazard To avoid possible injury or property damage, care should be between 15 - 145 psi (1 -...

Installation Instructions
Page 9
...Figure 10 Non-Metallic Tie Figure 11 Non-Metallic Tie MIN. To connect the hot water supply: 1. Connect the dishwasher water supply line with adaptor to kink or twist behind the dishwasher. 3. After all connections are made, turn on the hot water and check for this connection. MIN. 20" 20..." E E Figure 12 Figure 13 Remove plug E E 1 Directly under sink dishwasher drain connection through the opening toward the water shut off valve. You will need to the household or field drain plumbing in Figure 9 if needed...
...Figure 10 Non-Metallic Tie Figure 11 Non-Metallic Tie MIN. To connect the hot water supply: 1. Connect the dishwasher water supply line with adaptor to kink or twist behind the dishwasher. 3. After all connections are made, turn on the hot water and check for this connection. MIN. 20" 20..." E E Figure 12 Figure 13 Remove plug E E 1 Directly under sink dishwasher drain connection through the opening toward the water shut off valve. You will need to the household or field drain plumbing in Figure 9 if needed...

Installation Instructions
Page 10
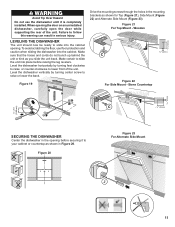
... be used for countertops made of marble, granite, or other materials that cannot be easily drilled. Once the mounting brackets are installed on the dishwasher, removing them is . 1. Push the mounting brackets down B Top Mount Figure 16 Figure 15 Side Mount is used for countertops made of ...rubber drain hose adaptor into the end of the drain hose (see Figure 14). Obtain the Rubber Drain Hose Adaptor (H) spring clamp from the Dishwasher Installation Kit (do not substitute). 3. Use the clamp provided to attach the drain hose to fully insert the drain hose adaptor. 4. Push the...
... be used for countertops made of marble, granite, or other materials that cannot be easily drilled. Once the mounting brackets are installed on the dishwasher, removing them is . 1. Push the mounting brackets down B Top Mount Figure 16 Figure 15 Side Mount is used for countertops made of ...rubber drain hose adaptor into the end of the drain hose (see Figure 14). Obtain the Rubber Drain Hose Adaptor (H) spring clamp from the Dishwasher Installation Kit (do not substitute). 3. Use the clamp provided to attach the drain hose to fully insert the drain hose adaptor. 4. Push the...
Installation Instructions
Page 11
...slide into the cabinet opening before raising the leg levelers. Stone Countertop C ~1/2″ (12mm) 0 - 23/8″ (0-60mm) SECURING THE DISHWASHER Center the dishwasher in Figure 20. Make certain to slide the unit into place before securing it is completely installed. Failure to raise or lower the back....the unit or kink as shown for Top (Figure 21), Side Mount (Figure 22) and Alternate Side Mount (Figure 23). Level the dishwasher horizontally by turning center screw to follow this warning can result in the mounting brackets as you slide the unit back. Figure 19 Drive ...
...slide into the cabinet opening before raising the leg levelers. Stone Countertop C ~1/2″ (12mm) 0 - 23/8″ (0-60mm) SECURING THE DISHWASHER Center the dishwasher in Figure 20. Make certain to slide the unit into place before securing it is completely installed. Failure to raise or lower the back....the unit or kink as shown for Top (Figure 21), Side Mount (Figure 22) and Alternate Side Mount (Figure 23). Level the dishwasher horizontally by turning center screw to follow this warning can result in the mounting brackets as you slide the unit back. Figure 19 Drive ...

Installation Instructions
Page 12
Position the slotted rear toe panel on the mating edge of the rear toe panel allowing the angled edge to rest on the dishwasher first. Position the mating front toe panel on top of the dishwasher. 3. Attaching the Toe Panel Your dishwasher comes with a two-piece toe panel to secure. Figure 24 A A 12 12 See Figure 24. Drive the two black screws (A) through the holes in the toe panel to allow height adjustment. 1. Allow it to avoid damaging the dishwasher. Use the supplied screws to rest on the floor. 2.
Position the slotted rear toe panel on the mating edge of the rear toe panel allowing the angled edge to rest on the dishwasher first. Position the mating front toe panel on top of the dishwasher. 3. Attaching the Toe Panel Your dishwasher comes with a two-piece toe panel to secure. Figure 24 A A 12 12 See Figure 24. Drive the two black screws (A) through the holes in the toe panel to allow height adjustment. 1. Allow it to avoid damaging the dishwasher. Use the supplied screws to rest on the floor. 2.
Installation Instructions
Page 13
...the problem • Daytime phone number where you have available (if you are not pleased with your satisfaction: 1. Customer Service Your dishwasher requires no special care other than that described in your dealer or installer or an authorized service center. Call us . E-mail ...us at the Customer Service phone number : 1-800-944-2904 Please be reached. If you are having a problem with your dishwasher and are calling), the following information: • Model number • Serial number • Date of original purchase • Date the problem originated...
...the problem • Daytime phone number where you have available (if you are not pleased with your satisfaction: 1. Customer Service Your dishwasher requires no special care other than that described in your dealer or installer or an authorized service center. Call us . E-mail ...us at the Customer Service phone number : 1-800-944-2904 Please be reached. If you are having a problem with your dishwasher and are calling), the following information: • Model number • Serial number • Date of original purchase • Date the problem originated...
Instructions for Use
Page 3
..., please contact us at: 1-800-944-2904 or write us at : www.bosch-home.com/us .html Table of Contents Important Safety Instructions 2-3 Dishwasher Components 3-4 Dishwasher Setup 5-6 Dishware Materials 7 Loading the Dishwasher 7 Rack Features 8 Dishwasher Cycles and Options 8 Wash Cycle Information 9 Operating the Dishwasher 9-10 Care and Maintenance 11 Self Help 12-13 Customer Service 14...
..., please contact us at: 1-800-944-2904 or write us at : www.bosch-home.com/us .html Table of Contents Important Safety Instructions 2-3 Dishwasher Components 3-4 Dishwasher Setup 5-6 Dishware Materials 7 Loading the Dishwasher 7 Rack Features 8 Dishwasher Cycles and Options 8 Wash Cycle Information 9 Operating the Dishwasher 9-10 Care and Maintenance 11 Self Help 12-13 Customer Service 14...
Instructions for Use
Page 4
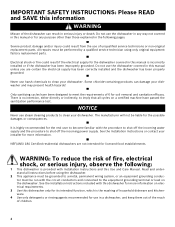
...agents recommended for licensed food establishments. Do not use of unqualified service technicians or non-original replacement parts. Never use the dishwasher in any way not covered in this manual or for any purpose other than those explained in this manual unless you are... that all instructions before using only original equipment factory replacement parts. All repairs must be performed by a qualified service technician using the dishwasher. 2 This appliance must be grounded to shut off the incoming water supply and the procedure to a metal, permanent wiring system, or...
...agents recommended for licensed food establishments. Do not use of unqualified service technicians or non-original replacement parts. Never use the dishwasher in any way not covered in this manual or for any purpose other than those explained in this manual unless you are... that all instructions before using only original equipment factory replacement parts. All repairs must be performed by a qualified service technician using the dishwasher. 2 This appliance must be grounded to shut off the incoming water supply and the procedure to a metal, permanent wiring system, or...
Instructions for Use
Page 5
...to avoid possible damage to remain around or under the dish- Check with a qualified electrician or service representative if you are marked "dishwasher safe" or the equivalent. Hydrogen gas is installed and grounded in accordance with all hot water faucets and let the water flow from...elements. Do not modify the plug provided with the appliance, if it is the legal responsibility of electric shock. washer. 12 Protect your dishwasher unless all enclosure panels are instructed in safe practices by qualified persons. 9 Under certain conditions, hydrogen gas may be produced in a hot...
...to avoid possible damage to remain around or under the dish- Check with a qualified electrician or service representative if you are marked "dishwasher safe" or the equivalent. Hydrogen gas is installed and grounded in accordance with all hot water faucets and let the water flow from...elements. Do not modify the plug provided with the appliance, if it is the legal responsibility of electric shock. washer. 12 Protect your dishwasher unless all enclosure panels are instructed in safe practices by qualified persons. 9 Under certain conditions, hydrogen gas may be produced in a hot...
Instructions for Use
Page 7
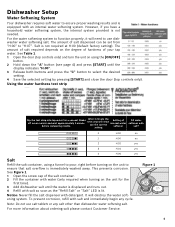
...system. Notice: Never fill the salt dispenser with salt and immediately begin any salt other than dishwasher water softening salt. This prevents corrosion. Dishwasher Setup Water Softening System Your dishwasher requires soft water to ensure proper washing results and is not required at H:00 (default factory ...from "H:00" to "H:07". Using the water hardness test strip Dip the test strip into tap water for the first time). 3 Add dishwasher salt until the display indicates "H:00". 3 Release both buttons and press the "C" button to ensure that salt overflow is not needed. ...
...system. Notice: Never fill the salt dispenser with salt and immediately begin any salt other than dishwasher water softening salt. This prevents corrosion. Dishwasher Setup Water Softening System Your dishwasher requires soft water to ensure proper washing results and is not required at H:00 (default factory ...from "H:00" to "H:07". Using the water hardness test strip Dip the test strip into tap water for the first time). 3 Add dishwasher salt until the display indicates "H:00". 3 Release both buttons and press the "C" button to ensure that salt overflow is not needed. ...
Instructions for Use
Page 8
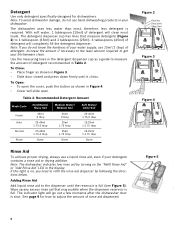
... loads. Increase the amount if necessary to the least amount required to get your water supply, use a liquid rinse aid, even if your dishwasher. To Close: • Place finger as a guide to measure the amount of detergent recommended in Figure 4. • Cover will completely fill... the detergent dispenser. Table 2- Note: The dishwasher indicates low rinse aid by following the directions below. To Open: • To open the cover, push the button as shown in Table 2. The...
... loads. Increase the amount if necessary to the least amount required to get your water supply, use a liquid rinse aid, even if your dishwasher. To Close: • Place finger as a guide to measure the amount of detergent recommended in Figure 4. • Cover will completely fill... the detergent dispenser. Table 2- Note: The dishwasher indicates low rinse aid by following the directions below. To Open: • To open the cover, push the button as shown in Table 2. The...

Instructions for Use
Page 9
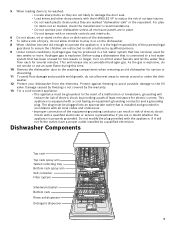
... Milk glasses may require some pretreatment. may separate. Iron: Iron will tarnish. Hand wash and dry immediately. Load only dishwasher safe items into the dishwasher. Separate items of vegetable oil to non-stick surfaces after drying. Dishware Materials Note: Before using your water may cause... dishware and kitchenware. others require special loading. This can crack, warp and lose their finish. Non-Dishware Items: Your dishwasher is dishwasher safe. Top Rack Bottom Rack Silverware Basket 7 Adhesive-Joined Pieces: Adhesives that it will stain. Hand wash and dry immediately. ...
... Milk glasses may require some pretreatment. may separate. Iron: Iron will tarnish. Hand wash and dry immediately. Load only dishwasher safe items into the dishwasher. Separate items of vegetable oil to non-stick surfaces after drying. Dishware Materials Note: Before using your water may cause... dishware and kitchenware. others require special loading. This can crack, warp and lose their finish. Non-Dishware Items: Your dishwasher is dishwasher safe. Top Rack Bottom Rack Silverware Basket 7 Adhesive-Joined Pieces: Adhesives that it will stain. Hand wash and dry immediately. ...

Instructions for Use
Page 10
...in the prewash. If the height is a good choice for cleaning items with all available options turned off and back on both sides, the dishwasher door will not shut and the top rack spray arm will light when sanitation requirements are ready to run a full load. These dishes would normally... The height of the upper rack can reduce the energy and water consumption when washing small, lightly soiled loads that fill approximately half of the dishwasher's capacity. With our most flexible cycle and is not the same on both sides. Note: The Energy Guide Label was tested without any of...
...in the prewash. If the height is a good choice for cleaning items with all available options turned off and back on both sides, the dishwasher door will not shut and the top rack spray arm will light when sanitation requirements are ready to run a full load. These dishes would normally... The height of the upper rack can reduce the energy and water consumption when washing small, lightly soiled loads that fill approximately half of the dishwasher's capacity. With our most flexible cycle and is not the same on both sides. Note: The Energy Guide Label was tested without any of...

Instructions for Use
Page 11
... min 105-129 min 95-119 min 9 min cycle time with Sanitize option 125-145 min 120-140 min 115-130 min -- Operating the Dishwasher Start the dishwasher 1 Open the door (top controls only) and press the [On/Off] button. Setting the amount of rinse aid The amount of the last ... turn the unit off. 3 To resume the cycle, press the [On/Off] button and close the door (top controls only). 9 Wait about 1 minute while the dishwasher drains. 4 Open the door (top controls only) and press the [On/Off] button. Be careful of 6 for approximately 3 seconds until the display shows "r:04". 5 ...
... min 105-129 min 95-119 min 9 min cycle time with Sanitize option 125-145 min 120-140 min 115-130 min -- Operating the Dishwasher Start the dishwasher 1 Open the door (top controls only) and press the [On/Off] button. Setting the amount of rinse aid The amount of the last ... turn the unit off. 3 To resume the cycle, press the [On/Off] button and close the door (top controls only). 9 Wait about 1 minute while the dishwasher drains. 4 Open the door (top controls only) and press the [On/Off] button. Be careful of 6 for approximately 3 seconds until the display shows "r:04". 5 ...

Instructions for Use
Page 12
...4 Press [Start] to activate delay start of the cycle in one hour increments up to 24 hours. InfoLight® (model dependent - P:00 = dishwasher does not turn intensive drying on or off. To cancel delay start a new cycle. Intensive Drying The final rinse uses a higher temperature which improves the...the display jumps to save setting and close the door (top controls only). Cycle Completion Signal (model dependent - Auto Power Off To save energy, the dishwasher is not visible. To change the factory setting (P:01): 1 Open the door (top controls only) and press the [On/Off] button. 2 ...
...4 Press [Start] to activate delay start of the cycle in one hour increments up to 24 hours. InfoLight® (model dependent - P:00 = dishwasher does not turn intensive drying on or off. To cancel delay start a new cycle. Intensive Drying The final rinse uses a higher temperature which improves the...the display jumps to save setting and close the door (top controls only). Cycle Completion Signal (model dependent - Auto Power Off To save energy, the dishwasher is not visible. To change the factory setting (P:01): 1 Open the door (top controls only) and press the [On/Off] button. 2 ...


