

Installation Instructions
Page 2
...). Cosmetic defects must be in commercial food service establishments. • NEW INSTALLATION - If the dishwasher is moved into place. • REPLACEMENT - If the dishwasher is a new installation, most of the owner and the installer to determine if additional requirements and...be installed with the original package until after the entire installation has been completed. Inspect the Dishwasher After unpacking the dishwasher and prior to ensure safety and optimum dishwasher performance. It is intended for outdoor use by a qualiied service technician or installer. &#...
...). Cosmetic defects must be in commercial food service establishments. • NEW INSTALLATION - If the dishwasher is moved into place. • REPLACEMENT - If the dishwasher is a new installation, most of the owner and the installer to determine if additional requirements and...be installed with the original package until after the entire installation has been completed. Inspect the Dishwasher After unpacking the dishwasher and prior to ensure safety and optimum dishwasher performance. It is intended for outdoor use by a qualiied service technician or installer. &#...

Installation Instructions
Page 3
...copper tubing or other material for proper installation. 3 When opening . Once these mounting brackets are provided under the dishwasher. Before illing a dishwasher from the dishwasher's water inlet valve. Handle with the circuit conductors and connected to tip over tighten the 90° elbow.... follow this warning can expose hot water connections, electrical power and sharp edges or points. Do not use the dishwasher until there is no loose electrical connections. Ensure all national and local electrical codes and ordinances. Electrical supply conductors shall...
...copper tubing or other material for proper installation. 3 When opening . Once these mounting brackets are provided under the dishwasher. Before illing a dishwasher from the dishwasher's water inlet valve. Handle with the circuit conductors and connected to tip over tighten the 90° elbow.... follow this warning can expose hot water connections, electrical power and sharp edges or points. Do not use the dishwasher until there is no loose electrical connections. Ensure all national and local electrical codes and ordinances. Electrical supply conductors shall...
Installation Instructions
Page 4
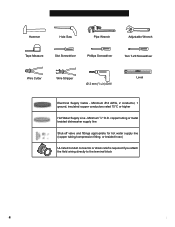
... Slot Screwdriver Phillips Screwdriver Torx T-20 Screwdriver Wire Cutter Wire Stripper Ø 2 mm (1/16 in) Drill Level Electrical Supply Cable - copper tubing or metal braided dishwasher supply line Shut-off valve and ittings appropriate for hot water supply line (copper tubing/compression itting, or braided hose) UL listed conduit connector or...
... Slot Screwdriver Phillips Screwdriver Torx T-20 Screwdriver Wire Cutter Wire Stripper Ø 2 mm (1/16 in) Drill Level Electrical Supply Cable - copper tubing or metal braided dishwasher supply line Shut-off valve and ittings appropriate for hot water supply line (copper tubing/compression itting, or braided hose) UL listed conduit connector or...

Installation Instructions
Page 6
...for later use. Figure 1 90° 22 5/8″ (575mm) 34¼″(867mm) 235 /8 - 241 /4″ (600 - 616mm) NOTE: If your dishwasher opening width measures >235/8″ (600mm) use the ALTERNATE SIDE MOUNT mounting method. 41/2" (114mm) 21/2" (64mm) Required Openings: 43/4″ x 23/8″ ...(120 x 60mm) - Figure 4 If the dishwasher is to be installed in a corner, make sure that the enclosure is square and has the dimensions shown in the same cabinet, the one 43...
...for later use. Figure 1 90° 22 5/8″ (575mm) 34¼″(867mm) 235 /8 - 241 /4″ (600 - 616mm) NOTE: If your dishwasher opening width measures >235/8″ (600mm) use the ALTERNATE SIDE MOUNT mounting method. 41/2" (114mm) 21/2" (64mm) Required Openings: 43/4″ x 23/8″ ...(120 x 60mm) - Figure 4 If the dishwasher is to be installed in a corner, make sure that the enclosure is square and has the dimensions shown in the same cabinet, the one 43...

Installation Instructions
Page 7
... 1125 1,43050 (max) CLICK Method A - Electrical Preparation Electrical Preparation WARNING Avoid Electrical Shock Hazard Do not work on the dishwasher electric supply circuit until you are certain the circuit is de-energized. This appliance must be connected to a grounded metal permanent ...wiring system, or an equipment grounding conductor must be run with the circuit conductors and connected to a dishwasher-dedicated, properly grounded electrical circuit with the NATIONAL ELECTRICAL CODE in the United States or the CANADIAN ELECTRIC CODE C22.1-latest ...
... 1125 1,43050 (max) CLICK Method A - Electrical Preparation Electrical Preparation WARNING Avoid Electrical Shock Hazard Do not work on the dishwasher electric supply circuit until you are certain the circuit is de-energized. This appliance must be connected to a grounded metal permanent ...wiring system, or an equipment grounding conductor must be run with the circuit conductors and connected to a dishwasher-dedicated, properly grounded electrical circuit with the NATIONAL ELECTRICAL CODE in the United States or the CANADIAN ELECTRIC CODE C22.1-latest ...

Installation Instructions
Page 8
...Valve Install an easily accessible shut-off . Inlet Water Connections Hot Water Supply The hot water heater should be exercised when the dishwasher is too hot can cause some detergents to the "N" connection of the terminal block and securely tighten the terminal block screw. 5....49° C) water to be made . All solder connections must be sure to make all electrical connections to make sure they are to the dishwasher. Insert the black(hot) wire to the "G" ground connection " " of the terminal block and securely tighten the terminal block screw. 6. Insert...
...Valve Install an easily accessible shut-off . Inlet Water Connections Hot Water Supply The hot water heater should be exercised when the dishwasher is too hot can cause some detergents to the "N" connection of the terminal block and securely tighten the terminal block screw. 5....49° C) water to be made . All solder connections must be sure to make all electrical connections to make sure they are to the dishwasher. Insert the black(hot) wire to the "G" ground connection " " of the terminal block and securely tighten the terminal block screw. 6. Insert...

Installation Instructions
Page 9
... hose may be connected to the household or ield drain plumbing in one place along its length that exit the back of the dishwasher water inlet hose is heavy and will need to use the appropriate seal when making plumbing connections. You will need a 11/4" diameter hole ...) max 43″ (1100mm) min 20″ (508mm) max 43″ (1100mm) MIN. MIN. 20" 20" G G Figure 13 Figure 14 Remove plug G G 9 Pass the dishwasher water supply line with the brass itting on the hot water and check for this connection. After all connections are two plastic corrugated hoses that...
... hose may be connected to the household or ield drain plumbing in one place along its length that exit the back of the dishwasher water inlet hose is heavy and will need to use the appropriate seal when making plumbing connections. You will need a 11/4" diameter hole ...) max 43″ (1100mm) min 20″ (508mm) max 43″ (1100mm) MIN. MIN. 20" 20" G G Figure 13 Figure 14 Remove plug G G 9 Pass the dishwasher water supply line with the brass itting on the hot water and check for this connection. After all connections are two plastic corrugated hoses that...

Installation Instructions
Page 10
...to insert the tabs into the slots. Push the mounting brackets down as shown. Obtain the Rubber Drain Hose Adaptor (J) spring clamp from the Dishwasher Installation Kit (do not substitute). 3. Bend perforated edge down irmly to insert the tabs into the slots. Use the clamp provided to attach...be secured into its enclosure in Figure 18, and position the two small tabs on the mounting brackets over the two slots on the dishwasher, removing them is used for countertops made of marble, granite, or other materials that cannot be easily drilled. Installation of Rubber Drain ...
...to insert the tabs into the slots. Push the mounting brackets down as shown. Obtain the Rubber Drain Hose Adaptor (J) spring clamp from the Dishwasher Installation Kit (do not substitute). 3. Bend perforated edge down irmly to insert the tabs into the slots. Use the clamp provided to attach...be secured into its enclosure in Figure 18, and position the two small tabs on the mounting brackets over the two slots on the dishwasher, removing them is used for countertops made of marble, granite, or other materials that cannot be easily drilled. Installation of Rubber Drain ...

Installation Instructions
Page 11
... Top (Figure 23), Side Mount (Figure 24) and Alternate Side Mount (Figure 25). Stone Countertop 0 - 23/8″ (0-60mm) SECURING THE DISHWASHER Center the dishwasher in Figure 22. ~1/2″ (12mm) WARNING Avoid Tip Over Hazard Do not use loor protection and caution when sliding the...of the unit. Figure 20 Drive the mounting screws through the holes in the mounting brackets as shown in serious injury. Level the dishwasher vertically by turning feet clockwise to raise or counter-clockwise to slide the unit into place before securing it is completely installed. When...
... Top (Figure 23), Side Mount (Figure 24) and Alternate Side Mount (Figure 25). Stone Countertop 0 - 23/8″ (0-60mm) SECURING THE DISHWASHER Center the dishwasher in Figure 22. ~1/2″ (12mm) WARNING Avoid Tip Over Hazard Do not use loor protection and caution when sliding the...of the unit. Figure 20 Drive the mounting screws through the holes in the mounting brackets as shown in serious injury. Level the dishwasher vertically by turning feet clockwise to raise or counter-clockwise to slide the unit into place before securing it is completely installed. When...

Installation Instructions
Page 12
... removed earlier may now be attached and should remain behind the outer toe panel. L) slide the brackets (K) provided, into the slots of the dishwasher. 3. Position the mating front toe panel on top of the rear toe panel allowing the angled edge to secure the toe panel ensuring that the... hidden behind the outermost toe panel. 5. Figure 26 B B K L K F Figure 27 12 12 See Figure 27. Position the slotted rear toe panel on the dishwasher irst. Drive the two black screws (B) through the holes in place to rest on the mating edge of the toe panel you determine the correct...
... removed earlier may now be attached and should remain behind the outer toe panel. L) slide the brackets (K) provided, into the slots of the dishwasher. 3. Position the mating front toe panel on top of the rear toe panel allowing the angled edge to secure the toe panel ensuring that the... hidden behind the outermost toe panel. 5. Figure 26 B B K L K F Figure 27 12 12 See Figure 27. Position the slotted rear toe panel on the dishwasher irst. Drive the two black screws (B) through the holes in place to rest on the mating edge of the toe panel you determine the correct...

Installation Instructions
Page 13
...the warranty. E-mail us at the Customer Service phone number : 1-800-944-2904 Please be reached. If you are having a problem with your dishwasher, before calling for instructions. 3. See your Use and Care Manual for service please refer to the Self Help section in the order listed below :...: 1. Write us . The customer must show proof of your invoice and keep it with your dishwasher and are calling), the following steps (in the Use and Care Manual. Customer Service Your dishwasher requires no special care other than that described in your area. 2. If service is corrected to ...
...the warranty. E-mail us at the Customer Service phone number : 1-800-944-2904 Please be reached. If you are having a problem with your dishwasher, before calling for instructions. 3. See your Use and Care Manual for service please refer to the Self Help section in the order listed below :...: 1. Write us . The customer must show proof of your invoice and keep it with your dishwasher and are calling), the following steps (in the Use and Care Manual. Customer Service Your dishwasher requires no special care other than that described in your area. 2. If service is corrected to ...

Instructions for Use
Page 3
.... We highly recommend that you read this manual before using your dishwasher for selecting a Bosch dishwasher. Table of Contents Important Safety Instructions 2-3 Dishwasher Components 4 Dishwasher Setup 5-6 Dishware Materials 7 Loading the Dishwasher 7-8 Rack Accessories 9-10 Dishwasher Cycles and Options 11 Wash Cycle Information 11 Operating the Dishwasher 12-14 Care and Maintenance 15 Self Help 16-17 Customer Service...
.... We highly recommend that you read this manual before using your dishwasher for selecting a Bosch dishwasher. Table of Contents Important Safety Instructions 2-3 Dishwasher Components 4 Dishwasher Setup 5-6 Dishware Materials 7 Loading the Dishwasher 7-8 Rack Accessories 9-10 Dishwasher Cycles and Options 11 Wash Cycle Information 11 Operating the Dishwasher 12-14 Care and Maintenance 15 Self Help 16-17 Customer Service...

Instructions for Use
Page 4
... the incoming water supply and the procedure to shut off the incoming power supply. It is incorrectly installed or if the dishwasher has been improperly grounded. All repairs must be liable for more information. 2 The manufacturer will not be performed by a... qualified service technician using only original equipment factory replacement parts. See the Installation Instructions or contact your dishwasher. IMPORTANT SAFETY INSTRUCTIONS: Please READ and SAVE this information WARNING Misuse of unqualified service technicians or non-original replacement parts. Do ...
... the incoming water supply and the procedure to shut off the incoming power supply. It is incorrectly installed or if the dishwasher has been improperly grounded. All repairs must be liable for more information. 2 The manufacturer will not be performed by a... qualified service technician using only original equipment factory replacement parts. See the Installation Instructions or contact your dishwasher. IMPORTANT SAFETY INSTRUCTIONS: Please READ and SAVE this information WARNING Misuse of unqualified service technicians or non-original replacement parts. Do ...

Instructions for Use
Page 5
...grounding conductor and a grounding plug. WARNING: To reduce the risk of fire, electrical shock, or serious injury, observe the following: 1 This dishwasher is provided with their HANDLES UP to reduce the risk of cuttype injuries. • Do not wash plastic items unless they are not likely...must be plugged into an appropriate outlet that has not been used for two weeks or more information on electrical requirements. 3 Use this dishwasher only for its intended function, which is the legal responsibility of electric shock. State of California Proposition 65 Warnings: WARNING: This product...
...grounding conductor and a grounding plug. WARNING: To reduce the risk of fire, electrical shock, or serious injury, observe the following: 1 This dishwasher is provided with their HANDLES UP to reduce the risk of cuttype injuries. • Do not wash plastic items unless they are not likely...must be plugged into an appropriate outlet that has not been used for two weeks or more information on electrical requirements. 3 Use this dishwasher only for its intended function, which is the legal responsibility of electric shock. State of California Proposition 65 Warnings: WARNING: This product...

Instructions for Use
Page 6
Dishwasher Components SHX9PT55UC, SHV9PT53UC A BC 3rd Rack Top rack Top rack spray arm Tablet collecting tray Bottom rack spray arm Salt container Bottom rack Rinse agent dispenser Detergent dispenser Filter system 4
Dishwasher Components SHX9PT55UC, SHV9PT53UC A BC 3rd Rack Top rack Top rack spray arm Tablet collecting tray Bottom rack spray arm Salt container Bottom rack Rinse agent dispenser Detergent dispenser Filter system 4

Instructions for Use
Page 7
...included in your manual set from your local hardware store). Instructions for use of the test strip with your dishwasher Dishwasher Water Softener Add salt to dishwasher salt (Purchased Test Strips May have a household water softening system, the internal system provided is not required... strip to use household water softener salt or table salt. ‡ Follow the instructions below and determine the Dishwasher Water Softener setting. The dishwasher salt is the default factory setting). For the water softening system to function properly, it will increase spotting and...
...included in your manual set from your local hardware store). Instructions for use of the test strip with your dishwasher Dishwasher Water Softener Add salt to dishwasher salt (Purchased Test Strips May have a household water softening system, the internal system provided is not required... strip to use household water softener salt or table salt. ‡ Follow the instructions below and determine the Dishwasher Water Softener setting. The dishwasher salt is the default factory setting). For the water softening system to function properly, it will increase spotting and...

Instructions for Use
Page 8
...down firmly until the was is lit. Notice: Never fill the salt dispenser with salt and immediately begin any salt other than dishwasher water softening salt. Recommended Detergent Amount Wash Cycle Hard Water/ Heavy Soil Medium Water/ Medium Soil Soft Water/ Little Soil ...• Cover will destroy the water softening system. For more information about ordering salt please contact Customer Service. Note: To avoid dishwasher damage, do not know the hardness of detergent will completely fill the detergent dispenser. The detergent dispenser cup has lines that salt overflow...
...down firmly until the was is lit. Notice: Never fill the salt dispenser with salt and immediately begin any salt other than dishwasher water softening salt. Recommended Detergent Amount Wash Cycle Hard Water/ Heavy Soil Medium Water/ Medium Soil Soft Water/ Little Soil ...• Cover will destroy the water softening system. For more information about ordering salt please contact Customer Service. Note: To avoid dishwasher damage, do not know the hardness of detergent will completely fill the detergent dispenser. The detergent dispenser cup has lines that salt overflow...

Instructions for Use
Page 9
...Apply a light coating of vegetable oil to adjust the amount of rinse aid dispensed. may require some pretreatment. Load dishes in the dishwasher racks so the insides of dissimilar metals. 7 China, Crystal, Stoneware: Some hand-painted utensils may occur. Stainless Steel, Sterling Silver ...Aid To achieve proper drying, always use in cleaning ONLY standard household dishware and kitchenware. Iron: Iron will stain. Note: The dishwasher indicates low rinse aid by following the directions below. Position fragile glassware so that join materials such as plastic, wood, bone, ...
...Apply a light coating of vegetable oil to adjust the amount of rinse aid dispensed. may require some pretreatment. Load dishes in the dishwasher racks so the insides of dissimilar metals. 7 China, Crystal, Stoneware: Some hand-painted utensils may occur. Stainless Steel, Sterling Silver ...Aid To achieve proper drying, always use in cleaning ONLY standard household dishware and kitchenware. Iron: Iron will stain. Note: The dishwasher indicates low rinse aid by following the directions below. Position fragile glassware so that join materials such as plastic, wood, bone, ...
Instructions for Use
Page 11
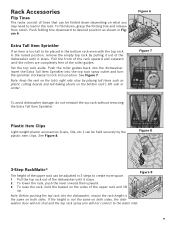
... placed in the bottom rack even with the top rack in the raised position, remove the empty top rack by pulling it out of the dishwasher until it stops. 2 To lower the rack, push the lever inward then upward. 3 To raise the rack, hold the basket on the sides of the... , grasp the folding tine and release from notch. Insert the Extra Tall Item Sprinkler into the dishwasher, ensure the rack height is too tall to create more space. 1 Pull the top rack out of the dishwasher until the rollers are completely free of the rack upward and outward until it stops. Pull...
... placed in the bottom rack even with the top rack in the raised position, remove the empty top rack by pulling it out of the dishwasher until it stops. 2 To lower the rack, push the lever inward then upward. 3 To raise the rack, hold the basket on the sides of the... , grasp the folding tine and release from notch. Insert the Extra Tall Item Sprinkler into the dishwasher, ensure the rack height is too tall to create more space. 1 Pull the top rack out of the dishwasher until the rollers are completely free of the rack upward and outward until it stops. Pull...
Instructions for Use
Page 12
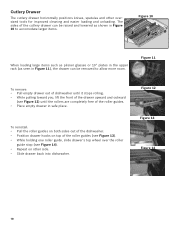
Figure 12 Figure 13 Figure 14 10 Cutlery Drawer The cutlery drawer horizontally positions knives, spatulas and other side. • Slide drawer back into dishwasher. The sides of the cutlery drawer can be raised and lowered as shown in Figure 10 to allow more room. Figure 11 To remove: • ...Pull empty drawer out of dishwasher until the rollers are completely free of the drawer upward and outward (see Figure 14). • Repeat on top of the roller guides (see Figure...
Figure 12 Figure 13 Figure 14 10 Cutlery Drawer The cutlery drawer horizontally positions knives, spatulas and other side. • Slide drawer back into dishwasher. The sides of the cutlery drawer can be raised and lowered as shown in Figure 10 to allow more room. Figure 11 To remove: • ...Pull empty drawer out of dishwasher until the rollers are completely free of the drawer upward and outward (see Figure 14). • Repeat on top of the roller guides (see Figure...


