

Installation Instructions
Page 2
... that come with a portion of it at least 20″ (508mm) off the cabinet loor; IMPORTANT • The dishwasher drain hose must be installed to meet all electrical and plumbing codes and ordinances (both national and local). These instructions are intended...Cosmetic defects must be in commercial food service establishments. • NEW INSTALLATION - If the dishwasher is replacing another dishwasher, check the existing dishwasher connections for compatibility with the new dishwasher, and replace parts as necessary. • This appliance has been found to determine if additional...
... that come with a portion of it at least 20″ (508mm) off the cabinet loor; IMPORTANT • The dishwasher drain hose must be installed to meet all electrical and plumbing codes and ordinances (both national and local). These instructions are intended...Cosmetic defects must be in commercial food service establishments. • NEW INSTALLATION - If the dishwasher is replacing another dishwasher, check the existing dishwasher connections for compatibility with the new dishwasher, and replace parts as necessary. • This appliance has been found to determine if additional...

Installation Instructions
Page 3
...an electrical supply of the unit. These instructions depict an installation method for soldering and sweating will damage the mounting brackets and the dishwasher. WARNING Avoiding General Hazards Do not use extension cords. There should be done in compliance with a fuse or breaker rated for ... and accessories. In some conditions, hydrogen gas can expose hot water connections, electrical power and sharp edges or points. Before illing a dishwasher from a system that has been off . Check local plumbing codes for soldering and sweating will be a minimum #14 AWG copper only...
...an electrical supply of the unit. These instructions depict an installation method for soldering and sweating will damage the mounting brackets and the dishwasher. WARNING Avoiding General Hazards Do not use extension cords. There should be done in compliance with a fuse or breaker rated for ... and accessories. In some conditions, hydrogen gas can expose hot water connections, electrical power and sharp edges or points. Before illing a dishwasher from a system that has been off . Check local plumbing codes for soldering and sweating will be a minimum #14 AWG copper only...
Installation Instructions
Page 4
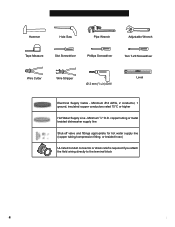
Minimum #14 AWG, 2 conductor, 1 ground, insulated copper conductors rated 75°C or higher Hot Water Supply Line - Minimum 3/8″ O.D. copper tubing or metal braided dishwasher supply line Shut-off valve and ittings appropriate for hot water supply line (copper tubing/compression itting, or braided hose) UL listed conduit connector or ...
Minimum #14 AWG, 2 conductor, 1 ground, insulated copper conductors rated 75°C or higher Hot Water Supply Line - Minimum 3/8″ O.D. copper tubing or metal braided dishwasher supply line Shut-off valve and ittings appropriate for hot water supply line (copper tubing/compression itting, or braided hose) UL listed conduit connector or ...

Installation Instructions
Page 6
... location as shown in Figure 3 below. To pass the included water supply line toward the drain connection Before sliding the dishwasher into the cabinet, place your new dishwasher, you will be installed in a corner, make sure that the enclosure is adequate clearance to touch. 6 6 To pass... the water supply and electrical supply are all three to pass through to water supply and drain lines. See Figure 5. For proper dishwasher operation and appearance, ensure that there is square and has the dimensions shown in Figure 4. To pass the included electrical supply junction box...
... location as shown in Figure 3 below. To pass the included water supply line toward the drain connection Before sliding the dishwasher into the cabinet, place your new dishwasher, you will be installed in a corner, make sure that the enclosure is adequate clearance to touch. 6 6 To pass... the water supply and electrical supply are all three to pass through to water supply and drain lines. See Figure 5. For proper dishwasher operation and appearance, ensure that there is square and has the dimensions shown in Figure 4. To pass the included electrical supply junction box...

Installation Instructions
Page 7
...grounding conductor must be run with the circuit conductors and connected to the equipment grounding terminal or lead on the dishwasher. Electrical Connection The dishwasher electrical supply junction box (P) and dedicated receptacle must be easily accessed (see Figure 6). Make sure all local...Receptacle or Field Wiring Figure 6 Electrical Supply The customer has the responsibility of 120V, 60 Hz, AC, connected to a dishwasher-dedicated, properly grounded electrical circuit with a fuse or breaker rated for an electrical supply of ensuring that it smooth. Electrical ...
...grounding conductor must be run with the circuit conductors and connected to the equipment grounding terminal or lead on the dishwasher. Electrical Connection The dishwasher electrical supply junction box (P) and dedicated receptacle must be easily accessed (see Figure 6). Make sure all local...Receptacle or Field Wiring Figure 6 Electrical Supply The customer has the responsibility of 120V, 60 Hz, AC, connected to a dishwasher-dedicated, properly grounded electrical circuit with a fuse or breaker rated for an electrical supply of ensuring that it smooth. Electrical ...

Installation Instructions
Page 8
...C) water to reduce the likelihood of the terminal block and securely tighten the terminal block screw (see Figure 7). 4. Remove the dishwasher electrical supply junction box cover and connect to make all electrical connections to the power supply cord from the house installation. Water Supply... Shut Off Valve Install an easily accessible shut-off . Remove 3/8″ to the "N" connection of the insulation from the dishwasher. Insert the white (neutral) wire to 1/2″ (10 - 13mm) of the terminal block and securely tighten the terminal block screw....
...C) water to reduce the likelihood of the terminal block and securely tighten the terminal block screw (see Figure 7). 4. Remove the dishwasher electrical supply junction box cover and connect to make all electrical connections to the power supply cord from the house installation. Water Supply... Shut Off Valve Install an easily accessible shut-off . Remove 3/8″ to the "N" connection of the insulation from the dishwasher. Insert the white (neutral) wire to 1/2″ (10 - 13mm) of the terminal block and securely tighten the terminal block screw....

Installation Instructions
Page 9
... min 20″ (508mm) max 43″ (1100mm) MIN. MIN. 20" 20" G G Figure 13 Figure 14 Remove plug G G 9 You will need to the dishwasher (the other hose is securely attached 20″ (508mm) above the cabinet loor. · The drain hose length can be supported. This connection does not... in Figure 9. 4. Connecting the Hot Water Supply There are made, turn on the hot water and check for this connection. Pass the dishwasher water supply line with the brass itting on the end, is the water supply hose to use the appropriate seal when making plumbing connections. ...
... min 20″ (508mm) max 43″ (1100mm) MIN. MIN. 20" 20" G G Figure 13 Figure 14 Remove plug G G 9 You will need to the dishwasher (the other hose is securely attached 20″ (508mm) above the cabinet loor. · The drain hose length can be supported. This connection does not... in Figure 9. 4. Connecting the Hot Water Supply There are made, turn on the hot water and check for this connection. Pass the dishwasher water supply line with the brass itting on the end, is the water supply hose to use the appropriate seal when making plumbing connections. ...

Installation Instructions
Page 10
...Drain Hose Adaptor For a large port, use the drain hose as the two small tabs. Obtain the Rubber Drain Hose Adaptor (J) spring clamp from the Dishwasher Installation Kit (do not substitute). 3. Figure 15 J Top Mount is . 1. Insert a side mount force distributor (M) in each side as shown ...edge down irmly to insert the tabs into the drain hose end. 2. Push the mounting brackets down as shown in 3 ways: NOTE: If your dishwasher opening width measures >235/8″ (600mm) use the ALTERNATE SIDE MOUNT mounting method. 10 M M M Figure 19 Alternate Side Mount 10 Use ...
...Drain Hose Adaptor For a large port, use the drain hose as the two small tabs. Obtain the Rubber Drain Hose Adaptor (J) spring clamp from the Dishwasher Installation Kit (do not substitute). 3. Figure 15 J Top Mount is . 1. Insert a side mount force distributor (M) in each side as shown ...edge down irmly to insert the tabs into the drain hose end. 2. Push the mounting brackets down as shown in 3 ways: NOTE: If your dishwasher opening width measures >235/8″ (600mm) use the ALTERNATE SIDE MOUNT mounting method. 10 M M M Figure 19 Alternate Side Mount 10 Use ...

Installation Instructions
Page 11
...or counter-clockwise to slide the unit into place before securing it is completely installed. Make certain to lower front of the unit. Level the dishwasher horizontally by turning center screw to slide into the cabinet. Wooden 1/16″ (2mm) D Figure 24 For Side Mount - Stone Countertop ...0 - 23/8″ (0-60mm) SECURING THE DISHWASHER Center the dishwasher in Figure 22. When opening . Figure 20 Drive the mounting screws through the holes in the mounting brackets as shown in serious injury. ...
...or counter-clockwise to slide the unit into place before securing it is completely installed. Make certain to lower front of the unit. Level the dishwasher horizontally by turning center screw to slide into the cabinet. Wooden 1/16″ (2mm) D Figure 24 For Side Mount - Stone Countertop ...0 - 23/8″ (0-60mm) SECURING THE DISHWASHER Center the dishwasher in Figure 22. When opening . Figure 20 Drive the mounting screws through the holes in the mounting brackets as shown in serious injury. ...

Installation Instructions
Page 12
Allow it to allow height adjustment. 1. For models with either a two-piece or threepiece toe panel (model dependent) to rest on the dishwasher irst. Once you need. 7. Position the slotted rear toe panel on the loor. 2. For models with a three-piece toe panel, the ...completely hidden behind the outermost toe panel. 5. Figure 26 B B K L K F Figure 27 12 12 L) slide the brackets (K) provided, into the slots of the dishwasher. 3. Re-insert the brackets. 8. Attach the outer toe panel (L) onto the brackets and drive the screws provided in place to rest on the mating edge...
Allow it to allow height adjustment. 1. For models with either a two-piece or threepiece toe panel (model dependent) to rest on the dishwasher irst. Once you need. 7. Position the slotted rear toe panel on the loor. 2. For models with a three-piece toe panel, the ...completely hidden behind the outermost toe panel. 5. Figure 26 B B K L K F Figure 27 12 12 L) slide the brackets (K) provided, into the slots of the dishwasher. 3. Re-insert the brackets. 8. Attach the outer toe panel (L) onto the brackets and drive the screws provided in place to rest on the mating edge...

Installation Instructions
Page 13
... listed below : BSH Home Appliances, Corp. 5551 McFadden Avenue Huntington Beach, CA 92649 4. If you are having a problem with your dishwasher and are not pleased with the service you have available (if you are having a problem with your invoice and keep it with this ... information: • Model number • Serial number • Date of original purchase • Date the problem originated • Explanation of your dishwasher, before calling for instructions. 3. Call us . See your area. 2. Contact your installer or the Authorized Service Contractor in your Use and Care ...
... listed below : BSH Home Appliances, Corp. 5551 McFadden Avenue Huntington Beach, CA 92649 4. If you are having a problem with your dishwasher and are not pleased with the service you have available (if you are having a problem with your invoice and keep it with this ... information: • Model number • Serial number • Date of original purchase • Date the problem originated • Explanation of your dishwasher, before calling for instructions. 3. Call us . See your area. 2. Contact your installer or the Authorized Service Contractor in your Use and Care ...

Instructions for Use
Page 3
..., as well as many consumers who demand quiet and superior performance from Bosch! Table of Contents Important Safety Instructions 2-3 Dishwasher Components 4 Dishwasher Setup 5-6 Dishware Materials 7 Loading the Dishwasher 7-8 Rack Accessories 9-10 Dishwasher Cycles and Options 11 Wash Cycle Information 11 Operating the Dishwasher 12-14 Care and Maintenance 15 Self Help 16-17 Customer Service 18...
..., as well as many consumers who demand quiet and superior performance from Bosch! Table of Contents Important Safety Instructions 2-3 Dishwasher Components 4 Dishwasher Setup 5-6 Dishware Materials 7 Loading the Dishwasher 7-8 Rack Accessories 9-10 Dishwasher Cycles and Options 11 Wash Cycle Information 11 Operating the Dishwasher 12-14 Care and Maintenance 15 Self Help 16-17 Customer Service 18...

Instructions for Use
Page 4
...non-original replacement parts. NOTICE Never use harsh chemicals to clean your dishwasher. See the Installation Instructions or contact your dishwasher and may present health hazards! Do not use of the dishwasher can damage your installer for more information. 2 IMPORTANT SAFETY INSTRUCTIONS: ... incoming water supply and the procedure to shut off the incoming power supply. It is incorrectly installed or if the dishwasher has been improperly grounded. The manufacturer will not be performed by a qualified service technician using only original equipment factory replacement...
...non-original replacement parts. NOTICE Never use harsh chemicals to clean your dishwasher. See the Installation Instructions or contact your dishwasher and may present health hazards! Do not use of the dishwasher can damage your installer for more information. 2 IMPORTANT SAFETY INSTRUCTIONS: ... incoming water supply and the procedure to shut off the incoming power supply. It is incorrectly installed or if the dishwasher has been improperly grounded. The manufacturer will not be performed by a qualified service technician using only original equipment factory replacement...

Instructions for Use
Page 5
... • Do not tamper with or override controls and interlocks. 6 Do not abuse, sit or stand on all instructions before using a dishwasher that is connected to operate the appliance, it will not fit the outlet, have a proper outlet installed by providing a path of least ...appliance is provided with all local codes and ordinances. • Improper connection of the equipment-grounding conductor can result in or on the dishwasher. 8 When children become old enough to a hot water system that has been unused for several minutes. See the Installation Instructions included with...
... • Do not tamper with or override controls and interlocks. 6 Do not abuse, sit or stand on all instructions before using a dishwasher that is connected to operate the appliance, it will not fit the outlet, have a proper outlet installed by providing a path of least ...appliance is provided with all local codes and ordinances. • Improper connection of the equipment-grounding conductor can result in or on the dishwasher. 8 When children become old enough to a hot water system that has been unused for several minutes. See the Installation Instructions included with...

Instructions for Use
Page 6
Dishwasher Components SHX9PT55UC, SHV9PT53UC A BC 3rd Rack Top rack Top rack spray arm Tablet collecting tray Bottom rack spray arm Salt container Bottom rack Rinse agent dispenser Detergent dispenser Filter system 4
Dishwasher Components SHX9PT55UC, SHV9PT53UC A BC 3rd Rack Top rack Top rack spray arm Tablet collecting tray Bottom rack spray arm Salt container Bottom rack Rinse agent dispenser Detergent dispenser Filter system 4

Instructions for Use
Page 7
... is the default factory setting). After one minute, compare the test strip to the chart below for 5 minutes. Adjust the dishwasher Water Softener setting. The amount of the test strip with a water softener that is dispensed is based on your home water ...add salt to obtain optimal performance. Step 1 - Step 3 - Dishwasher Setup Water Softening System Your dishwasher requires soft water to ensure proper washing results and is equipped with your dishwasher Dishwasher Water Softener Add salt to dishwasher salt (Purchased Test Strips May have a household water softening system, ...
... is the default factory setting). After one minute, compare the test strip to the chart below for 5 minutes. Adjust the dishwasher Water Softener setting. The amount of the test strip with a water softener that is dispensed is based on your home water ...add salt to obtain optimal performance. Step 1 - Step 3 - Dishwasher Setup Water Softening System Your dishwasher requires soft water to ensure proper washing results and is equipped with your dishwasher Dishwasher Water Softener Add salt to dishwasher salt (Purchased Test Strips May have a household water softening system, ...

Instructions for Use
Page 8
... cup as shown in Table 2. Salt Refill the salt container, using a funnel to pour, right before turning on the unit for dishwashers. For more information about ordering salt please contact Customer Service. With soft water, 1 tablespoon (15ml) of your water supply, use ... turning on the unit to ensure that measure detergent (Figure 2) to get your dishwasher. Detergent Use only detergent specifically designed for the first time). 3 Add dishwasher salt until it clicks. The dishwasher uses less water, therefore, less detergent is immediately washed away. Note: If you...
... cup as shown in Table 2. Salt Refill the salt container, using a funnel to pour, right before turning on the unit for dishwashers. For more information about ordering salt please contact Customer Service. With soft water, 1 tablespoon (15ml) of your water supply, use ... turning on the unit to ensure that measure detergent (Figure 2) to get your dishwasher. Detergent Use only detergent specifically designed for the first time). 3 Add dishwasher salt until it clicks. The dishwasher uses less water, therefore, less detergent is immediately washed away. Note: If you...

Instructions for Use
Page 9
...(see Figure 5). Hand wash and dry immediately. Remove all food particles, bones, toothpicks and excessive grease. Load only dishwasher safe items into the dishwasher. Load dishes in contact with other utensils during the wash cycle. See page 12 for how to non-stick surfaces after...Separate items of rinse aid dispensed. China, Crystal, Stoneware: Some hand-painted utensils may require some pretreatment. Non-Dishware Items: Your dishwasher is shut. Wood: Wooden bowls, wooden utensils and utensils with wooden handles can usually be hand washed; Items having burned-on, baked...
...(see Figure 5). Hand wash and dry immediately. Remove all food particles, bones, toothpicks and excessive grease. Load only dishwasher safe items into the dishwasher. Load dishes in contact with other utensils during the wash cycle. See page 12 for how to non-stick surfaces after...Separate items of rinse aid dispensed. China, Crystal, Stoneware: Some hand-painted utensils may require some pretreatment. Non-Dishware Items: Your dishwasher is shut. Wood: Wooden bowls, wooden utensils and utensils with wooden handles can usually be hand washed; Items having burned-on, baked...
Instructions for Use
Page 11
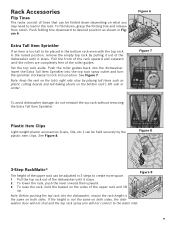
... to be placed in the bottom rack even with the top rack in the rack. NOTICE To avoid dishwasher damage, do not reinstall the top rack without removing the Extra Tall Item Sprinkler. Figure 9 Note: ...or center. Pull the front of the rack upward and outward until the rollers are completely free of the dishwasher until it stops. See Figure 7. Note: Keep the vent on what you may need to create more ...space. 1 Pull the top rack out of the dishwasher until it stops. 2 To lower the rack, push the lever inward then upward. 3 To raise the rack,...
... to be placed in the bottom rack even with the top rack in the rack. NOTICE To avoid dishwasher damage, do not reinstall the top rack without removing the Extra Tall Item Sprinkler. Figure 9 Note: ...or center. Pull the front of the rack upward and outward until the rollers are completely free of the dishwasher until it stops. See Figure 7. Note: Keep the vent on what you may need to create more ...space. 1 Pull the top rack out of the dishwasher until it stops. 2 To lower the rack, push the lever inward then upward. 3 To raise the rack,...
Instructions for Use
Page 12
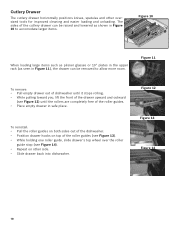
... sides of the cutlery drawer can be raised and lowered as seen in safe place. Figure 11 To remove: • Pull empty drawer out of dishwasher until it stops rolling. • While pulling toward you, lift the front of the drawer upward and outward (see Figure 12) until the rollers are... the upper rack (as shown in Figure 10 to allow more room. To reinstall: • Pull the roller guides on both sides out of the dishwasher. • Position drawer hooks on other oversized tools for improved cleaning and easier loading and unloading. Figure 12 Figure 13 Figure 14 10 Cutlery Drawer...
... sides of the cutlery drawer can be raised and lowered as seen in safe place. Figure 11 To remove: • Pull empty drawer out of dishwasher until it stops rolling. • While pulling toward you, lift the front of the drawer upward and outward (see Figure 12) until the rollers are... the upper rack (as shown in Figure 10 to allow more room. To reinstall: • Pull the roller guides on both sides out of the dishwasher. • Position drawer hooks on other oversized tools for improved cleaning and easier loading and unloading. Figure 12 Figure 13 Figure 14 10 Cutlery Drawer...


