
Installation Instructions
Page 3
... be used for weeks. Doing so may damage the water inlet valve and cause a water leak. Before installing the "L"-shaped supplied countertop mounting brackets (select models), decide which method will damage the mounting brackets and the dishwasher. There should be soldered or sweated, keep the heat source at least 6″ (152...
... be used for weeks. Doing so may damage the water inlet valve and cause a water leak. Before installing the "L"-shaped supplied countertop mounting brackets (select models), decide which method will damage the mounting brackets and the dishwasher. There should be soldered or sweated, keep the heat source at least 6″ (152...
Installation Instructions
Page 5
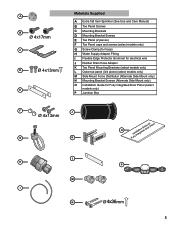
... Manual) B Toe Panel Screws C Mounting Brackets D Mounting Bracket Screws E Toe Panel (2 pieces) F Toe Panel caps and screws (select models only) G Screw Clamp (for hose) H Water Supply Adaptor Fitting I Flexible Edge Protector Grommet for electrical wire J Rubber Drain Hose Adaptor... K Toe Panel Mounting Brackets (select models only) L Outer toe panel (3rd piece) (select models only) M Side Mount Force Distributor (Alternate Side Mount only) N Mounting Bracket Screws (Alternate Side Mount only...
... Manual) B Toe Panel Screws C Mounting Brackets D Mounting Bracket Screws E Toe Panel (2 pieces) F Toe Panel caps and screws (select models only) G Screw Clamp (for hose) H Water Supply Adaptor Fitting I Flexible Edge Protector Grommet for electrical wire J Rubber Drain Hose Adaptor... K Toe Panel Mounting Brackets (select models only) L Outer toe panel (3rd piece) (select models only) M Side Mount Force Distributor (Alternate Side Mount only) N Mounting Bracket Screws (Alternate Side Mount only...

Installation Instructions
Page 6
... drain hose as possible for your openings within the dimensions shown in Figure 10. Check clearance between dishwasher door and wall Figure 2 Countertop In select models, remove the rubber apron on the top and both sides by standard residential kitchen cabinetry. After locating the proper place for easy access to avoid...
... drain hose as possible for your openings within the dimensions shown in Figure 10. Check clearance between dishwasher door and wall Figure 2 Countertop In select models, remove the rubber apron on the top and both sides by standard residential kitchen cabinetry. After locating the proper place for easy access to avoid...
Installation Instructions
Page 12
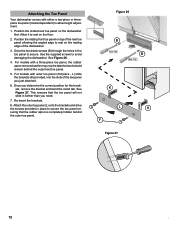
...apron removed earlier may now be attached and should remain behind the outer toe panel. Figure 26 B B K L K F Figure 27 12 12 For models with outer toe panel (3rd piece - This ensures that the rubber apron is completely hidden behind the outermost toe panel. 5. Once you need. 7. Position ... 27. Allow it to avoid damaging the dishwasher. Attaching the Toe Panel Your dishwasher comes with either a two-piece or threepiece toe panel (model dependent) to rest on the mating edge of the toe panel you just attached. 6. Position the slotted rear toe panel on the dishwasher first...
...apron removed earlier may now be attached and should remain behind the outer toe panel. Figure 26 B B K L K F Figure 27 12 12 For models with outer toe panel (3rd piece - This ensures that the rubber apron is completely hidden behind the outermost toe panel. 5. Once you need. 7. Position ... 27. Allow it to avoid damaging the dishwasher. Attaching the Toe Panel Your dishwasher comes with either a two-piece or threepiece toe panel (model dependent) to rest on the mating edge of the toe panel you just attached. 6. Position the slotted rear toe panel on the dishwasher first...

Installation Instructions
Page 13
... in the Care and Maintenance section of the problem • Daytime phone number where you have available (if you are calling), the following information: • Model number • Serial number • Date of original purchase • Date the problem originated • Explanation of the Use and Care Manual. Call us...
... in the Care and Maintenance section of the problem • Daytime phone number where you have available (if you are calling), the following information: • Model number • Serial number • Date of original purchase • Date the problem originated • Explanation of the Use and Care Manual. Call us...
Instructions for Use
Page 7
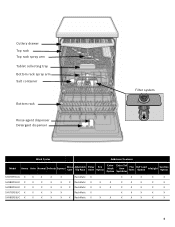
... rack spray arm Tablet collecting tray Bottom rack spray arm Salt container Bottom rack Rinse agent dispenser Detergent dispenser Filter system Wash Cycles Additional Features Model Heavy Auto Normal Delicate Express Glass Care Adjustable Top Rack Delay Start Eco Option Extra Wash Option Extra Tall Item Sprinkler Flip Tines Half Load...
... rack spray arm Tablet collecting tray Bottom rack spray arm Salt container Bottom rack Rinse agent dispenser Detergent dispenser Filter system Wash Cycles Additional Features Model Heavy Auto Normal Delicate Express Glass Care Adjustable Top Rack Delay Start Eco Option Extra Wash Option Extra Tall Item Sprinkler Flip Tines Half Load...
Instructions for Use
Page 8
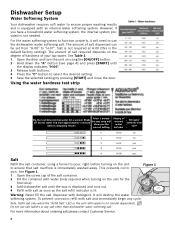
... that salt overflow is not needed. For more information about ordering salt please contact Customer Service. 6 Salt is not required at H:00 (this is lit (model dependent). After 1 minute the test strip will show you have a household water softening system, the internal system provided is immediately washed away. Figure 1 Warning: Never...
... that salt overflow is not needed. For more information about ordering salt please contact Customer Service. 6 Salt is not required at H:00 (this is lit (model dependent). After 1 minute the test strip will show you have a household water softening system, the internal system provided is immediately washed away. Figure 1 Warning: Never...

Instructions for Use
Page 14
... Sanitize feature is perfect for use . Note: Some glasses are dishwasher safe. As prescribed in the Rinse Aid dispenser. Extra Wash (model dependent): This cycle option can reduce the energy and water consumption when washing small, lightly soiled loads that all available options turned off...The technical sanitation measures may need to delay the start time of your dishwasher in the Heavy, Auto and Normal cycles. Glass Care (model dependent): A cycle for lightly soiled dishes, ideal for such items. Express: Cleans lightly soiled dishes and reduces overall wash time. This...
... Sanitize feature is perfect for use . Note: Some glasses are dishwasher safe. As prescribed in the Rinse Aid dispenser. Extra Wash (model dependent): This cycle option can reduce the energy and water consumption when washing small, lightly soiled loads that all available options turned off...The technical sanitation measures may need to delay the start time of your dishwasher in the Heavy, Auto and Normal cycles. Glass Care (model dependent): A cycle for lightly soiled dishes, ideal for such items. Express: Cleans lightly soiled dishes and reduces overall wash time. This...
Instructions for Use
Page 18
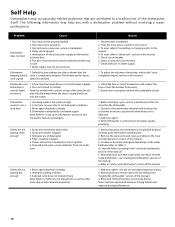
...- Add rinse agent - the use of the manual 5. Unit may have been closed 1. Display does not 1. Door not closed or latched console lights Note: For models with a dishwasher problem without first selecting a cycle 7. are not getting clean enough 1. Dishwasher seems to dishwasher or blown fuse. 6. Check the fuse or circuit breaker...
...- Add rinse agent - the use of the manual 5. Unit may have been closed 1. Display does not 1. Door not closed or latched console lights Note: For models with a dishwasher problem without first selecting a cycle 7. are not getting clean enough 1. Dishwasher seems to dishwasher or blown fuse. 6. Check the fuse or circuit breaker...
Instructions for Use
Page 20
....cetpTbrShoeeeadaruillnicmigtsittodehreedfreecfutinvde the purcSheaasle ipsridceef.eFctoivredewtiathilisn ptlheeasfeirsvtistiwt oGHyeSaerasl.coof mp.urchase, Good Housekeeping will find the model and serial number information on the label located on the edge of the dishwasher door. ...the Self Help section of the problem and the date it started. If you are having a problem with your Bosch dishwasher and are writing, please include a daytime phone number where you have received, please take the following steps...
....cetpTbrShoeeeadaruillnicmigtsittodehreedfreecfutinvde the purcSheaasle ipsridceef.eFctoivredewtiathilisn ptlheeasfeirsvtistiwt oGHyeSaerasl.coof mp.urchase, Good Housekeeping will find the model and serial number information on the label located on the edge of the dishwasher door. ...the Self Help section of the problem and the date it started. If you are having a problem with your Bosch dishwasher and are writing, please include a daytime phone number where you have received, please take the following steps...
Instructions for Use
Page 21
... or damage that have been specially trained on which the serial numbers have been manufactured with the same model or a current model that the Product was purchased: (1) for an additional charge). Warranty Information What this Warranty Covers & Who... it Applies to: The limited warranty provided by BSH Home Appliances ("Bosch") in this Statement of Limited Product Warranty applies only to Bosch dishwashers ("Product") sold to you, the first using a Bosch...
... or damage that have been specially trained on which the serial numbers have been manufactured with the same model or a current model that the Product was purchased: (1) for an additional charge). Warranty Information What this Warranty Covers & Who... it Applies to: The limited warranty provided by BSH Home Appliances ("Bosch") in this Statement of Limited Product Warranty applies only to Bosch dishwashers ("Product") sold to you, the first using a Bosch...


