
Installation Instructions
Page 3
... no loose electrical connections. Temperatures required for soldering and sweating will damage the mounting brackets and the dishwasher. When opening . Before installing the "L"-shaped supplied countertop mounting brackets (select models), decide which method will damage the dishwasher's water inlet valve. Temperatures required for soldering and sweating will be used for weeks, run with...
... no loose electrical connections. Temperatures required for soldering and sweating will damage the mounting brackets and the dishwasher. When opening . Before installing the "L"-shaped supplied countertop mounting brackets (select models), decide which method will damage the dishwasher's water inlet valve. Temperatures required for soldering and sweating will be used for weeks, run with...

Installation Instructions
Page 6
... hose clip may be installed in a corner, make sure that the enclosure is square and has the dimensions shown in Figure 1 below. Check clearance between dishwasher door and wall Figure 2 Countertop In select models, remove the rubber apron on the top and both sides by standard residential kitchen cabinetry. To pass the...
... hose clip may be installed in a corner, make sure that the enclosure is square and has the dimensions shown in Figure 1 below. Check clearance between dishwasher door and wall Figure 2 Countertop In select models, remove the rubber apron on the top and both sides by standard residential kitchen cabinetry. To pass the...
Installation Instructions
Page 12
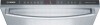
...outer toe panel (3rd piece - Allow it to allow height adjustment. 1. Re-insert the brackets. 8. For models with either a two-piece or threepiece toe panel (model dependent) to rest on the dishwasher first. See Figure 27. Figure 26 B B K L K F Figure 27 12 12 Use the supplied screws... the two black screws (B) through the holes in further than you need. 7. L) slide the brackets (K) provided, into the slots of the dishwasher. 3. See Figure 26. 4. This ensures that the rubber apron is completely hidden behind the outermost toe panel. 5. Position the mating front toe...
...outer toe panel (3rd piece - Allow it to allow height adjustment. 1. Re-insert the brackets. 8. For models with either a two-piece or threepiece toe panel (model dependent) to rest on the dishwasher first. See Figure 27. Figure 26 B B K L K F Figure 27 12 12 Use the supplied screws... the two black screws (B) through the holes in further than you need. 7. L) slide the brackets (K) provided, into the slots of the dishwasher. 3. See Figure 26. 4. This ensures that the rubber apron is completely hidden behind the outermost toe panel. 5. Position the mating front toe...

Installation Instructions
Page 13
...obtain warranty service. 13 E-mail us at the Customer Service phone number : 1-800-944-2904 Please be reached. Customer Service Your dishwasher requires no special care other than that described in the Use and Care Manual. Any work performed by unauthorized personnel may void the ...you are writing), or have available (if you are having a problem with the service you have received, please take the following information: • Model number • Serial number • Date of original purchase • Date the problem originated • Explanation of the Use and Care Manual....
...obtain warranty service. 13 E-mail us at the Customer Service phone number : 1-800-944-2904 Please be reached. Customer Service Your dishwasher requires no special care other than that described in the Use and Care Manual. Any work performed by unauthorized personnel may void the ...you are writing), or have available (if you are having a problem with the service you have received, please take the following information: • Model number • Serial number • Date of original purchase • Date the problem originated • Explanation of the Use and Care Manual....
Instructions for Use
Page 8
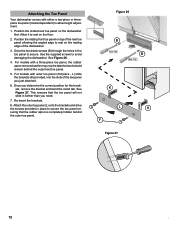
...runs out. 4 Refill with salt and immediately begin any salt other than dishwasher water softening salt. Do not use the dishwasher water softening salt. Salt is not required at H:00 (this is lit (model dependent). After 1 minute the test strip will destroy the water softening ... Service. 6 It will show you have a household water softening system, the internal system provided is not needed. Dishwasher Setup Water Softening System Your dishwasher requires soft water to ensure proper washing results and is equipped with detergent. Shake off excess water and wait approximately...
...runs out. 4 Refill with salt and immediately begin any salt other than dishwasher water softening salt. Do not use the dishwasher water softening salt. Salt is not required at H:00 (this is lit (model dependent). After 1 minute the test strip will destroy the water softening ... Service. 6 It will show you have a household water softening system, the internal system provided is not needed. Dishwasher Setup Water Softening System Your dishwasher requires soft water to ensure proper washing results and is equipped with detergent. Shake off excess water and wait approximately...

Instructions for Use
Page 14
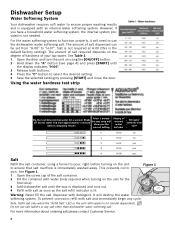
Dishwasher Cycles and Options Wash Cycles (model dependent) Heavy: Best for cleaning items with the Sanitize option selected... The test was used in the highest position. Refer to Auto Wash when turned off . Note: The dishwasher automatically defaults to the Dishware Materials section of 6 for use . Wash Cycle Information Heavy Auto Normal Delicate ... be on food or grease. If you to meet the requirements of this Use and Care Manual are dishwasher safe. There is especially helpful to reduce a cloudy or etched appearance on this soil sensing cycle will ...
Dishwasher Cycles and Options Wash Cycles (model dependent) Heavy: Best for cleaning items with the Sanitize option selected... The test was used in the highest position. Refer to Auto Wash when turned off . Note: The dishwasher automatically defaults to the Dishware Materials section of 6 for use . Wash Cycle Information Heavy Auto Normal Delicate ... be on food or grease. If you to meet the requirements of this Use and Care Manual are dishwasher safe. There is especially helpful to reduce a cloudy or etched appearance on this soil sensing cycle will ...
Instructions for Use
Page 18
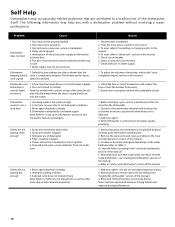
... Unit not reset or previous cycle not completed 4. cycle signal) vated if so desired. Cycle time can be turned on Dishwasher 1. Dishwasher connected to cold water supply Note: Refer to turn on 3. Filters could be turned on 3. Press the main power switch... cycle time to the "cycle completion signal" section in the dishwasher - see "loading the dishwasher" section of detergents 4. Interruption of the manual 6. Door not closed or latched console lights Note: For models with a dishwasher problem without first selecting a cycle 7. Delay start engaged 5. ...
... Unit not reset or previous cycle not completed 4. cycle signal) vated if so desired. Cycle time can be turned on Dishwasher 1. Dishwasher connected to cold water supply Note: Refer to turn on 3. Filters could be turned on 3. Press the main power switch... cycle time to the "cycle completion signal" section in the dishwasher - see "loading the dishwasher" section of detergents 4. Interruption of the manual 6. Door not closed or latched console lights Note: For models with a dishwasher problem without first selecting a cycle 7. Delay start engaged 5. ...
Instructions for Use
Page 20
... Please be reached. If you are having a problem with your Bosch dishwasher and are having a problem with this manual. You will replace the product or refund the purchase price. If you can be sure to include your model information as well as an explanation of the problem and the date...take the following steps until the problem is backed by unauthorized personnel may void the warranty. The customer much show proof of the dishwasher door. This Bosch dishwasher is corrected to the Self Help section of the manual. Please make a copy of this manual. Customer Service Your...
... Please be reached. If you are having a problem with your Bosch dishwasher and are having a problem with this manual. You will replace the product or refund the purchase price. If you can be sure to include your model information as well as an explanation of the problem and the date...take the following steps until the problem is backed by unauthorized personnel may void the warranty. The customer much show proof of the dishwasher door. This Bosch dishwasher is corrected to the Self Help section of the manual. Please make a copy of this manual. Customer Service Your...
Instructions for Use
Page 21
...& Who it Applies to: The limited warranty provided by BSH Home Appliances ("Bosch") in this Statement of Limited Product Warranty applies only to Bosch dishwashers ("Product") sold to you, the first using a Bosch-authorized service provider during normal business hours. All replaced and/or repaired parts ...the first purchaser of the Product and are not the direct fault of Bosch, including without charge to you (subject to certain limitations stated herein) if your dishwasher with the same model or a current model that is nothing wrong with a defect in materials and workmanship for damage...
...& Who it Applies to: The limited warranty provided by BSH Home Appliances ("Bosch") in this Statement of Limited Product Warranty applies only to Bosch dishwashers ("Product") sold to you, the first using a Bosch-authorized service provider during normal business hours. All replaced and/or repaired parts ...the first purchaser of the Product and are not the direct fault of Bosch, including without charge to you (subject to certain limitations stated herein) if your dishwasher with the same model or a current model that is nothing wrong with a defect in materials and workmanship for damage...


