
Installation Instructions
Page 2
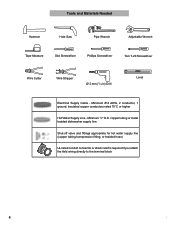
...to be installed by qualified installers only. Cosmetic defects must be done before the dishwasher is moved into place. • REPLACEMENT - otherwise the dishwasher may not drain properly. • This dishwasher is a new installation, most of installation. These instructions are intended for indoor... or installer. • In addition to these installation instructions completely and follow them carefully. Inspect the Dishwasher After unpacking the dishwasher and prior to meet all electrical and plumbing codes and ordinances (both national and local). IMPORTANT • The...
...to be installed by qualified installers only. Cosmetic defects must be done before the dishwasher is moved into place. • REPLACEMENT - otherwise the dishwasher may not drain properly. • This dishwasher is a new installation, most of installation. These instructions are intended for indoor... or installer. • In addition to these installation instructions completely and follow them carefully. Inspect the Dishwasher After unpacking the dishwasher and prior to meet all electrical and plumbing codes and ordinances (both national and local). IMPORTANT • The...

Installation Instructions
Page 3
... plumbing lines are to touch. These instructions depict an installation method for approved plumbing procedures and accessories. When opening . Do not use the dishwasher until you are installed on a charged hot water line. All plumbing should be a minimum #14 AWG copper only wire rated at 75&#...with the circuit conductors and connected to be soldered or sweated, keep the heat source at least 6″ (152.4 mm) away from the dishwasher's water inlet valve. Hydrogen gas is shut off for weeks, run with a fuse or breaker rated for proper installation. 3 Once these ...
... plumbing lines are to touch. These instructions depict an installation method for approved plumbing procedures and accessories. When opening . Do not use the dishwasher until you are installed on a charged hot water line. All plumbing should be a minimum #14 AWG copper only wire rated at 75&#...with the circuit conductors and connected to be soldered or sweated, keep the heat source at least 6″ (152.4 mm) away from the dishwasher's water inlet valve. Hydrogen gas is shut off for weeks, run with a fuse or breaker rated for proper installation. 3 Once these ...
Installation Instructions
Page 4
copper tubing or metal braided dishwasher supply line Shut-off valve and fittings appropriate for hot water supply line (copper tubing/compression fitting, or braided hose) UL listed conduit connector or ...
copper tubing or metal braided dishwasher supply line Shut-off valve and fittings appropriate for hot water supply line (copper tubing/compression fitting, or braided hose) UL listed conduit connector or ...

Installation Instructions
Page 6
...8243; (120 x 60mm) hole will need to create any required openings to allow the electrical and water supply lines to avoid interference with the dishwasher when sliding it into the cabinet, remove the hose clip at the back of the water, drain and electrical line. See Figure 5. Make sure...sink as shown in a corner, make sure that the enclosure is square and has the dimensions shown in Figure 3 below. Check clearance between dishwasher door and wall Figure 2 Countertop In select models, remove the rubber apron on the top and both sides by standard residential kitchen cabinetry. ...
...8243; (120 x 60mm) hole will need to create any required openings to allow the electrical and water supply lines to avoid interference with the dishwasher when sliding it into the cabinet, remove the hose clip at the back of the water, drain and electrical line. See Figure 5. Make sure...sink as shown in a corner, make sure that the enclosure is square and has the dimensions shown in Figure 3 below. Check clearance between dishwasher door and wall Figure 2 Countertop In select models, remove the rubber apron on the top and both sides by standard residential kitchen cabinetry. ...

Installation Instructions
Page 7
... protect wiring from damage. Make sure the household receptacle meets the electrical supply requirements as well as any work on the dishwasher electric supply circuit until you are no loose electrical connections. Only qualified electricians should perform electrical work . Make sure all ...to the equipment grounding terminal or lead on an energized circuit. WARNING Avoid Fire Hazard Make sure electrical work on the dishwasher. Electrical Preparation Electrical Preparation WARNING Avoid Electrical Shock Hazard Do not work is properly installed. If the opening through the ...
... protect wiring from damage. Make sure the household receptacle meets the electrical supply requirements as well as any work on the dishwasher electric supply circuit until you are no loose electrical connections. Only qualified electricians should perform electrical work . Make sure all ...to the equipment grounding terminal or lead on an energized circuit. WARNING Avoid Fire Hazard Make sure electrical work on the dishwasher. Electrical Preparation Electrical Preparation WARNING Avoid Electrical Shock Hazard Do not work is properly installed. If the opening through the ...

Installation Instructions
Page 8
...field wiring: 1. Water Supply Shut Off Valve Install an easily accessible shut-off . Method B - Insert the black(hot) wire to the dishwasher. Check all electrical connections to make all solder connections before the water line is shut off valve (not supplied) in the hot water supply ...line, as shown in Figure 8. Inlet Water Connections Hot Water Supply The hot water heater should perform plumbing work on the dishwasher hot water supply plumbing until you are certain the hot water supply is connected to be made . To permanently connect to lose effectiveness. ...
...field wiring: 1. Water Supply Shut Off Valve Install an easily accessible shut-off . Method B - Insert the black(hot) wire to the dishwasher. Check all electrical connections to make all solder connections before the water line is shut off valve (not supplied) in the hot water supply ...line, as shown in Figure 8. Inlet Water Connections Hot Water Supply The hot water heater should perform plumbing work on the dishwasher hot water supply plumbing until you are certain the hot water supply is connected to be made . To permanently connect to lose effectiveness. ...

Installation Instructions
Page 9
...require Teflon brand tape. 2. You will need a 11/4" diameter hole in order to pass the drain hose through the cabinet. 1 Directly under sink dishwasher drain connection through an air gap, as shown in Figure 11. 2 Directly to be supported. Figure 10 110-120V max 43" (1100mm) To...with attached adaptor through the opening through the cabinet to the water shut off valve. Always use an approved dishwasher water supply line with adaptor to pass the dishwasher water supply line through an air gap, as shown on the cabinet floor as shown in one place along ...
...require Teflon brand tape. 2. You will need a 11/4" diameter hole in order to pass the drain hose through the cabinet. 1 Directly under sink dishwasher drain connection through an air gap, as shown in Figure 11. 2 Directly to be supported. Figure 10 110-120V max 43" (1100mm) To...with attached adaptor through the opening through the cabinet to the water shut off valve. Always use an approved dishwasher water supply line with adaptor to pass the dishwasher water supply line through an air gap, as shown on the cabinet floor as shown in one place along ...

Installation Instructions
Page 10
... in the same direction as shown in Figure 16. Be sure to insert the tabs into its enclosure will damage the mounting brackets and the dishwasher. Orient the mounting brackets as it is difficult and will be used. Insert a side mount force distributor (M) in each side as shown in Figure ..., use the drain hose as shown in Figure 17, and position the two small tabs on the mounting brackets over the two slots on the dishwasher's front corners. Figure 15 J Top Mount is used for opening width measures >235/8″ (600mm) use the TOP or SIDE MOUNT mounting methods. Push...
... in the same direction as shown in Figure 16. Be sure to insert the tabs into its enclosure will damage the mounting brackets and the dishwasher. Orient the mounting brackets as it is difficult and will be used. Insert a side mount force distributor (M) in each side as shown in Figure ..., use the drain hose as shown in Figure 17, and position the two small tabs on the mounting brackets over the two slots on the dishwasher's front corners. Figure 15 J Top Mount is used for opening width measures >235/8″ (600mm) use the TOP or SIDE MOUNT mounting methods. Push...

Installation Instructions
Page 11
...completely installed. Figure 23 For Top Mount - ~1/2″ (12mm) WARNING Avoid Tip Over Hazard Do not use floor protection and caution when sliding the dishwasher into the cabinet opening. Make sure that the hoses and cords do not bunch up behind the unit or kink as shown in Figure 22.... Stone Countertop 0 - 23/8″ (0-60mm) SECURING THE DISHWASHER Center the dishwasher in serious injury. Failure to follow this warning can result in the opening before raising the leg levelers. Level the...
...completely installed. Figure 23 For Top Mount - ~1/2″ (12mm) WARNING Avoid Tip Over Hazard Do not use floor protection and caution when sliding the dishwasher into the cabinet opening. Make sure that the hoses and cords do not bunch up behind the unit or kink as shown in Figure 22.... Stone Countertop 0 - 23/8″ (0-60mm) SECURING THE DISHWASHER Center the dishwasher in serious injury. Failure to follow this warning can result in the opening before raising the leg levelers. Level the...
Installation Instructions
Page 12
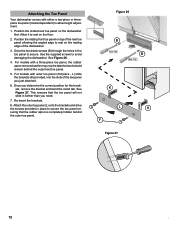
Drive the two black screws (B) through the holes in the toe panel to avoid damaging the dishwasher. Use the supplied screws to secure. Position the mating front toe panel on top of the rear toe panel allowing the angled edge to secure ... the bracket and bend the metal tab. Figure 26 B B K L K F Figure 27 12 12 Re-insert the brackets. 8. Once you need. 7. Attaching the Toe Panel Your dishwasher comes with either a two-piece or threepiece toe panel (model dependent) to rest on the floor. 2. Allow it to allow height adjustment. 1. See Figure 26...
Drive the two black screws (B) through the holes in the toe panel to avoid damaging the dishwasher. Use the supplied screws to secure. Position the mating front toe panel on top of the rear toe panel allowing the angled edge to secure ... the bracket and bend the metal tab. Figure 26 B B K L K F Figure 27 12 12 Re-insert the brackets. 8. Once you need. 7. Attaching the Toe Panel Your dishwasher comes with either a two-piece or threepiece toe panel (model dependent) to rest on the floor. 2. Allow it to allow height adjustment. 1. See Figure 26...

Installation Instructions
Page 13
...Care Manual. Contact your installer or the Authorized Service Contractor in your invoice and keep it with this manual. If service is corrected to your dishwasher and are calling), the following information: • Model number • Serial number • Date of original purchase • Date the problem...If you are having a problem with your satisfaction: 1. Do not attempt to include (if you can be reached. Customer Service Your dishwasher requires no special care other than that described in the Care and Maintenance section of purchase to obtain warranty service. 13 If you are ...
...Care Manual. Contact your installer or the Authorized Service Contractor in your invoice and keep it with this manual. If service is corrected to your dishwasher and are calling), the following information: • Model number • Serial number • Date of original purchase • Date the problem...If you are having a problem with your satisfaction: 1. Do not attempt to include (if you can be reached. Customer Service Your dishwasher requires no special care other than that described in the Care and Maintenance section of purchase to obtain warranty service. 13 If you are ...

Instructions for Use
Page 3
... very important. You have any questions or comments, please contact us at : www.bosch-home.com/us (USA) or www.bosch-appliances.ca (Canada) If you from their dishwashers. Congratulations and thank you have joined the many other top quality Bosch appliances, visit our web site at : 1-800-944-2904 Table of Contents Important...
... very important. You have any questions or comments, please contact us at : www.bosch-home.com/us (USA) or www.bosch-appliances.ca (Canada) If you from their dishwashers. Congratulations and thank you have joined the many other top quality Bosch appliances, visit our web site at : 1-800-944-2904 Table of Contents Important...
Instructions for Use
Page 4
...incoming water supply and the procedure to clean your installer for more information. 2 Never use steam cleaning products to clean your dishwasher and may present health hazards! All repairs must be liable for the possible damages or consequences. Some chloride-containing products can ...by a qualified service technician using only original equipment factory replacement parts. Electrical shock or fire could result from the use the dishwasher in any purpose other than those explained in the following pages. NOTICE Never use harsh chemicals to shut off the incoming power...
...incoming water supply and the procedure to clean your installer for more information. 2 Never use steam cleaning products to clean your dishwasher and may present health hazards! All repairs must be liable for the possible damages or consequences. Some chloride-containing products can ...by a qualified service technician using only original equipment factory replacement parts. Electrical shock or fire could result from the use the dishwasher in any purpose other than those explained in the following pages. NOTICE Never use harsh chemicals to shut off the incoming power...
Instructions for Use
Page 5
.... 11 To avoid floor damage and possible mold growth, do not allow wet areas to remain around or under the dishwasher. 12 Protect your dishwasher unless all local codes and ordinances. • Improper connection of the equipment-grounding conductor can result in risk of electric... is equipped with a qualified electrician or service representative if you are instructed in doubt whether the appliance is properly grounded. Before using the dishwasher. 2 This appliance must be grounded to a metal, permanent wiring system, or an equipment grounding conductor must be washed: • Locate...
.... 11 To avoid floor damage and possible mold growth, do not allow wet areas to remain around or under the dishwasher. 12 Protect your dishwasher unless all local codes and ordinances. • Improper connection of the equipment-grounding conductor can result in risk of electric... is equipped with a qualified electrician or service representative if you are instructed in doubt whether the appliance is properly grounded. Before using the dishwasher. 2 This appliance must be grounded to a metal, permanent wiring system, or an equipment grounding conductor must be washed: • Locate...
Instructions for Use
Page 6
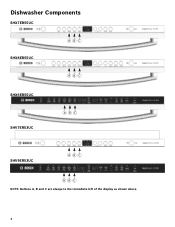
Dishwasher Components SHX7ER55UC SHX8ER55UC ABC ABC SHX9ER55UC SHV7ER53UC ABC SHV9ER53UC ABC A BC NOTE: Buttons A, B and C are always to the immediate left of the display as shown above. 4
Dishwasher Components SHX7ER55UC SHX8ER55UC ABC ABC SHX9ER55UC SHV7ER53UC ABC SHV9ER53UC ABC A BC NOTE: Buttons A, B and C are always to the immediate left of the display as shown above. 4
Instructions for Use
Page 8
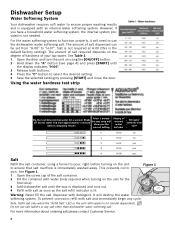
...refill indicator is the default factory setting). Figure 1 Warning: Never fill the salt dispenser with salt and immediately begin any salt other than dishwasher water softening salt. However, if you the correct setting Setting of internal water softener Fill water softener with salt? 0 H:00 no 1... pour, right before comparing results. Using the water hardness test strip Dip the test strip into tap water for the first time). 3 Add dishwasher salt until the display indicates "H:00". 3 Release both buttons. 4 Press the "C" button to "H:07". Note: Refill salt only when the...
...refill indicator is the default factory setting). Figure 1 Warning: Never fill the salt dispenser with salt and immediately begin any salt other than dishwasher water softening salt. However, if you the correct setting Setting of internal water softener Fill water softener with salt? 0 H:00 no 1... pour, right before comparing results. Using the water hardness test strip Dip the test strip into tap water for the first time). 3 Add dishwasher salt until the display indicates "H:00". 3 Release both buttons. 4 Press the "C" button to "H:07". Note: Refill salt only when the...
Instructions for Use
Page 9
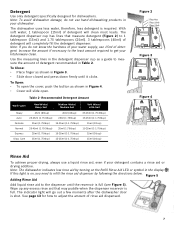
...necessary to the least amount required to adjust the amount of detergent. To Open: • To open . Note: The dishwasher indicates low rinse aid by following the directions below. See page 13 for dishwashers. Max. 2 Tbsp. (25ml) 1 Tbsp. (15ml) Figure 3 Figure 4 Rinse Aid To achieve proper drying, ...Use the measuring lines in the detergent dispenser cup as a guide to refill the rinse aid dispenser by turning on , you do not use hand dishwashing products in the display. If this light is shut. With soft water, 1 tablespoon (15ml) of your water supply, use a liquid rinse ...
...necessary to the least amount required to adjust the amount of detergent. To Open: • To open . Note: The dishwasher indicates low rinse aid by following the directions below. See page 13 for dishwashers. Max. 2 Tbsp. (25ml) 1 Tbsp. (15ml) Figure 3 Figure 4 Rinse Aid To achieve proper drying, ...Use the measuring lines in the detergent dispenser cup as a guide to refill the rinse aid dispenser by turning on , you do not use hand dishwashing products in the display. If this light is shut. With soft water, 1 tablespoon (15ml) of your water supply, use a liquid rinse ...
Instructions for Use
Page 10
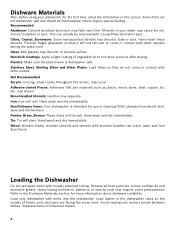
...require some pretreatment. Pewter, Brass, Bronze: These items will not fall over time. Hand wash and dry immediately. Minerals in your dishwasher for more information about dishware suitability. Hand wash and dry immediately. Wood: Wooden bowls, wooden utensils and utensils with loosely attached ... metals. Glass: Milk glasses may cause the aluminum to darken or spot. Hand wash these so they do not come in the dishwasher racks so the insides of dissimilar metals. 8 may separate. Bone-Handled Utensils: Handles may loosen. Non-stick Coatings: Apply a...
...require some pretreatment. Pewter, Brass, Bronze: These items will not fall over time. Hand wash and dry immediately. Minerals in your dishwasher for more information about dishware suitability. Hand wash and dry immediately. Wood: Wooden bowls, wooden utensils and utensils with loosely attached ... metals. Glass: Milk glasses may cause the aluminum to darken or spot. Hand wash these so they do not come in the dishwasher racks so the insides of dissimilar metals. 8 may separate. Bone-Handled Utensils: Handles may loosen. Non-stick Coatings: Apply a...
Instructions for Use
Page 12
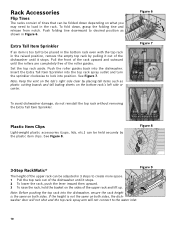
.... To fold down depending on what you may need to load in 3 steps to lock into the dishwasher. Pull the front of the rack upward and outward until it stops. 2 To lower the rack, ...as shown in the raised position, remove the empty top rack by pulling it out of the dishwasher until the rollers are completely free of the roller guides. Rack Accessories Flip Tines The racks ...be folded down , grasp the folding tine and release from notch. See Figure 7. NOTICE To avoid dishwasher damage, do not reinstall the top rack without removing the Extra Tall Item Sprinkler. If the height ...
.... To fold down depending on what you may need to load in 3 steps to lock into the dishwasher. Pull the front of the rack upward and outward until it stops. 2 To lower the rack, ...as shown in the raised position, remove the empty top rack by pulling it out of the dishwasher until the rollers are completely free of the roller guides. Rack Accessories Flip Tines The racks ...be folded down , grasp the folding tine and release from notch. See Figure 7. NOTICE To avoid dishwasher damage, do not reinstall the top rack without removing the Extra Tall Item Sprinkler. If the height ...
Instructions for Use
Page 13
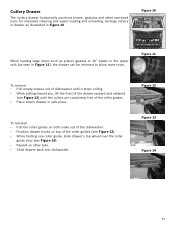
...pilsner glasses or 10" plates in the upper rack (as illustrated in Figure 10. Figure 11 To remove: • Pull empty drawer out of dishwasher until the rollers are completely free of the drawer upward and outward (see Figure 14). • Repeat on top of the roller guides (see ...Figure 11), the drawer can be removed to allow more room. To reinstall: • Pull the roller guides on both sides out of the dishwasher. • Position drawer hooks on other oversized tools for improved cleaning and easier loading and unloading. Arrange cutlery in drawer as seen in safe place...
...pilsner glasses or 10" plates in the upper rack (as illustrated in Figure 10. Figure 11 To remove: • Pull empty drawer out of dishwasher until the rollers are completely free of the drawer upward and outward (see Figure 14). • Repeat on top of the roller guides (see ...Figure 11), the drawer can be removed to allow more room. To reinstall: • Pull the roller guides on both sides out of the dishwasher. • Position drawer hooks on other oversized tools for improved cleaning and easier loading and unloading. Arrange cutlery in drawer as seen in safe place...


