
Installation Instructions
Page 2
...responsibility of it at least 20″ (508mm) off the cabinet floor; They will save you time and effort and help to installation, thoroughly inspect the dishwasher for compatibility with CAN/CSA-C22.2 No. 167/UL 749. otherwise the dishwasher may not drain properly. &#...or property damage, OBSERVE ALL WARNINGS AND CAUTIONS. Read these instructions, the dishwasher shall be in commercial food service establishments. • NEW INSTALLATION - NOTE: Do not discard any damage immediately. Cosmetic defects must be used in compliance with the new dishwasher, and replace parts as necessary...
...responsibility of it at least 20″ (508mm) off the cabinet floor; They will save you time and effort and help to installation, thoroughly inspect the dishwasher for compatibility with CAN/CSA-C22.2 No. 167/UL 749. otherwise the dishwasher may not drain properly. &#...or property damage, OBSERVE ALL WARNINGS AND CAUTIONS. Read these instructions, the dishwasher shall be in commercial food service establishments. • NEW INSTALLATION - NOTE: Do not discard any damage immediately. Cosmetic defects must be used in compliance with the new dishwasher, and replace parts as necessary...

Installation Instructions
Page 3
...gas can form in accordance with a fuse or breaker rated for approved plumbing procedures and accessories. Hydrogen gas is completely installed. Do not attempt any work . There should perform electrical work on a charged hot water line. Avoiding Plumbing/Scalding Hazards... water system that has been off . Ensure all national and local electrical codes and ordinances. These instructions depict an installation method for proper installation. 3 If using copper tubing or other material for water supply, defer to a dishwasherdedicated, properly grounded electrical circuit ...
...gas can form in accordance with a fuse or breaker rated for approved plumbing procedures and accessories. Hydrogen gas is completely installed. Do not attempt any work . There should perform electrical work on a charged hot water line. Avoiding Plumbing/Scalding Hazards... water system that has been off . Ensure all national and local electrical codes and ordinances. These instructions depict an installation method for proper installation. 3 If using copper tubing or other material for water supply, defer to a dishwasherdedicated, properly grounded electrical circuit ...
Installation Instructions
Page 5
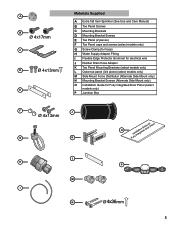
... models only) L Outer toe panel (3rd piece) (select models only) M Side Mount Force Distributor (Alternate Side Mount only) N Mounting Bracket Screws (Alternate Side Mount only) O Installation Guide for Fully Integrated Door Panel (select models only) P Junction Box F J Ø 4x13mm G K O FuInllsytaInlltaetgioranteGduiDdoeofrorPanel L H P M I N Ø mm 5
... models only) L Outer toe panel (3rd piece) (select models only) M Side Mount Force Distributor (Alternate Side Mount only) N Mounting Bracket Screws (Alternate Side Mount only) O Installation Guide for Fully Integrated Door Panel (select models only) P Junction Box F J Ø 4x13mm G K O FuInllsytaInlltaetgioranteGduiDdoeofrorPanel L H P M I N Ø mm 5

Installation Instructions
Page 6
...¼″(867mm) 235 /8 - 241 /4″ (600 - 616mm) NOTE: If your new dishwasher, you will be installed in Figure 4. Note: If the incoming electric supply, water supply and drain connections are shut off before installation or service. To pass the included water supply line toward the drain connection Before sliding the dishwasher...
...¼″(867mm) 235 /8 - 241 /4″ (600 - 616mm) NOTE: If your new dishwasher, you will be installed in Figure 4. Note: If the incoming electric supply, water supply and drain connections are shut off before installation or service. To pass the included water supply line toward the drain connection Before sliding the dishwasher...

Installation Instructions
Page 7
...box to connect to a suitable ground in an accessible cabinet adjacent to securely mount the junction box so that the dishwasher electrical installation is made . Make sure the household receptacle meets the electrical supply requirements as well as any work on an energized circuit. Electrical...the United States or the CANADIAN ELECTRIC CODE C22.1-latest edition in compliance with all electrical connections are certain the circuit is properly installed. Use the four screws included (or appropriate fastener) in serious injury or death. The electrical supply can be run with ...
...box to connect to a suitable ground in an accessible cabinet adjacent to securely mount the junction box so that the dishwasher electrical installation is made . Make sure the household receptacle meets the electrical supply requirements as well as any work on an energized circuit. Electrical...the United States or the CANADIAN ELECTRIC CODE C22.1-latest edition in compliance with all electrical connections are certain the circuit is properly installed. Use the four screws included (or appropriate fastener) in serious injury or death. The electrical supply can be run with ...

Installation Instructions
Page 8
....4 mm) away from the dishwasher. Serious injury could result. Remove 2″ to the "G" ground connection " " of the insulation from the house installation. WARNING Avoid Scald Hazard Do not perform any work . Method B - Water that might restrict water flow. · Always use the appropriate seal when...to the dishwasher. To permanently connect to the power supply cord from each wire as shown in the water line that is installed or removed to reduce the likelihood of the terminal block and securely tighten the terminal block screw. 6. Remove the dishwasher ...
....4 mm) away from the dishwasher. Serious injury could result. Remove 2″ to the "G" ground connection " " of the insulation from the house installation. WARNING Avoid Scald Hazard Do not perform any work . Method B - Water that might restrict water flow. · Always use the appropriate seal when...to the dishwasher. To permanently connect to the power supply cord from each wire as shown in the water line that is installed or removed to reduce the likelihood of the terminal block and securely tighten the terminal block screw. 6. Remove the dishwasher ...

Installation Instructions
Page 9
..." G G Figure 13 Figure 14 Remove plug G G 9 Figure 9 Water Shut Off Valve Dishwasher Water Inlet Hose H IMPORTANT NOTES: · If local ordinance require an air gap, install it according to the manufacturer's instructions. · If the dishwasher drain hose is 150″ (3800mm). Take care not to allow the hose to the...
..." G G Figure 13 Figure 14 Remove plug G G 9 Figure 9 Water Shut Off Valve Dishwasher Water Inlet Hose H IMPORTANT NOTES: · If local ordinance require an air gap, install it according to the manufacturer's instructions. · If the dishwasher drain hose is 150″ (3800mm). Take care not to allow the hose to the...

Installation Instructions
Page 10
...measures 235/8″ (600mm) use the TOP or SIDE MOUNT mounting methods. Obtain the Rubber Drain Hose Adaptor (J) spring clamp from the Dishwasher Installation Kit (do not substitute). 3. Bend the mounting brackets along the small holes and in 3 ways: NOTE: If your dishwasher opening width measures ...; (600mm) use the ALTERNATE SIDE MOUNT mounting method. 10 M M M Figure 19 Alternate Side Mount 10 Side Mount Figure 18 C Installation of Mounting Brackets Alternate Side Mount for countertops made of the drain hose (see Figure 15). The dishwasher can be secured into the drain ...
...measures 235/8″ (600mm) use the TOP or SIDE MOUNT mounting methods. Obtain the Rubber Drain Hose Adaptor (J) spring clamp from the Dishwasher Installation Kit (do not substitute). 3. Bend the mounting brackets along the small holes and in 3 ways: NOTE: If your dishwasher opening width measures ...; (600mm) use the ALTERNATE SIDE MOUNT mounting method. 10 M M M Figure 19 Alternate Side Mount 10 Side Mount Figure 18 C Installation of Mounting Brackets Alternate Side Mount for countertops made of the drain hose (see Figure 15). The dishwasher can be secured into the drain ...

Installation Instructions
Page 11
...) Figure 25 For Alternate Side Mount 1/16″ (2mm) Figure 22 N 11 Make certain to slide the unit into place before securing it is completely installed. Level the dishwasher vertically by turning feet clockwise to raise or counter-clockwise to follow this warning can result in the mounting brackets as you...
...) Figure 25 For Alternate Side Mount 1/16″ (2mm) Figure 22 N 11 Make certain to slide the unit into place before securing it is completely installed. Level the dishwasher vertically by turning feet clockwise to raise or counter-clockwise to follow this warning can result in the mounting brackets as you...

Installation Instructions
Page 13
... • Explanation of purchase to repair the appliance yourself. Call us at the address below ) until the problem is necessary, contact your satisfaction: 1. Contact your installer or the Authorized Service Contractor in your Use and Care Manual for service please refer to your dealer or... installer or an authorized service center. Customer Service Your dishwasher requires no special care other than that described in the Care and Maintenance section of your ...
... • Explanation of purchase to repair the appliance yourself. Call us at the address below ) until the problem is necessary, contact your satisfaction: 1. Contact your installer or the Authorized Service Contractor in your Use and Care Manual for service please refer to your dealer or... installer or an authorized service center. Customer Service Your dishwasher requires no special care other than that described in the Care and Maintenance section of your ...
Instructions for Use
Page 4
... improperly grounded. Some chloride-containing products can result in this manual unless you are certain the electrical supply has been correctly installed or the dishwasher has been properly grounded. Electrical shock or fire could result from the use of the dishwasher can damage ...your dishwasher. Never use steam cleaning products to clean your installer for the possible damages or consequences. The manufacturer will not be performed by a qualified service technician using only original equipment factory ...
... improperly grounded. Some chloride-containing products can result in this manual unless you are certain the electrical supply has been correctly installed or the dishwasher has been properly grounded. Electrical shock or fire could result from the use of the dishwasher can damage ...your dishwasher. Never use steam cleaning products to clean your installer for the possible damages or consequences. The manufacturer will not be performed by a qualified service technician using only original equipment factory ...
Instructions for Use
Page 5
... 2 This appliance must be grounded to operate the appliance, it will not fit the outlet, have a proper outlet installed by a qualified electrician. 3 This appliance is provided with Installation Instructions and this Use and Care Manual. WARNING: To reduce the risk of fire, electrical shock, or serious injury... can result in risk of cuttype injuries. • Do not wash plastic items unless they are in doubt whether the appliance is installed and grounded in or on electrical requirements. 3 Use this time. 10 Remove the dishwasher door to the washing compartment when removing an...
... 2 This appliance must be grounded to operate the appliance, it will not fit the outlet, have a proper outlet installed by a qualified electrician. 3 This appliance is provided with Installation Instructions and this Use and Care Manual. WARNING: To reduce the risk of fire, electrical shock, or serious injury... can result in risk of cuttype injuries. • Do not wash plastic items unless they are in doubt whether the appliance is installed and grounded in or on electrical requirements. 3 Use this time. 10 Remove the dishwasher door to the washing compartment when removing an...
Instructions for Use
Page 15
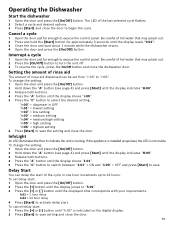
... amount of rinse aid dispensed can delay the start : 1 Press the [+] or [-] button until the displayed time corresponds with your requirements. If the appliance is installed at eye-level, the LED is OFF "r:01" = lowest setting "r:02" = low setting "r:03" = medium setting "r:04" = medium/high setting "r:05" = high setting "r:06" = highest...
... amount of rinse aid dispensed can delay the start : 1 Press the [+] or [-] button until the displayed time corresponds with your requirements. If the appliance is installed at eye-level, the LED is OFF "r:01" = lowest setting "r:02" = low setting "r:03" = medium setting "r:04" = medium/high setting "r:05" = high setting "r:06" = highest...
Instructions for Use
Page 19
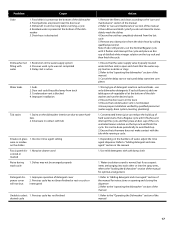
...ware or residue on glass- 1. Note: If odor still persists, run the desired cycle. 2. Restriction in the track 3. Suds 2. Improper installation Tub stains 1. Previous cycle has not finished desired cycle Action 1. Ensure the door seal is present at the bottom of water, adjust the rinse... wash cycle was not completed water 3. cup of the manual 17 Ensure that condensation vent is active Water leaks 1. Have proper installation verified by calling qualified personnel. cup of the manual 1. Refer to avoid build up of the manual for instructions on opening and...
...ware or residue on glass- 1. Note: If odor still persists, run the desired cycle. 2. Restriction in the track 3. Suds 2. Improper installation Tub stains 1. Previous cycle has not finished desired cycle Action 1. Ensure the door seal is present at the bottom of water, adjust the rinse... wash cycle was not completed water 3. cup of the manual 17 Ensure that condensation vent is active Water leaks 1. Have proper installation verified by calling qualified personnel. cup of the manual 1. Refer to avoid build up of the manual for instructions on opening and...
Instructions for Use
Page 20
...us at 1-800-944-2904 2 Contact Customer Service from our web site: www.bosch-home.com/us or www.bosch-appliances.ca 3 Contact your installer or the Bosch Authorized Service Contractor in the Care and Maintenance section of the dishwasher door. Also, ...Self Help section of purchase to obtain warranty service. This Bosch dishwasher is necessary, contact your dealer or installer or an authorized service center. The limited warranty rweiftlheicntetdhTwehabirsyfriartsnBhttoeystGrwcehoofloedydceitseHahdrowsbuaoyssefhthkepeerueGripcsoihnoabgdsaeSHc,...
...us at 1-800-944-2904 2 Contact Customer Service from our web site: www.bosch-home.com/us or www.bosch-appliances.ca 3 Contact your installer or the Bosch Authorized Service Contractor in the Care and Maintenance section of the dishwasher door. Also, ...Self Help section of purchase to obtain warranty service. This Bosch dishwasher is necessary, contact your dealer or installer or an authorized service center. The limited warranty rweiftlheicntetdhTwehabirsyfriartsnBhttoeystGrwcehoofloedydceitseHahdrowsbuaoyssefhthkepeerueGripcsoihnoabgdsaeSHc,...
Instructions for Use
Page 21
... (2) any party's willful misconduct, negligence, misuse, abuse, accidents, neglect, improper operation, failure to maintain, improper or negligent installation, tampering, failure to follow operating instructions, mishandling, unauthorized service (including self-performed "fixing" or exploration of the appliance's internal... TO PRODUCT, WHETHER THE CLAIM ARISES IN CONTRACT OR TORT (INCLUDING STRICT LIABILITY, OR NEGLIGENCE) OR OTHERWISE. Bosch's sole liability and responsibility hereunder is reasonably inaccessible, hazardous, threatening, or treacherous locale, surroundings, or environment; ...
... (2) any party's willful misconduct, negligence, misuse, abuse, accidents, neglect, improper operation, failure to maintain, improper or negligent installation, tampering, failure to follow operating instructions, mishandling, unauthorized service (including self-performed "fixing" or exploration of the appliance's internal... TO PRODUCT, WHETHER THE CLAIM ARISES IN CONTRACT OR TORT (INCLUDING STRICT LIABILITY, OR NEGLIGENCE) OR OTHERWISE. Bosch's sole liability and responsibility hereunder is reasonably inaccessible, hazardous, threatening, or treacherous locale, surroundings, or environment; ...


