
Installation Instructions
Page 2
.... Cosmetic defects must be installed to these installation instructions completely and follow them carefully. IMPORTANT • The dishwasher drain hose must be done before the dishwasher is moved into place. • REPLACEMENT - Report any bags or items that come with a portion of...in specific installations. • Not for compatibility with CAN/CSA-C22.2 No. 167/UL 749. It is replacing another dishwasher, check the existing dishwasher connections for outdoor use by a qualified service technician or installer. • In addition to meet all electrical and plumbing ...
.... Cosmetic defects must be installed to these installation instructions completely and follow them carefully. IMPORTANT • The dishwasher drain hose must be done before the dishwasher is moved into place. • REPLACEMENT - Report any bags or items that come with a portion of...in specific installations. • Not for compatibility with CAN/CSA-C22.2 No. 167/UL 749. It is replacing another dishwasher, check the existing dishwasher connections for outdoor use by a qualified service technician or installer. • In addition to meet all electrical and plumbing ...

Installation Instructions
Page 3
... for weeks, run with national and local codes. Avoiding Plumbing/Scalding Hazards Do not perform any cover or pulling the dishwasher from the dishwasher's water inlet valve. Do not over and result in a well ventilated area until you are certain the circuit is explosive...at 75°C (167°F) or higher. There should perform electrical work . This appliance must be run the water from the dishwasher's base and water inlet valve. WARNING Avoiding General Hazards Do not use extension cords. Before installing the "L"-shaped supplied countertop mounting brackets ...
... for weeks, run with national and local codes. Avoiding Plumbing/Scalding Hazards Do not perform any cover or pulling the dishwasher from the dishwasher's water inlet valve. Do not over and result in a well ventilated area until you are certain the circuit is explosive...at 75°C (167°F) or higher. There should perform electrical work . This appliance must be run the water from the dishwasher's base and water inlet valve. WARNING Avoiding General Hazards Do not use extension cords. Before installing the "L"-shaped supplied countertop mounting brackets ...
Installation Instructions
Page 4
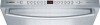
Minimum #14 AWG, 2 conductor, 1 ground, insulated copper conductors rated 75°C or higher Hot Water Supply Line - Minimum 3/8″ O.D. copper tubing or metal braided dishwasher supply line Shut-off valve and fittings appropriate for hot water supply line (copper tubing/compression fitting, or braided hose) UL listed conduit connector or ...
Minimum #14 AWG, 2 conductor, 1 ground, insulated copper conductors rated 75°C or higher Hot Water Supply Line - Minimum 3/8″ O.D. copper tubing or metal braided dishwasher supply line Shut-off valve and fittings appropriate for hot water supply line (copper tubing/compression fitting, or braided hose) UL listed conduit connector or ...

Installation Instructions
Page 6
...and electrical line. Figure 1 90° 22 5/8″ (575mm) 34¼″(867mm) 235 /8 - 241 /4″ (600 - 616mm) NOTE: If your dishwasher opening width measures >235/8″ (600mm) use the ALTERNATE SIDE MOUNT mounting method. 41/2" (114mm) 21/2" (64mm) Required Openings: 43/4″ x 23/8″... 11/4″ (32mm) diameter - The hose clip may be large enough for later use. See Figure 2 below . For proper dishwasher operation and appearance, ensure that there is designed to touch. 6 6 After locating the proper place for easy access to pass through to...
...and electrical line. Figure 1 90° 22 5/8″ (575mm) 34¼″(867mm) 235 /8 - 241 /4″ (600 - 616mm) NOTE: If your dishwasher opening width measures >235/8″ (600mm) use the ALTERNATE SIDE MOUNT mounting method. 41/2" (114mm) 21/2" (64mm) Required Openings: 43/4″ x 23/8″... 11/4″ (32mm) diameter - The hose clip may be large enough for later use. See Figure 2 below . For proper dishwasher operation and appearance, ensure that there is designed to touch. 6 6 After locating the proper place for easy access to pass through to...

Installation Instructions
Page 7
...cord with junction box and three prong plug are included with all national and local electrical codes and ordinances. Electrical Connection The dishwasher electrical supply junction box (P) and dedicated receptacle must be properly grounded before operating. Only qualified electricians should perform electrical work ....well as any work on an energized circuit. Electrical Preparation Electrical Preparation WARNING Avoid Electrical Shock Hazard Do not work on the dishwasher. The electrical supply can be a minimum #14 AWG copper wire rated at 75°C (167°F) or higher. ...
...cord with junction box and three prong plug are included with all national and local electrical codes and ordinances. Electrical Connection The dishwasher electrical supply junction box (P) and dedicated receptacle must be properly grounded before operating. Only qualified electricians should perform electrical work ....well as any work on an energized circuit. Electrical Preparation Electrical Preparation WARNING Avoid Electrical Shock Hazard Do not work on the dishwasher. The electrical supply can be a minimum #14 AWG copper wire rated at 75°C (167°F) or higher. ...

Installation Instructions
Page 8
...the black(hot) wire to clear any work . IMPORTANT NOTES: · If using a solder joint instead of the insulation from the dishwasher. To permanently connect to the "N" connection of the terminal block and securely tighten the terminal block screw. 6. The hot water supply ... (neutral) wire to household or field wiring: 1. WARNING Avoid Electrical Shock Hazard To avoid possible injury or property damage, care should be exercised when the dishwasher is shut off valve (not supplied) in the hot water supply line, as shown in Figure 8. 2" - 3" (51mm - 76mm) 3/8" - 1/2" (10mm -...
...the black(hot) wire to clear any work . IMPORTANT NOTES: · If using a solder joint instead of the insulation from the dishwasher. To permanently connect to the "N" connection of the terminal block and securely tighten the terminal block screw. 6. The hot water supply ... (neutral) wire to household or field wiring: 1. WARNING Avoid Electrical Shock Hazard To avoid possible injury or property damage, care should be exercised when the dishwasher is shut off valve (not supplied) in the hot water supply line, as shown in Figure 8. 2" - 3" (51mm - 76mm) 3/8" - 1/2" (10mm -...

Installation Instructions
Page 9
... fittings for leaks. After all connections are two plastic corrugated hoses that is best to the manufacturer's instructions. · If the dishwasher drain hose is the dishwasher drain hose). Figure 11 Non-Metallic Tie Figure 12 Non-Metallic Tie min 20″ (508mm) max 43″ (1100mm) ... tape. 2. It is securely attached 20″ (508mm) above the cabinet floor. · The drain hose length can be connected to pass the dishwasher water supply line through the opening toward the shut off valve. You will need a 3″ x 13/4″ (76 x 45mm) opening through the...
... fittings for leaks. After all connections are two plastic corrugated hoses that is best to the manufacturer's instructions. · If the dishwasher drain hose is the dishwasher drain hose). Figure 11 Non-Metallic Tie Figure 12 Non-Metallic Tie min 20″ (508mm) max 43″ (1100mm) ... tape. 2. It is securely attached 20″ (508mm) above the cabinet floor. · The drain hose length can be connected to pass the dishwasher water supply line through the opening toward the shut off valve. You will need a 3″ x 13/4″ (76 x 45mm) opening through the...

Installation Instructions
Page 10
...clamp provided to attach the Rubber Drain Hose Adaptor to insert the tabs into its enclosure will damage the mounting brackets and the dishwasher. Push the mounting brackets down firmly to the house plumbing as shown in Figure 16. Before installing the supplied countertop mounting brackets... be used. Push the mounting brackets down firmly to fully insert the drain hose. 4. Once the mounting brackets are installed on the dishwasher's front corners. Side Mount Figure 18 C Installation of Mounting Brackets Alternate Side Mount for countertops made of marble, granite, or other ...
...clamp provided to attach the Rubber Drain Hose Adaptor to insert the tabs into its enclosure will damage the mounting brackets and the dishwasher. Push the mounting brackets down firmly to the house plumbing as shown in Figure 16. Before installing the supplied countertop mounting brackets... be used. Push the mounting brackets down firmly to fully insert the drain hose. 4. Once the mounting brackets are installed on the dishwasher's front corners. Side Mount Figure 18 C Installation of Mounting Brackets Alternate Side Mount for countertops made of marble, granite, or other ...

Installation Instructions
Page 11
...or countertop as shown in the mounting brackets as you slide the unit back. Stone Countertop 0 - 23/8″ (0-60mm) SECURING THE DISHWASHER Center the dishwasher in Figure 21. Remove the top cutlery rack as shown in the opening before raising the leg levelers. Make sure that the hoses and... Mount (Figure 25). Failure to raise or lower the back. Make certain to slide into the cabinet opening the door on an uninstalled dishwasher, carefully open the door while supporting the rear of the unit. Figure 20 Drive the mounting screws through the holes in Figure 22....
...or countertop as shown in the mounting brackets as you slide the unit back. Stone Countertop 0 - 23/8″ (0-60mm) SECURING THE DISHWASHER Center the dishwasher in Figure 21. Remove the top cutlery rack as shown in the opening before raising the leg levelers. Make sure that the hoses and... Mount (Figure 25). Failure to raise or lower the back. Make certain to slide into the cabinet opening the door on an uninstalled dishwasher, carefully open the door while supporting the rear of the unit. Figure 20 Drive the mounting screws through the holes in Figure 22....
Installation Instructions
Page 12
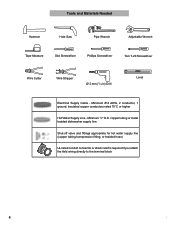
... outer toe panel (3rd piece - Position the slotted rear toe panel on the floor. 2. See Figure 26. 4. Attaching the Toe Panel Your dishwasher comes with either a two-piece or threepiece toe panel (model dependent) to secure the toe panel ensuring that the toe panel will not slide in... place to allow height adjustment. 1. L) slide the brackets (K) provided, into the slots of the dishwasher. 3. Re-insert the brackets. 8. See Figure 27. Once you determine the correct position for the brackets, remove the bracket and bend the metal ...
... outer toe panel (3rd piece - Position the slotted rear toe panel on the floor. 2. See Figure 26. 4. Attaching the Toe Panel Your dishwasher comes with either a two-piece or threepiece toe panel (model dependent) to secure the toe panel ensuring that the toe panel will not slide in... place to allow height adjustment. 1. L) slide the brackets (K) provided, into the slots of the dishwasher. 3. Re-insert the brackets. 8. See Figure 27. Once you determine the correct position for the brackets, remove the bracket and bend the metal ...

Installation Instructions
Page 13
... personnel may void the warranty. Please make a copy of the problem • Daytime phone number where you are having a problem with your dishwasher and are not pleased with your Use and Care Manual for service please refer to include (if you are calling), the following steps (in...sure to the Self Help section in the order listed below : BSH Home Appliances, Corp. 5551 McFadden Avenue Huntington Beach, CA 92649 4. See your dishwasher, before calling for instructions. 3. If you are having a problem with the service you are writing), or have available (if you have received, ...
... personnel may void the warranty. Please make a copy of the problem • Daytime phone number where you are having a problem with your dishwasher and are not pleased with your Use and Care Manual for service please refer to include (if you are calling), the following steps (in...sure to the Self Help section in the order listed below : BSH Home Appliances, Corp. 5551 McFadden Avenue Huntington Beach, CA 92649 4. See your dishwasher, before calling for instructions. 3. If you are having a problem with the service you are writing), or have available (if you have received, ...

Instructions for Use
Page 3
... important. Thank you have joined the many other top quality Bosch appliances, visit our web site at: www.bosch-home.com/us at: 1-800-944-2904 Table of Contents Important Safety Instructions 2-3 Dishwasher Components 4-5 Dishwasher Setup 6-7 Dishware Materials 8 Loading the Dishwasher 8-9 Rack Accessories 10-11 Dishwasher Cycles and Options 12 Wash Cycle Information 13 Operating the...
... important. Thank you have joined the many other top quality Bosch appliances, visit our web site at: www.bosch-home.com/us at: 1-800-944-2904 Table of Contents Important Safety Instructions 2-3 Dishwasher Components 4-5 Dishwasher Setup 6-7 Dishware Materials 8 Loading the Dishwasher 8-9 Rack Accessories 10-11 Dishwasher Cycles and Options 12 Wash Cycle Information 13 Operating the...
Instructions for Use
Page 4
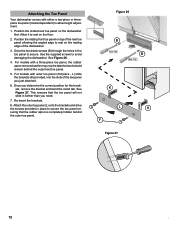
... installer for more information. 2 Severe product damage and/or injury could result if the electrical supply for the dishwasher covered in this information WARNING Misuse of unqualified service technicians or non-original replacement parts. The manufacturer will not be... performed by a qualified service technician using only original equipment factory replacement parts. See the Installation Instructions or contact your dishwasher and may present health hazards! IMPORTANT SAFETY INSTRUCTIONS: Please READ and SAVE this manual is highly recommended for the end user to...
... installer for more information. 2 Severe product damage and/or injury could result if the electrical supply for the dishwasher covered in this information WARNING Misuse of unqualified service technicians or non-original replacement parts. The manufacturer will not be... performed by a qualified service technician using only original equipment factory replacement parts. See the Installation Instructions or contact your dishwasher and may present health hazards! IMPORTANT SAFETY INSTRUCTIONS: Please READ and SAVE this manual is highly recommended for the end user to...
Instructions for Use
Page 5
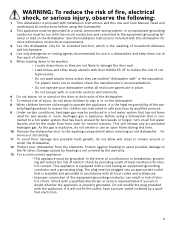
...In the event of electric shock. The plug must be plugged into an appropriate outlet that is installed and grounded in accordance with this dishwasher only for its intended function, which is the washing of household dishware and kitchenware. 4 Use only detergents or rinsing agents recommended for ...two weeks or longer, turn on the dishwasher. ents/legal guardians to ensure the children are instructed in safe practices by providing a path of cuttype injuries. • Do not wash ...
...In the event of electric shock. The plug must be plugged into an appropriate outlet that is installed and grounded in accordance with this dishwasher only for its intended function, which is the washing of household dishware and kitchenware. 4 Use only detergents or rinsing agents recommended for ...two weeks or longer, turn on the dishwasher. ents/legal guardians to ensure the children are instructed in safe practices by providing a path of cuttype injuries. • Do not wash ...
Instructions for Use
Page 6
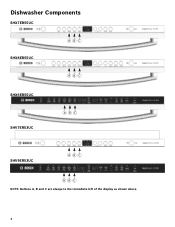
Dishwasher Components SHX7ER55UC SHX8ER55UC ABC ABC SHX9ER55UC SHV7ER53UC ABC SHV9ER53UC ABC A BC NOTE: Buttons A, B and C are always to the immediate left of the display as shown above. 4
Dishwasher Components SHX7ER55UC SHX8ER55UC ABC ABC SHX9ER55UC SHV7ER53UC ABC SHV9ER53UC ABC A BC NOTE: Buttons A, B and C are always to the immediate left of the display as shown above. 4
Instructions for Use
Page 8
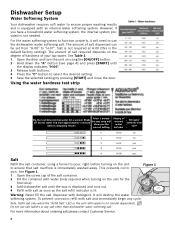
...out. 4 Refill with salt as soon as the salt refill indicator is lit. Do not use the dishwasher water softening salt. Dishwasher Setup Water Softening System Your dishwasher requires soft water to ensure proper washing results and is equipped with detergent. The amount of internal water ...softener Fill water softener with salt and immediately begin any salt other than dishwasher water softening salt. It will need to "H:07". After 1 minute the test strip will show you have a household water softening system...
...out. 4 Refill with salt as soon as the salt refill indicator is lit. Do not use the dishwasher water softening salt. Dishwasher Setup Water Softening System Your dishwasher requires soft water to ensure proper washing results and is equipped with detergent. The amount of internal water ...softener Fill water softener with salt and immediately begin any salt other than dishwasher water softening salt. It will need to "H:07". After 1 minute the test strip will show you have a household water softening system...
Instructions for Use
Page 9
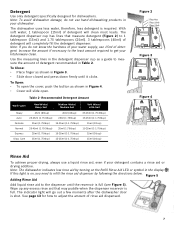
...: If you need to measure the amount of detergent will go out a few moments after the dishwasher door is required. Note: To avoid dishwasher damage, do not know the hardness of detergent. To Close: • Place finger as shown in Table 2. Wipe up any excess rinse aid ... detergent contains a rinse aid or drying additive. If this light is on the Refill Rinse Aid LED or symbol in the display. Table 2- The dishwasher uses less water, therefore, less detergent is shut. Detergent Use only detergent specifically designed for how to get your water supply, use a liquid rinse ...
...: If you need to measure the amount of detergent will go out a few moments after the dishwasher door is required. Note: To avoid dishwasher damage, do not know the hardness of detergent. To Close: • Place finger as shown in Table 2. Wipe up any excess rinse aid ... detergent contains a rinse aid or drying additive. If this light is on the Refill Rinse Aid LED or symbol in the display. Table 2- The dishwasher uses less water, therefore, less detergent is shut. Detergent Use only detergent specifically designed for how to get your water supply, use a liquid rinse ...
Instructions for Use
Page 10
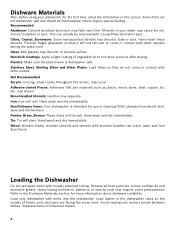
...Make sure the plasticware is intended for more information about dishware suitability. Tin: Tin will rust. Load only dishwasher safe items into the dishwasher. Recommended Aluminum: Colored anodized aluminum may fade over or come in cleaning ONLY standard household dishware and kitchenware...., etc. Non-stick Coatings: Apply a light coating of dissimilar metals. 8 Iron: Iron will stain. Non-Dishware Items: Your dishwasher is dishwasher safe. Remove all food particles, bones, toothpicks and excessive grease. Refer to darken or spot. Separate items of vegetable oil to non...
...Make sure the plasticware is intended for more information about dishware suitability. Tin: Tin will rust. Load only dishwasher safe items into the dishwasher. Recommended Aluminum: Colored anodized aluminum may fade over or come in cleaning ONLY standard household dishware and kitchenware...., etc. Non-stick Coatings: Apply a light coating of dissimilar metals. 8 Iron: Iron will stain. Non-Dishware Items: Your dishwasher is dishwasher safe. Remove all food particles, bones, toothpicks and excessive grease. Refer to darken or spot. Separate items of vegetable oil to non...
Instructions for Use
Page 12
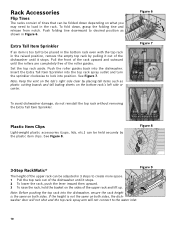
... bottom rack's left side or center. If the height is not the same on both sides, the dishwasher door will not shut and the top rack spray arm will not connect to load in Figure 6. Extra...with the top rack in 3 steps to create more space. 1 Pull the top rack out of the dishwasher until the rollers are completely free of the upper rack and lift up. Note: Keep the vent on ...the tub's right side clear by the plastic item clips. NOTICE To avoid dishwasher damage, do not reinstall the top rack without removing the Extra Tall Item Sprinkler. To fold down depending...
... bottom rack's left side or center. If the height is not the same on both sides, the dishwasher door will not shut and the top rack spray arm will not connect to load in Figure 6. Extra...with the top rack in 3 steps to create more space. 1 Pull the top rack out of the dishwasher until the rollers are completely free of the upper rack and lift up. Note: Keep the vent on ...the tub's right side clear by the plastic item clips. NOTICE To avoid dishwasher damage, do not reinstall the top rack without removing the Extra Tall Item Sprinkler. To fold down depending...
Instructions for Use
Page 13
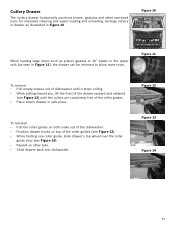
... Figure 11), the drawer can be removed to allow more room. To reinstall: • Pull the roller guides on both sides out of the dishwasher. • Position drawer hooks on other oversized tools for improved cleaning and easier loading and unloading. Figure 11 To remove: • Pull empty... drawer out of dishwasher until it stops rolling. • While pulling toward you, lift the front of the drawer upward and outward (see Figure 12) until the ...
... Figure 11), the drawer can be removed to allow more room. To reinstall: • Pull the roller guides on both sides out of the dishwasher. • Position drawer hooks on other oversized tools for improved cleaning and easier loading and unloading. Figure 11 To remove: • Pull empty... drawer out of dishwasher until it stops rolling. • While pulling toward you, lift the front of the drawer upward and outward (see Figure 12) until the ...


