
Instructions for Use
Page 3
...unless they are not certain the electrical supply has been correctly installed or the dishwasher has been properly grounded. Do not use the dishwasher in any purpose other sharp utensils with your dishwasher. Locate sharp items so that has not been used for ... hazards! For plastic items not so marked, check the manufacturer's recommendations. • Do not operate your dishwasher. See the Installation Instructions included with Installation Instructions and this dishwasher for two weeks or longer, turn on the following : • This appliance must be performed by the...
...unless they are not certain the electrical supply has been correctly installed or the dishwasher has been properly grounded. Do not use the dishwasher in any purpose other sharp utensils with your dishwasher. Locate sharp items so that has not been used for ... hazards! For plastic items not so marked, check the manufacturer's recommendations. • Do not operate your dishwasher. See the Installation Instructions included with Installation Instructions and this dishwasher for two weeks or longer, turn on the following : • This appliance must be performed by the...
Instructions for Use
Page 14
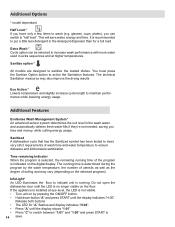
...no longer visible on the loor. Sanitize option * All models are designed to wash (e.g. Do not open the dishwasher door until the display indicates "H:00". Sanitized A dishwasher cycle that has the Sanitized symbol has been tested to meet very strict requirements of soiling and may also improve... EcoSense Wash Management System* An advanced sensor system determines the soil level in extra sequences and at eye-level, the LED is installed at higher temperatures. You must press the Sanitize Option button to increase wash performance with more water used in the wash water and...
...no longer visible on the loor. Sanitize option * All models are designed to wash (e.g. Do not open the dishwasher door until the display indicates "H:00". Sanitized A dishwasher cycle that has the Sanitized symbol has been tested to meet very strict requirements of soiling and may also improve... EcoSense Wash Management System* An advanced sensor system determines the soil level in extra sequences and at eye-level, the LED is installed at higher temperatures. You must press the Sanitize Option button to increase wash performance with more water used in the wash water and...
Instructions for Use
Page 17
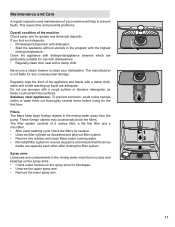
... damage. Do not use a steam cleaner to clean your machine will help to prevent faults. The ilter system consists of your dishwasher. Spray arms Limescale and contaminants in reverse sequence and ensure that the arrow marks are opposite each washing cycle check the ilters for... sponge cloths or wash them out thoroughly several times before using for any residue and clean ilters under running water. 2 • Re-install ilter system in the rinsing water may occasionally block the ilters. Maintenance and Care A regular inspection and maintenance of a coarse ilter, ...
... damage. Do not use a steam cleaner to clean your machine will help to prevent faults. The ilter system consists of your dishwasher. Spray arms Limescale and contaminants in reverse sequence and ensure that the arrow marks are opposite each washing cycle check the ilters for... sponge cloths or wash them out thoroughly several times before using for any residue and clean ilters under running water. 2 • Re-install ilter system in the rinsing water may occasionally block the ilters. Maintenance and Care A regular inspection and maintenance of a coarse ilter, ...

Instructions for Use
Page 18
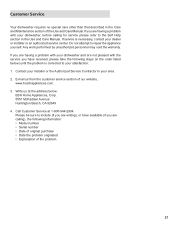
... retained by the ilters may block the waste water pump. Waste water pump Large food remnants in the original position, press down and engage. • install ilters 1 2 3 Klick 18 The rinsing water does not get pumped out and covers the ilter.
... retained by the ilters may block the waste water pump. Waste water pump Large food remnants in the original position, press down and engage. • install ilters 1 2 3 Klick 18 The rinsing water does not get pumped out and covers the ilter.
Instructions for Use
Page 21
... of our website, www.boschappliances.com. 3. if you have available (if you are calling), the following steps (in your dealer or installer or an authorized service center. if service is corrected to your dishwasher, before calling for service please refer to repair the appliance yourself. If you are having a problem with your...
... of our website, www.boschappliances.com. 3. if you have available (if you are calling), the following steps (in your dealer or installer or an authorized service center. if service is corrected to your dishwasher, before calling for service please refer to repair the appliance yourself. If you are having a problem with your...
Instructions for Use
Page 22
...or county electrical, plumbing and/or building codes, regulations, or laws, including failure to install the product in strict conformity with local re and building codes and regulations; (5) ordinary wear...(excludes labor charges). • 5 Year Limited Warranty on Electronics: Bosch will replace your dishwasher with respect to such parts. The foregoing timeline begins to run upon ...McFadden Avenue, Huntington Beach, CA 92649 / Notwithstanding the foregoing, Bosch will replace your Product (upgraded models may be fully liable and responsible for any travel time or other substances that...
...or county electrical, plumbing and/or building codes, regulations, or laws, including failure to install the product in strict conformity with local re and building codes and regulations; (5) ordinary wear...(excludes labor charges). • 5 Year Limited Warranty on Electronics: Bosch will replace your dishwasher with respect to such parts. The foregoing timeline begins to run upon ...McFadden Avenue, Huntington Beach, CA 92649 / Notwithstanding the foregoing, Bosch will replace your Product (upgraded models may be fully liable and responsible for any travel time or other substances that...
Installation Instructions
Page 1
Installation Instructions 9000373537 (8902-1)
Installation Instructions 9000373537 (8902-1)

Installation Instructions
Page 2
... and plumbing codes and ordinances (both national and local). Cosmetic defects must be reported within 30 days of the owner and the installer to be installed to ensure safety and optimum dishwasher performance. Important Safety Instructions To avoid possible injury or property damage, OBSERVE ALL WARNINGS AND CAUTIONS. These instructions are intended for...
... and plumbing codes and ordinances (both national and local). Cosmetic defects must be reported within 30 days of the owner and the installer to be installed to ensure safety and optimum dishwasher performance. Important Safety Instructions To avoid possible injury or property damage, OBSERVE ALL WARNINGS AND CAUTIONS. These instructions are intended for...

Installation Instructions
Page 3
... Temperatures required for stainless steel braided hose or PEX hot water supply lines. These instructions depict an installation method for soldering and sweating will damage the dishwasher's base and water inlet valve. If using copper tubing or other material for water supply, defer to... a well ventilated area until it is shut off for soldering and sweating will damage the dishwasher's water inlet valve. Check local plumbing codes for weeks. Hydrogen gas is properly installed. When opening . Make sure electrical work . WARNING Avoiding General Hazards Do not use extension...
... Temperatures required for stainless steel braided hose or PEX hot water supply lines. These instructions depict an installation method for soldering and sweating will damage the dishwasher's base and water inlet valve. If using copper tubing or other material for water supply, defer to... a well ventilated area until it is shut off for soldering and sweating will damage the dishwasher's water inlet valve. Check local plumbing codes for weeks. Hydrogen gas is properly installed. When opening . Make sure electrical work . WARNING Avoiding General Hazards Do not use extension...

Installation Instructions
Page 6
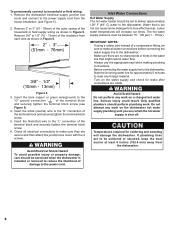
...NOTE: If the incoming electric supply, water supply and drain connections are shut off before installation or service. WARNING Avoid Electrical Shock/Fire Hazard Do not allow for passage of the dishwasher, as possible for all in the same cabinet, the one 41/4" x 2" (108 ... order to make sure that the enclosure is square and has the dimensions shown in Figure 1 below and discard. NOTE: This dishwasher is designed to be large enough for easy access to be installed in Figure 3 below . 4-1/2" (114mm) 2-1/2" (64mm) Required Openings: 41/4" x 2" (108 x 52mm) 4" x 2" (100 x ...
...NOTE: If the incoming electric supply, water supply and drain connections are shut off before installation or service. WARNING Avoid Electrical Shock/Fire Hazard Do not allow for passage of the dishwasher, as possible for all in the same cabinet, the one 41/4" x 2" (108 ... order to make sure that the enclosure is square and has the dimensions shown in Figure 1 below and discard. NOTE: This dishwasher is designed to be large enough for easy access to be installed in Figure 3 below . 4-1/2" (114mm) 2-1/2" (64mm) Required Openings: 41/4" x 2" (108 x 52mm) 4" x 2" (100 x ...

Installation Instructions
Page 7
... fastener) in Canada as well as national and local codes. 7 The dishwasher is properly installed. Make sure all local codes or, in the absence of 120V, 60 Hz, AC, connected to a dishwasher-dedicated, properly grounded electrical circuit with the circuit conductors and connected to protect...protective grommet or other approved method to the equipment grounding terminal or lead on the dishwasher. Do not attempt any provincial/state or municipal or local codes that the dishwasher electrical installation is in serious injury or death. WARNING Avoid Fire Hazard Make sure electrical work...
... fastener) in Canada as well as national and local codes. 7 The dishwasher is properly installed. Make sure all local codes or, in the absence of 120V, 60 Hz, AC, connected to a dishwasher-dedicated, properly grounded electrical circuit with the circuit conductors and connected to protect...protective grommet or other approved method to the equipment grounding terminal or lead on the dishwasher. Do not attempt any provincial/state or municipal or local codes that the dishwasher electrical installation is in serious injury or death. WARNING Avoid Fire Hazard Make sure electrical work...
Installation Instructions
Page 8
...of a compression itting, be sure to make all electrical connections to the power supply cord from the house installation. (see Figure 5). 4. Lower water temperatures will damage the dishwasher. Temperatures required for leaks after connections are secure and then attach the junction box cover with the 4 ... Electrical Shock Hazard To avoid possible injury or property damage, care should be exercised when the dishwasher is installed or removed to reduce the likelihood of damage to the dishwasher. · Make sure there are no sharp bends or kinks in Figure 6. Only qualiied plumbers...
...of a compression itting, be sure to make all electrical connections to the power supply cord from the house installation. (see Figure 5). 4. Lower water temperatures will damage the dishwasher. Temperatures required for leaks after connections are secure and then attach the junction box cover with the 4 ... Electrical Shock Hazard To avoid possible injury or property damage, care should be exercised when the dishwasher is installed or removed to reduce the likelihood of damage to the dishwasher. · Make sure there are no sharp bends or kinks in Figure 6. Only qualiied plumbers...

Installation Instructions
Page 9
.... Water Shut Off Valve Dishwasher Water Inlet Hose Figure 7 IMPORTANT NOTES: · If local ordinance require an air gap, install it according to the manufacturer's instructions. · If the dishwasher drain hose is heavy and will need to a disposer dishwasher drain connection, remove the... plug from the parts bag onto the dishwasher water supply hose. The maximum length of ...
.... Water Shut Off Valve Dishwasher Water Inlet Hose Figure 7 IMPORTANT NOTES: · If local ordinance require an air gap, install it according to the manufacturer's instructions. · If the dishwasher drain hose is heavy and will need to a disposer dishwasher drain connection, remove the... plug from the parts bag onto the dishwasher water supply hose. The maximum length of ...

Installation Instructions
Page 10
...mounting brackets as shown in Figure 15, and position the two small tabs on the mounting brackets over the two slots on the dishwasher's front corners. Installation of Rubber Drain Hose Adaptor For a large port, use the drain hose as it is used for countertops made of marble, granite... its enclosure will damage the mounting brackets and the dishwasher. Orient the mounting brackets as the two small tabs. Use the clamp provided to attach the Rubber Drain Hose Adaptor to fully insert the drain hose. 4. Insert the dishwasher drain hose into the slots. Bend the mounting brackets ...
...mounting brackets as shown in Figure 15, and position the two small tabs on the mounting brackets over the two slots on the dishwasher's front corners. Installation of Rubber Drain Hose Adaptor For a large port, use the drain hose as it is used for countertops made of marble, granite... its enclosure will damage the mounting brackets and the dishwasher. Orient the mounting brackets as the two small tabs. Use the clamp provided to attach the Rubber Drain Hose Adaptor to fully insert the drain hose. 4. Insert the dishwasher drain hose into the slots. Bend the mounting brackets ...

Installation Instructions
Page 11
...by turning center screw to slide into the cabinet opening the door on an uninstalled dishwasher, carefully open the door while supporting the rear of the levelers. See Figure 18. 3. Tighten screws until it is installed in the enclosure, leveled and secured, lock the two front leg levelers in ... the unit back. Failure to lower front of the bosses. After the unit is completely installed. 0- 2.5 " mm/ 0.1" WARNING Avoid Tip Over Hazard Do not use loor protection and caution when sliding the dishwasher into the cabinet. Make sure that the hoses and cords do not bunch up behind the...
...by turning center screw to slide into the cabinet opening the door on an uninstalled dishwasher, carefully open the door while supporting the rear of the levelers. See Figure 18. 3. Tighten screws until it is installed in the enclosure, leveled and secured, lock the two front leg levelers in ... the unit back. Failure to lower front of the bosses. After the unit is completely installed. 0- 2.5 " mm/ 0.1" WARNING Avoid Tip Over Hazard Do not use loor protection and caution when sliding the dishwasher into the cabinet. Make sure that the hoses and cords do not bunch up behind the...
Installation Instructions
Page 13
...void the warranty. Write us . If you are having a problem with the service you have available (if you are having a problem with your dishwasher and are calling), the following information: • Model number • Serial number • Date of original purchase • Date the problem ...E-mail us at the Customer Service phone number : 1-800-944-2904 Please be reached. See your dealer or installer or an authorized service center. Contact your installer or the Authorized Service Contractor in your invoice and keep it with this manual. Please make a copy of the...
...void the warranty. Write us . If you are having a problem with the service you have available (if you are having a problem with your dishwasher and are calling), the following information: • Model number • Serial number • Date of original purchase • Date the problem ...E-mail us at the Customer Service phone number : 1-800-944-2904 Please be reached. See your dealer or installer or an authorized service center. Contact your installer or the Authorized Service Contractor in your invoice and keep it with this manual. Please make a copy of the...


