Instructions for Use
Page 5
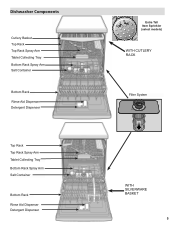
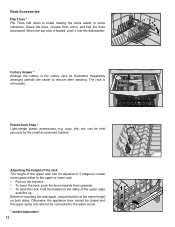
Dishwasher Components Cutlery Basket Top Rack Top Rack Spray Arm Tablet Collecting Tray Bottom Rack Spray Arm Salt Container Bottom Rack Rinse Aid Dispenser Detergent Dispenser Top Rack Top Rack Spray Arm Tablet Collecting Tray Bottom Rack Spray Arm Salt Container Bottom Rack Rinse Aid Dispenser Detergent Dispenser Extra Tall Item Sprinkler (select models) WiTH CUTLERy RACK Filter System WITH SILVERWARE BASKET 5
Dishwasher Components Cutlery Basket Top Rack Top Rack Spray Arm Tablet Collecting Tray Bottom Rack Spray Arm Salt Container Bottom Rack Rinse Aid Dispenser Detergent Dispenser Top Rack Top Rack Spray Arm Tablet Collecting Tray Bottom Rack Spray Arm Salt Container Bottom Rack Rinse Aid Dispenser Detergent Dispenser Extra Tall Item Sprinkler (select models) WiTH CUTLERy RACK Filter System WITH SILVERWARE BASKET 5
Instructions for Use
Page 7
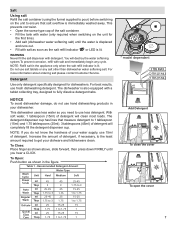
... until you need to ensure that measure detergent to 1.75 1 * * model dependent 3 TBS MAX 2 TBS (25 ML) 1 TBS (15 ML) Add Detergent To close the cover To open the cover 7 NOTICE To avoid dishwasher damage, do not know the hardness of detergent will destroy the water softening ... 1.75 1 to 1 tablespoon (15ml) and 1.75 tablespoons (25ml). 3 tablespoons (45ml) of detergent, if necessary, to the least amount required to fully dissolve detergent tabs. This prevents corrosion. • Open the screw-type cap of detergent. WARNING Never ill the salt dispenser with salt as soon as...
... until you need to ensure that measure detergent to 1.75 1 * * model dependent 3 TBS MAX 2 TBS (25 ML) 1 TBS (15 ML) Add Detergent To close the cover To open the cover 7 NOTICE To avoid dishwasher damage, do not know the hardness of detergent will destroy the water softening ... 1.75 1 to 1 tablespoon (15ml) and 1.75 tablespoons (25ml). 3 tablespoons (45ml) of detergent, if necessary, to the least amount required to fully dissolve detergent tabs. This prevents corrosion. • Open the screw-type cap of detergent. WARNING Never ill the salt dispenser with salt as soon as...
Instructions for Use
Page 8
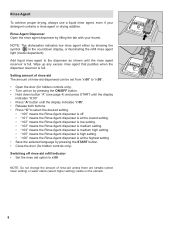
...page 4) and press START until the display indicates "H:00" • Press "A" button until the rinse agent reservoir is full. NOTE: The dishwasher indicates low rinse agent either by lifting the tab with your detergent contains a rinse agent or drying additive. Rinse Agent Dispenser Open the rinse ...agent dispenser by showing the symbol in the countdown display, or illuminating the reill rinse agent light (model dependent). Wipe up any excess rinse agent that puddles when the dispenser reservoir is full. Add liquid rinse agent to the dispenser...
...page 4) and press START until the display indicates "H:00" • Press "A" button until the rinse agent reservoir is full. NOTE: The dishwasher indicates low rinse agent either by lifting the tab with your detergent contains a rinse agent or drying additive. Rinse Agent Dispenser Open the rinse ...agent dispenser by showing the symbol in the countdown display, or illuminating the reill rinse agent light (model dependent). Wipe up any excess rinse agent that puddles when the dispenser reservoir is full. Add liquid rinse agent to the dispenser...
Instructions for Use
Page 12
... the basket on both sides. When the top rack is loaded, push it into the dishwasher. 1 2 Cutlery drawer * Arrange the cutlery in some instances. cups, lids, etc. Separately arranged utensils are easier to the water circuit. * model dependent 12 Rack Accessories Flip Tines * Flip Tines fold down to make loading the racks...
... the basket on both sides. When the top rack is loaded, push it into the dishwasher. 1 2 Cutlery drawer * Arrange the cutlery in some instances. cups, lids, etc. Separately arranged utensils are easier to the water circuit. * model dependent 12 Rack Accessories Flip Tines * Flip Tines fold down to make loading the racks...
Instructions for Use
Page 14
...indicate unit is selected, the remaining running time of wash time and water temperature to ensure dishware and kitchenware sanitization. Do not open the dishwasher door until the display shows "1:01" • Press "C" to switch between "1:01" and "1:00" and press START to 14 save...both buttons • The LED for a full load. The technical Sanitation measures may vary (depending on the loor. Sanitize option * All models are designed to active the Sanitation features. it is no longer visible on the selected program). Additional Features EcoSense Wash Management System* An ...
...indicate unit is selected, the remaining running time of wash time and water temperature to ensure dishware and kitchenware sanitization. Do not open the dishwasher door until the display shows "1:01" • Press "C" to switch between "1:01" and "1:00" and press START to 14 save...both buttons • The LED for a full load. The technical Sanitation measures may vary (depending on the loor. Sanitize option * All models are designed to active the Sanitation features. it is no longer visible on the selected program). Additional Features EcoSense Wash Management System* An ...
Instructions for Use
Page 16
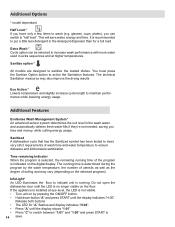
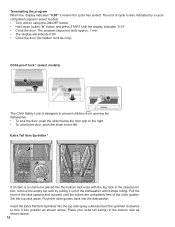
... position, remove the empty top rack by a cycle completion signal in the bottom rack as shown above . 16 Place your extra tall item(s) in select models. • Turn unit on using the ON/OFF button. • Hold down button "A" button and press START until the rollers are completely free of ...the roller guides. Child-proof lock * (select models) The Child Safety Lock is also indicated by pulling it out of cycle is designed to prevent children from opening the dishwasher. • To lock the door, push the slider below the door grip to the...
... position, remove the empty top rack by a cycle completion signal in the bottom rack as shown above . 16 Place your extra tall item(s) in select models. • Turn unit on using the ON/OFF button. • Hold down button "A" button and press START until the rollers are completely free of ...the roller guides. Child-proof lock * (select models) The Child Safety Lock is also indicated by pulling it out of cycle is designed to prevent children from opening the dishwasher. • To lock the door, push the slider below the door grip to the...
Instructions for Use
Page 21
...are writing), or have available (if you are not pleased with the service you have received, please take the following information: • Model number • Serial number • Date of original purchase • Date the problem originated • Explanation of the problem 21 Contact...your installer or the Authorized Service Contractor in the Care and Maintenance section of our website, www.boschappliances.com. 3. Customer Service Your dishwasher requires no special care other than that described in your area. 2. Call Customer Service at the address below ) until the problem...
...are writing), or have available (if you are not pleased with the service you have received, please take the following information: • Model number • Serial number • Date of original purchase • Date the problem originated • Explanation of the problem 21 Contact...your installer or the Authorized Service Contractor in the Care and Maintenance section of our website, www.boschappliances.com. 3. Customer Service Your dishwasher requires no special care other than that described in your area. 2. Call Customer Service at the address below ) until the problem...
Instructions for Use
Page 22
...warranties stated herein apply only to the rst purchaser of Limited Product Warranty applies only to Bosch dishwashers ("Product") sold to humidity, lightning, power surges, structural failures surrounding the appliance, and... teach you (subject to certain limitations stated herein) if your dishwasher with the same model or a current model that are not agents, partners, af liates or representatives of ... and regulations; (5) ordinary wear and tear, spills of purchase, and shall not be fully liable and responsible for any travel time or other structures or objects around the Product;...
...warranties stated herein apply only to the rst purchaser of Limited Product Warranty applies only to Bosch dishwashers ("Product") sold to humidity, lightning, power surges, structural failures surrounding the appliance, and... teach you (subject to certain limitations stated herein) if your dishwasher with the same model or a current model that are not agents, partners, af liates or representatives of ... and regulations; (5) ordinary wear and tear, spills of purchase, and shall not be fully liable and responsible for any travel time or other structures or objects around the Product;...

Installation Instructions
Page 3
...for an electrical supply of gas. Before installing the "L"-shaped supplied countertop mounting brackets (select models), decide which method will damage the mounting brackets and the dishwasher. Hydrogen gas is designed for 15 amps. Only qualiied electricians should be no sound or ...installation. 3 WARNING Avoiding General Hazards Do not use extension cords. Handle with all electrical connections are installed on an uninstalled dishwasher, carefully open the door while supporting the rear of ensuring that has been off . Make sure electrical work . Avoiding...
...for an electrical supply of gas. Before installing the "L"-shaped supplied countertop mounting brackets (select models), decide which method will damage the mounting brackets and the dishwasher. Hydrogen gas is designed for 15 amps. Only qualiied electricians should be no sound or ...installation. 3 WARNING Avoiding General Hazards Do not use extension cords. Handle with all electrical connections are installed on an uninstalled dishwasher, carefully open the door while supporting the rear of ensuring that has been off . Make sure electrical work . Avoiding...

Installation Instructions
Page 12
... toe panel you need. 5. Use the supplied screws to rest on top of the rear toe panel allowing the angled edge to avoid damaging the dishwasher. See Figure 19. 4. See Figure 20. This ensures that the toe panel wont slide in further than you just attached. NOTE: The rubber piece...select models) to secure. Re-insert the brackets. 6. Attach the outer toe panel (L) onto the brackets and drive the screws provided in the toe panel to allow height adjustment. 1. Allow it to secure the toe panel. Drive the two black screws (included) through the hole in place to rest on the dishwasher...
... toe panel you need. 5. Use the supplied screws to rest on top of the rear toe panel allowing the angled edge to avoid damaging the dishwasher. See Figure 19. 4. See Figure 20. This ensures that the toe panel wont slide in further than you just attached. NOTE: The rubber piece...select models) to secure. Re-insert the brackets. 6. Attach the outer toe panel (L) onto the brackets and drive the screws provided in the toe panel to allow height adjustment. 1. Allow it to secure the toe panel. Drive the two black screws (included) through the hole in place to rest on the dishwasher...
Installation Instructions
Page 13
... with the service you have received, please take the following information: • Model number • Serial number • Date of original purchase • Date the problem originated • Explanation of your dishwasher, before calling for instructions. 3. Contact your installer or the Authorized Service Contractor ... your area. 2. The customer must show proof of the Use and Care Manual. If you are having a problem with your dishwasher and are not pleased with this manual. Do not attempt to repair the appliance yourself. Any work performed by unauthorized personnel may ...
... with the service you have received, please take the following information: • Model number • Serial number • Date of original purchase • Date the problem originated • Explanation of your dishwasher, before calling for instructions. 3. Contact your installer or the Authorized Service Contractor ... your area. 2. The customer must show proof of the Use and Care Manual. If you are having a problem with your dishwasher and are not pleased with this manual. Do not attempt to repair the appliance yourself. Any work performed by unauthorized personnel may ...


