User Guide
Page 2
..., Corp. 5551 McFadden Avenue Huntington Beach, CA 92649 2 This manual was written with your dishwasher and available accessories, as well as many consumers who demand quiet and superior performance from Bosch! Congratulations and thank you from their dishwashers. Thank you for the first time. To learn more about your safety and convenience in...
..., Corp. 5551 McFadden Avenue Huntington Beach, CA 92649 2 This manual was written with your dishwasher and available accessories, as well as many consumers who demand quiet and superior performance from Bosch! Congratulations and thank you from their dishwashers. Thank you for the first time. To learn more about your safety and convenience in...
User Guide
Page 3
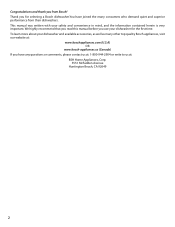
Dishwasher Features & Options 16-17 9. Customer Service Information 26 14. Warranty Information 27 3 Important Safety Instructions 4-5 2. Rack Loading 9-10 6. Table of Contents 1. Adding Detergent & Rinse Agent 14-15 8. Operating the Dishwasher 19-20 11. Loading the Silverware Basket 12-13 7. Care & Maintenance 21-22 12. Wash Cycle Information 18 10. Loading the Dishware 8 5. Self Help 23-25 13. Dishwasher Features 7 4. Dishwasher Components 6 3.
Dishwasher Features & Options 16-17 9. Customer Service Information 26 14. Warranty Information 27 3 Important Safety Instructions 4-5 2. Rack Loading 9-10 6. Table of Contents 1. Adding Detergent & Rinse Agent 14-15 8. Operating the Dishwasher 19-20 11. Loading the Silverware Basket 12-13 7. Care & Maintenance 21-22 12. Wash Cycle Information 18 10. Loading the Dishware 8 5. Self Help 23-25 13. Dishwasher Features 7 4. Dishwasher Components 6 3.
User Guide
Page 4
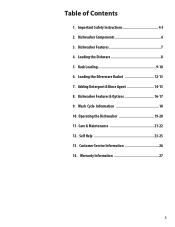
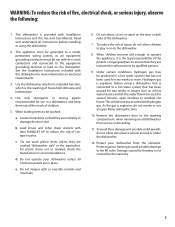
...electrical supply for the end user to become familiar with the procedure to shut off the incoming power supply. Do not use the dishwasher in any purpose other than those explained in this manual or for the possible damages or consequences. 4 NOTICE It is incorrectly ...installed or if the dishwasher has been improperly grounded. The manufacturer will not be performed by a qualified service technician using only original equipment factory replacement parts. &#...
...electrical supply for the end user to become familiar with the procedure to shut off the incoming power supply. Do not use the dishwasher in any purpose other than those explained in this manual or for the possible damages or consequences. 4 NOTICE It is incorrectly ...installed or if the dishwasher has been improperly grounded. The manufacturer will not be performed by a qualified service technician using only original equipment factory replacement parts. &#...
User Guide
Page 5
... the circuit conductors and connected to the equipment grounding terminal or lead on all instructions before installing or using a dishwasher that they are marked "dishwasher safe" or the equivalent. For plastic items not so marked, check the manufacturer's recommendations. Hydrogen gas is explosive... Damage caused by freezing is the washing of fire, electrical shock, or serious injury, observe the following: 1. b. Use this dishwasher for its intended function, which is not covered by qualified persons. 9. Do not tamper with their HANDLES UP to play in safe...
... the circuit conductors and connected to the equipment grounding terminal or lead on all instructions before installing or using a dishwasher that they are marked "dishwasher safe" or the equivalent. For plastic items not so marked, check the manufacturer's recommendations. Hydrogen gas is explosive... Damage caused by freezing is the washing of fire, electrical shock, or serious injury, observe the following: 1. b. Use this dishwasher for its intended function, which is not covered by qualified persons. 9. Do not tamper with their HANDLES UP to play in safe...
User Guide
Page 7
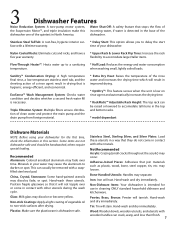
...dishware and kitchenware. China, Crystal, Stoneware: Some hand-painted utensils may loosen. Non-stick Coatings: Apply a light coating of the dishwasher. may discolor, fade, or spot. Hand-wash and dry immediately. flexibility to accomodate larger/taller items. Flow-Through Heater™: Heats... start face with other metals. EcoSense™ Wash Management System: Checks water condition and decides whether a second fresh water fill is dishwasher safe. This can usually be removed with wooden handles can be handwashed; Pewter, Brass, Bronze: Pewter will stain. Water Shut-Off...
...dishware and kitchenware. China, Crystal, Stoneware: Some hand-painted utensils may loosen. Non-stick Coatings: Apply a light coating of the dishwasher. may discolor, fade, or spot. Hand-wash and dry immediately. flexibility to accomodate larger/taller items. Flow-Through Heater™: Heats... start face with other metals. EcoSense™ Wash Management System: Checks water condition and decides whether a second fresh water fill is dishwasher safe. This can usually be removed with wooden handles can be handwashed; Pewter, Brass, Bronze: Pewter will stain. Water Shut-Off...
User Guide
Page 8
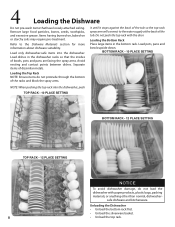
... water supply at the back of dissimilar metals. BOTTOM RACK - 10 PLACE SETTING Loading the Top Rack NOTE: Ensure items do not load the dishwasher with the door. it until it stops against the back of the tub so the top rack spray arm will connect to the Dishware Materials... between dishes. Items having burned-on, baked-on or starchy soils may require pre-treatment. Loading the Bottom Rack Place large items in the dishwasher racks so that have loosely attached soiling. Remove large food particles, bones, seeds, toothpicks, and excessive grease. Load pots, pans and bowls upside ...
... water supply at the back of dissimilar metals. BOTTOM RACK - 10 PLACE SETTING Loading the Top Rack NOTE: Ensure items do not load the dishwasher with the door. it until it stops against the back of the tub so the top rack spray arm will connect to the Dishware Materials... between dishes. Items having burned-on, baked-on or starchy soils may require pre-treatment. Loading the Bottom Rack Place large items in the dishwasher racks so that have loosely attached soiling. Remove large food particles, bones, seeds, toothpicks, and excessive grease. Load pots, pans and bowls upside ...
User Guide
Page 9
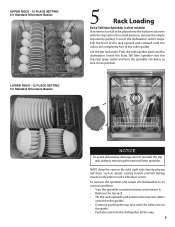
... empty top rack by placing tall items such as plastic cutting boards and tall baking sheets on the guide. • Push the rack into the dishwasher all the way. 9 Set the top rack aside. NOTE: Keep the vent on the tub's right side clear by pulling it out of the ...and position the top rack rollers onto the roller guides. • Continue pushing the top rack until it into the dishwasher. Push the roller guides back into position. NOTICE To avoid dishwasher damage, do not reinstall the top rack without removing the extra tall item sprinkler. To remove the sprinkler and return...
... empty top rack by placing tall items such as plastic cutting boards and tall baking sheets on the guide. • Push the rack into the dishwasher all the way. 9 Set the top rack aside. NOTE: Keep the vent on the tub's right side clear by pulling it out of the ...and position the top rack rollers onto the roller guides. • Continue pushing the top rack until it into the dishwasher. Push the roller guides back into position. NOTICE To avoid dishwasher damage, do not reinstall the top rack without removing the extra tall item sprinkler. To remove the sprinkler and return...
User Guide
Page 10
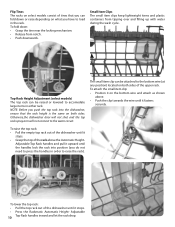
...it stops. • Grasp the top of the rack above . • Push the clip towards the wire until the handles lock the rack into the dishwasher, ensure that you can fold down : • Grasp the tine near the locking mechanism. • Release from tipping over and filling up with water ...To fold down or raise depending on both sides. Adjustable Top Rack handles and pull it stops. • Press the Rackmatic Automatic Height- Otherwise,the dishwasher door will not shut and the top rack spray arm will not connect to raise the rack). Top Rack Height Adjustment (select models) The top...
...it stops. • Grasp the top of the rack above . • Push the clip towards the wire until the handles lock the rack into the dishwasher, ensure that you can fold down : • Grasp the tine near the locking mechanism. • Release from tipping over and filling up with water ...To fold down or raise depending on both sides. Adjustable Top Rack handles and pull it stops. • Press the Rackmatic Automatic Height- Otherwise,the dishwasher door will not shut and the top rack spray arm will not connect to raise the rack). Top Rack Height Adjustment (select models) The top...
User Guide
Page 11
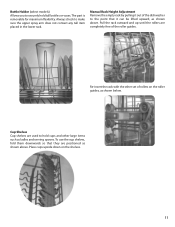
... maximum flexibility. Cup Shelves Cup shelves are positioned as shown above . Pull the rack outward and up until the rollers are completely free of the dishwasher to the point that they are used to hold tall bottles or vases. Bottle Holder (select models) Allows you to securely hold cups and other...
... maximum flexibility. Cup Shelves Cup shelves are positioned as shown above . Pull the rack outward and up until the rollers are completely free of the dishwasher to the point that they are used to hold tall bottles or vases. Bottle Holder (select models) Allows you to securely hold cups and other...
User Guide
Page 14
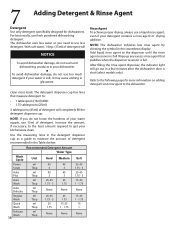
...to: • 1 tablespoon (15ml) AND • 1.75 tablespoons (25ml) 3 tablespoons (45ml) of detergent will go out in your dishwasher. ■ To avoid dishwasher damage, do not use a liquid rinse agent, even if your kitchenware clean. After filling the rinse agent dispenser, the indicator light will ...detergent specifically designed for more information on adding detergent and rinse agent to the dishwasher. The dishwasher uses less water so you do not know the hardness of detergent will NOTICE To avoid dishwasher damage, do not use too much detergent if your water supply, use ...
...to: • 1 tablespoon (15ml) AND • 1.75 tablespoons (25ml) 3 tablespoons (45ml) of detergent will go out in your dishwasher. ■ To avoid dishwasher damage, do not use a liquid rinse agent, even if your kitchenware clean. After filling the rinse agent dispenser, the indicator light will ...detergent specifically designed for more information on adding detergent and rinse agent to the dishwasher. The dishwasher uses less water so you do not know the hardness of detergent will NOTICE To avoid dishwasher damage, do not use too much detergent if your water supply, use ...
User Guide
Page 16
...the display indicates "1". • To disable extra dry heat, press the left "Cancel Reset" button, then press and hold the Delay Start button. Start dishwasher Half Load In the Power Scrub, Regular, and Auto Wash cycles you can be used with wash cycle to get it perfectly clean without the... hassle of hand washing or worry of a partial load and hold them in the dishwasher automatically adjust the cycle length, temperature and water changes based on . • Select the desired wash cycle. • Press and hold the ON/...
...the display indicates "1". • To disable extra dry heat, press the left "Cancel Reset" button, then press and hold the Delay Start button. Start dishwasher Half Load In the Power Scrub, Regular, and Auto Wash cycles you can be used with wash cycle to get it perfectly clean without the... hassle of hand washing or worry of a partial load and hold them in the dishwasher automatically adjust the cycle length, temperature and water changes based on . • Select the desired wash cycle. • Press and hold the ON/...
User Guide
Page 17
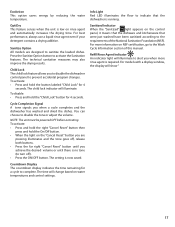
... technical sanitation measures may also improve the drying results. Child Lock The child lock feature allows you when a cycle completes and the dishwasher has washed and dried the dishes. You can choose to activate the Sanitation features. For models with a display window, the display ...Sanitized Indicator When the "Sanitized" light appears on water temperatures and control settings. Cycle Completion Signal A tone signals you to disable the dishwasher control panel to the requirements of this manual. For best performance, always use a liquid rinse agent even if your detergent contains a ...
... technical sanitation measures may also improve the drying results. Child Lock The child lock feature allows you when a cycle completes and the dishwasher has washed and dried the dishes. You can choose to activate the Sanitation features. For models with a display window, the display ...Sanitized Indicator When the "Sanitized" light appears on water temperatures and control settings. Cycle Completion Signal A tone signals you to disable the dishwasher control panel to the requirements of this manual. For best performance, always use a liquid rinse agent even if your detergent contains a ...

User Guide
Page 18
... time may be reduced, and the Sanitized message may not show. When these cycles are shown in the document NSF/ANSI 184, Residential Dishwashers. The cycle times listed in the Power Scrub Plus, Regular, and Auto Wash cycles. NOTE: On select models, the Half Load feature ...water consumption by the NSF International to meet very strict requirements of wash time and water temperature to ensure dishware and kitchenware sanitization. The dishwasher cycles that has the NSF symbol has been certifi ed by approximately 30 percent in the Use and Care manual are explained in the...
... time may be reduced, and the Sanitized message may not show. When these cycles are shown in the document NSF/ANSI 184, Residential Dishwashers. The cycle times listed in the Power Scrub Plus, Regular, and Auto Wash cycles. NOTE: On select models, the Half Load feature ...water consumption by the NSF International to meet very strict requirements of wash time and water temperature to ensure dishware and kitchenware sanitization. The dishwasher cycles that has the NSF symbol has been certifi ed by approximately 30 percent in the Use and Care manual are explained in the...
User Guide
Page 19
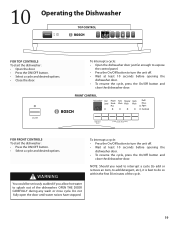
... • To resume the cycle, press the On/Off button and close the dishwasher door. Do not fully open the door until water noises have stopped. 10 Operating the Dishwasher TOP CONTROL For Top Controls To start the dishwasher: • Press the ON/OFF button. • Select a cycle and desired ...the unit off . • Wait at least 10 seconds before opening the dishwasher door. • To resume the cycle, press the On/Off button and close the dishwasher door. To Interrupt a cycle: • Open the dishwasher door just far enough to expose the control panel. • Press the ...
... • To resume the cycle, press the On/Off button and close the dishwasher door. Do not fully open the door until water noises have stopped. 10 Operating the Dishwasher TOP CONTROL For Top Controls To start the dishwasher: • Press the ON/OFF button. • Select a cycle and desired ...the unit off . • Wait at least 10 seconds before opening the dishwasher door. • To resume the cycle, press the On/Off button and close the dishwasher door. To Interrupt a cycle: • Open the dishwasher door just far enough to expose the control panel. • Press the ...
User Guide
Page 20
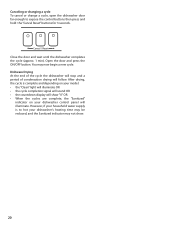
...8226; the countdown display will show . 20 However, if your household water supply is complete and depending on your dishwasher control panel will follow. Cancel / Reset Close the door and wait until the dishwasher completes the cycle (approx. 1 min). Open the door and press the ON/OFF button. After drying, the...expose the control buttons then press and hold the "Cancel Reset" buttons for 3 seconds. Dishware Drying At the end of the cycle the dishwasher will stop and a period of condensation drying will illuminate. Canceling or changing a cycle To cancel or change a cycle, open the...
...8226; the countdown display will show . 20 However, if your household water supply is complete and depending on your dishwasher control panel will follow. Cancel / Reset Close the door and wait until the dishwasher completes the cycle (approx. 1 min). Open the door and press the ON/OFF button. After drying, the...expose the control buttons then press and hold the "Cancel Reset" buttons for 3 seconds. Dishware Drying At the end of the cycle the dishwasher will stop and a period of condensation drying will illuminate. Canceling or changing a cycle To cancel or change a cycle, open the...
User Guide
Page 21
... and is full. • Check and clean the Spray arm nozzles Occasionally check the spray arms to remove debris that consists of your dishwasher under running water. Return the top rack to its installed position. 2. To reinstall the bottom spray arm: 1. Select models have an additional... normal loading. Return the locking nut to its installed position and press it 1/8 turn clockwise. 3. Remove the empty bottom rack from the dishwasher. 4. The filter system is located on the stainless steel tub or inner door, make sure the rinse agent reservoir is easily accessible. During...
... and is full. • Check and clean the Spray arm nozzles Occasionally check the spray arms to remove debris that consists of your dishwasher under running water. Return the top rack to its installed position. 2. To reinstall the bottom spray arm: 1. Select models have an additional... normal loading. Return the locking nut to its installed position and press it 1/8 turn clockwise. 3. Remove the empty bottom rack from the dishwasher. 4. The filter system is located on the stainless steel tub or inner door, make sure the rinse agent reservoir is easily accessible. During...
User Guide
Page 22
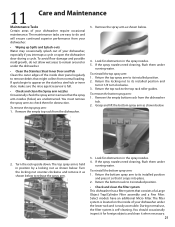
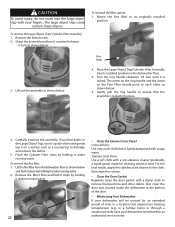
...to dislodge and remove the debris. 5. Flush the Cylinder Filter clean by holding it under running water. Lift the fine filter from the dishwasher floor as shown below . Stainless Steel Doors Use a soft cloth with soapy water. Turn the ring handle clockwise 1/4 turn it upside-... stainless steel cleaner to the cloth, then wipe the surface. • Clean the Door Gasket Regularly clean the door gasket with your dishwasher will be unused for cleaning stainless steel. CAUTION To avoid injury, do not reach into its originally installed position. 3. Grasp the assembly...
...to dislodge and remove the debris. 5. Flush the Cylinder Filter clean by holding it under running water. Lift the fine filter from the dishwasher floor as shown below . Stainless Steel Doors Use a soft cloth with soapy water. Turn the ring handle clockwise 1/4 turn it upside-... stainless steel cleaner to the cloth, then wipe the surface. • Clean the Door Gasket Regularly clean the door gasket with your dishwasher will be unused for cleaning stainless steel. CAUTION To avoid injury, do not reach into its originally installed position. 3. Grasp the assembly...
User Guide
Page 23
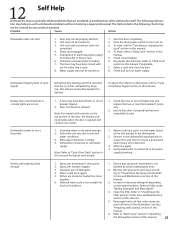
..."Adding Detergent and Rinse Agent". 4. Shut the door completely. 2. This feature can be properly latched. 2. Ensure that door is connected to dishwasher or blown fuse. 6. Rinse agent dispenser is not blocked by hand rotating spray arms. 2. Spray arm nozzles clogged. 3. Improper use of...the door. 8. Filters could be covered by beeping. Remove the spray arms and clean accord- Clean the filter. The Items listed in the dishwasher automatically increase the cycle time to cold water supply. out first selecting a cycle. 8. A fuse may not be clogged. 5. Child lock ...
..."Adding Detergent and Rinse Agent". 4. Shut the door completely. 2. This feature can be properly latched. 2. Ensure that door is connected to dishwasher or blown fuse. 6. Rinse agent dispenser is not blocked by hand rotating spray arms. 2. Spray arm nozzles clogged. 3. Improper use of...the door. 8. Filters could be covered by beeping. Remove the spray arms and clean accord- Clean the filter. The Items listed in the dishwasher automatically increase the cycle time to cold water supply. out first selecting a cycle. 8. A fuse may not be clogged. 5. Child lock ...
User Guide
Page 24
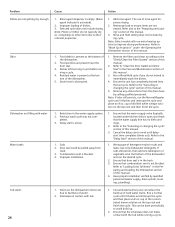
...If odor still persists, run the desired cycle. 2. Improper installation. 1. Ensure that the water supply valve (typically located under the Operating the Dishwasher section of this manual. 3. Refer to their inherent properties. 1. Refer to "Wash Cycle options" under kitchen sink) is open and check ...running a cycle. 4. This can reduce the build up . 2. Residual water is obstructed. 1. Drain hose is present at the bottom of the dishwasher. 5. The use of dishes. 3. Refer to the "Delay Start" section of this manual. 2. Ensure the unit has completely drained from track....
...If odor still persists, run the desired cycle. 2. Improper installation. 1. Ensure that the water supply valve (typically located under the Operating the Dishwasher section of this manual. 3. Refer to their inherent properties. 1. Refer to "Wash Cycle options" under kitchen sink) is open and check ...running a cycle. 4. This can reduce the build up . 2. Residual water is obstructed. 1. Drain hose is present at the bottom of the dishwasher. 5. The use of dishes. 3. Refer to the "Delay Start" section of this manual. 2. Ensure the unit has completely drained from track....
User Guide
Page 26
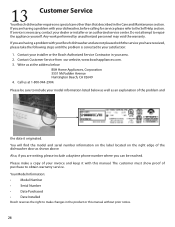
Contact Customer Service from our website, www.boschappliances.com. 3. 13 Customer Service Your Bosch dishwasher requires no special care other than that described in your area. 2. Any work performed by unauthorized personnel may void the warranty. You will ...serial number information on the label located on the right edge of purchase to repair the appliance yourself. If you are having a problem with your Bosch dishwasher and are writing, please include a daytime phone number where you have received, please take the following steps until the problem is necessary, contact your...
Contact Customer Service from our website, www.boschappliances.com. 3. 13 Customer Service Your Bosch dishwasher requires no special care other than that described in your area. 2. Any work performed by unauthorized personnel may void the warranty. You will ...serial number information on the label located on the right edge of purchase to repair the appliance yourself. If you are having a problem with your Bosch dishwasher and are writing, please include a daytime phone number where you have received, please take the following steps until the problem is necessary, contact your...


