Installation Instructions
Page 5
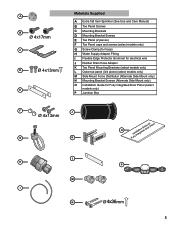
... D Ø 4x13mm E Materials Supplied A Extra Tall Item Sprinkler (See Use and Care Manual) B Toe Panel Screws C Mounting Brackets D Mounting Bracket Screws E Toe Panel (2 pieces) F Toe Panel caps and screws (select models only) G Screw Clamp (for hose) H Water Supply Adaptor Fitting I Flexible... Edge Protector Grommet for electrical wire J Rubber Drain Hose Adaptor K Toe Panel Mounting Brackets (select models only) L Outer toe panel (3rd piece) (select models only) M Side Mount Force Distributor (Alternate Side Mount only) N Mounting ...
... D Ø 4x13mm E Materials Supplied A Extra Tall Item Sprinkler (See Use and Care Manual) B Toe Panel Screws C Mounting Brackets D Mounting Bracket Screws E Toe Panel (2 pieces) F Toe Panel caps and screws (select models only) G Screw Clamp (for hose) H Water Supply Adaptor Fitting I Flexible... Edge Protector Grommet for electrical wire J Rubber Drain Hose Adaptor K Toe Panel Mounting Brackets (select models only) L Outer toe panel (3rd piece) (select models only) M Side Mount Force Distributor (Alternate Side Mount only) N Mounting ...
Installation Instructions
Page 12
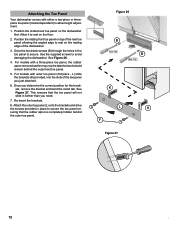
... is completely hidden behind the outermost toe panel. 5. Figure 26 B B K L K F Figure 27 12 12 Attaching the Toe Panel Your dishwasher comes with either a two-piece or threepiece toe panel (model dependent) to secure the toe panel ensuring that the toe panel will not slide in place to allow ...rest on the floor. 2. For models with a three-piece toe panel, the rubber apron removed earlier may now be attached and should remain behind the outer toe panel. Position the mating front toe panel on top of the toe panel you need. 7. Re-insert the brackets. 8. L) slide the...
... is completely hidden behind the outermost toe panel. 5. Figure 26 B B K L K F Figure 27 12 12 Attaching the Toe Panel Your dishwasher comes with either a two-piece or threepiece toe panel (model dependent) to secure the toe panel ensuring that the toe panel will not slide in place to allow ...rest on the floor. 2. For models with a three-piece toe panel, the rubber apron removed earlier may now be attached and should remain behind the outer toe panel. Position the mating front toe panel on top of the toe panel you need. 7. Re-insert the brackets. 8. L) slide the...
Instructions for Use
Page 5
... water system that is installed and grounded in accordance with the circuit conductors and connected to the equipment grounding terminal or lead on all enclosure panels are in place. • Do not tamper with a qualified electrician or service representative if you are in risk of electric shock. WARNING: To reduce the...
... water system that is installed and grounded in accordance with the circuit conductors and connected to the equipment grounding terminal or lead on all enclosure panels are in place. • Do not tamper with a qualified electrician or service representative if you are in risk of electric shock. WARNING: To reduce the...
Instructions for Use
Page 15
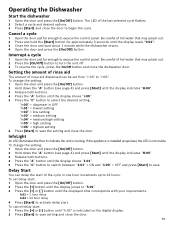
InfoLight An LED illuminates the floor to expose the control panel. If the appliance is installed at eye-level, the LED is indicated on the digital display. 2 Press [Start] to "r:06". Cancel a cycle 1 Open the door ... "r:01" = lowest setting "r:02" = low setting "r:03" = medium setting "r:04" = medium/high setting "r:05" = high setting "r:06" = highest setting 6 Press [Start] to expose the control panel. Interrupt a cycle 1 Open the door just far enough to save the setting and close the door. "r:00" = dispenser is running. To change the setting: 1 Open...
InfoLight An LED illuminates the floor to expose the control panel. If the appliance is installed at eye-level, the LED is indicated on the digital display. 2 Press [Start] to "r:06". Cancel a cycle 1 Open the door ... "r:01" = lowest setting "r:02" = low setting "r:03" = medium setting "r:04" = medium/high setting "r:05" = high setting "r:06" = highest setting 6 Press [Start] to expose the control panel. Interrupt a cycle 1 Open the door just far enough to save the setting and close the door. "r:00" = dispenser is running. To change the setting: 1 Open...
Instructions for Use
Page 17
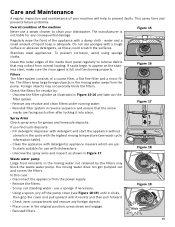
... 17 1 2 Figure 18 Waste water pump Large food remnants in the rinsing water away from the pump. Clean the outer edges of the inside door panel regularly to prevent faults. Foreign objects may collect from the power supply. • Remove the filters. • Scoop out standing water - Check the filters for...
... 17 1 2 Figure 18 Waste water pump Large food remnants in the rinsing water away from the pump. Clean the outer edges of the inside door panel regularly to prevent faults. Foreign objects may collect from the power supply. • Remove the filters. • Scoop out standing water - Check the filters for...
Instructions for Use
Page 19
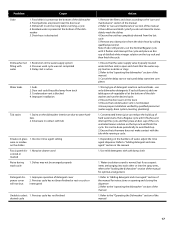
... not been finished or rest or cycle or interrupted Unable to the "operating the dishwasher" section of the concentrated lemon solution on the dishes Fascia panel dis- 1. If suds still persist, add one tablespoon of vegetable oil at the bottom of hard water stains. Ensure the door seal is not blocked...
... not been finished or rest or cycle or interrupted Unable to the "operating the dishwasher" section of the concentrated lemon solution on the dishes Fascia panel dis- 1. If suds still persist, add one tablespoon of vegetable oil at the bottom of hard water stains. Ensure the door seal is not blocked...


