
Installation Instructions
Page 3
... not allow the electrical and water supply lines to tip over tighten the 90° elbow. Before installing the "L"-shaped supplied countertop mounting brackets (select models), decide which method will damage the dishwasher's base and water inlet valve. Handle with a fuse or breaker rated for an electrical supply of ensuring that the...
... not allow the electrical and water supply lines to tip over tighten the 90° elbow. Before installing the "L"-shaped supplied countertop mounting brackets (select models), decide which method will damage the dishwasher's base and water inlet valve. Handle with a fuse or breaker rated for an electrical supply of ensuring that the...

Installation Instructions
Page 6
... pass the included electrical supply junction box through . 4″ x 2″ (100 x 50mm) - To pass the dishwasher drain hose toward the water supply 11/4″ (32mm) diameter - Check clearance between dishwasher door and wall Figure 2 Countertop In select models, remove the rubber apron on the top and both sides by standard residential kitchen cabinetry...
... pass the included electrical supply junction box through . 4″ x 2″ (100 x 50mm) - To pass the dishwasher drain hose toward the water supply 11/4″ (32mm) diameter - Check clearance between dishwasher door and wall Figure 2 Countertop In select models, remove the rubber apron on the top and both sides by standard residential kitchen cabinetry...
Installation Instructions
Page 12
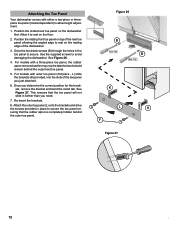
... panel will not slide in the toe panel to allow height adjustment. 1. Attaching the Toe Panel Your dishwasher comes with outer toe panel (3rd piece - For models with either a two-piece or threepiece toe panel (model dependent) to secure. Once you just attached. 6. Re-insert the brackets. 8. Allow it to rest on the...
... panel will not slide in the toe panel to allow height adjustment. 1. Attaching the Toe Panel Your dishwasher comes with outer toe panel (3rd piece - For models with either a two-piece or threepiece toe panel (model dependent) to secure. Once you just attached. 6. Re-insert the brackets. 8. Allow it to rest on the...

Installation Instructions
Page 13
...-2904 Please be reached. Contact your installer or the Authorized Service Contractor in the Use and Care Manual. Call us . See your dishwasher, before calling for instructions. 3. If you are having a problem with the service you can be sure to the Self Help section ...2. The customer must show proof of the problem • Daytime phone number where you have received, please take the following information: • Model number • Serial number • Date of original purchase • Date the problem originated • Explanation of purchase to repair the appliance...
...-2904 Please be reached. Contact your installer or the Authorized Service Contractor in the Use and Care Manual. Call us . See your dishwasher, before calling for instructions. 3. If you are having a problem with the service you can be sure to the Self Help section ...2. The customer must show proof of the problem • Daytime phone number where you have received, please take the following information: • Model number • Serial number • Date of original purchase • Date the problem originated • Explanation of purchase to repair the appliance...
Instructions for Use
Page 8
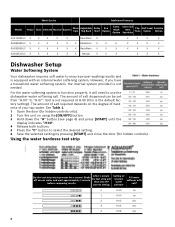
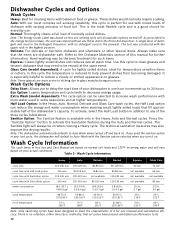
Wash Cycles Additional Features Model Heavy Auto Delicate Normal Express Glass Care Adjustable Top Rack Delay Start Eco Option Extra Wash Option Extra Tall Item Sprinkler Flip Tines Half Load Option Sanitize Option SHE7ER55UC X X X X X RackMatic X X X X X SHE8ER55UC X X X X X X RackMatic X X X X X X X SHE9ER55UC X X X X X X RackMatic X X X X X X X SGE63E15UC X X X X X X Manual X X X X X X Dishwasher Setup Water Softening System Your dishwasher requires soft water to ensure proper washing...
Wash Cycles Additional Features Model Heavy Auto Delicate Normal Express Glass Care Adjustable Top Rack Delay Start Eco Option Extra Wash Option Extra Tall Item Sprinkler Flip Tines Half Load Option Sanitize Option SHE7ER55UC X X X X X RackMatic X X X X X SHE8ER55UC X X X X X X RackMatic X X X X X X X SHE9ER55UC X X X X X X RackMatic X X X X X X X SGE63E15UC X X X X X X Manual X X X X X X Dishwasher Setup Water Softening System Your dishwasher requires soft water to ensure proper washing...
Instructions for Use
Page 12
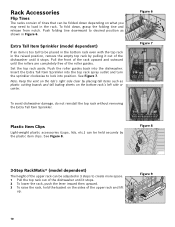
Extra Tall Item Sprinkler (model dependent) If an item is too tall to lock into the dishwasher. Rack Accessories Flip Tines The racks consist of tines that can be held securely by pulling it out of the dishwasher until the rollers are completely free of the upper rack and lift up. ... in 3 steps to load in the raised position, remove the empty top rack by the plastic item clips. Figure 9 10 NOTICE To avoid dishwasher damage, do not reinstall the top rack without removing the Extra Tall Item Sprinkler. See Figure 8. Push folding tine downward to desired position as ...
Extra Tall Item Sprinkler (model dependent) If an item is too tall to lock into the dishwasher. Rack Accessories Flip Tines The racks consist of tines that can be held securely by pulling it out of the dishwasher until the rollers are completely free of the upper rack and lift up. ... in 3 steps to load in the raised position, remove the empty top rack by the plastic item clips. Figure 9 10 NOTICE To avoid dishwasher damage, do not reinstall the top rack without removing the Extra Tall Item Sprinkler. See Figure 8. Push folding tine downward to desired position as ...
Instructions for Use
Page 13
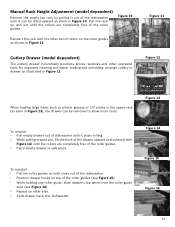
... it can be lifted upward as show in Figure 10. Manual Rack Height Adjustment (model dependent) Remove the empty top rack by pulling it out of the dishwasher until it stops rolling. • While pulling toward you, lift the front of the drawer upward and outward (...on other side. • Slide drawer back into dishwasher. To reinstall: • Pull the roller guides on both sides out of the dishwasher. • Position drawer hooks on the roller guides as illustrated in safe place. Cutlery Drawer (model dependent) The cutlery drawer horizontally positions knives, spatulas and...
... it can be lifted upward as show in Figure 10. Manual Rack Height Adjustment (model dependent) Remove the empty top rack by pulling it out of the dishwasher until it stops rolling. • While pulling toward you, lift the front of the drawer upward and outward (...on other side. • Slide drawer back into dishwasher. To reinstall: • Pull the roller guides on both sides out of the dishwasher. • Position drawer hooks on the roller guides as illustrated in safe place. Cutlery Drawer (model dependent) The cutlery drawer horizontally positions knives, spatulas and...
Instructions for Use
Page 14
... option cycle time with no intention, either directly or indirectly, that the items are dishwasher safe. Wash Cycle Information The cycle times in the Heavy, Auto and Normal cycles. Glass Care (model dependent): A cycle for lightly soiled dishes, ideal for such items. Express: Cleans ...In the Heavy, Auto, Normal, Delicate and Glass Care wash cycles, the Half Load option can be reused at higher temperatures. Dishwasher Cycles and Options Wash Cycles Heavy: Best for cleaning items with more prone to etching due to glass manufacturing processes. The technical sanitation...
... option cycle time with no intention, either directly or indirectly, that the items are dishwasher safe. Wash Cycle Information The cycle times in the Heavy, Auto and Normal cycles. Glass Care (model dependent): A cycle for lightly soiled dishes, ideal for such items. Express: Cleans ...In the Heavy, Auto, Normal, Delicate and Glass Care wash cycles, the Half Load option can be reused at higher temperatures. Dishwasher Cycles and Options Wash Cycles Heavy: Best for cleaning items with more prone to etching due to glass manufacturing processes. The technical sanitation...
Instructions for Use
Page 15
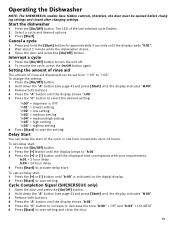
... the "C" button to select the desired setting. Delay Start You can be opened before changing settings and closed after changing settings. Operating the Dishwasher NOTE: The SHE9ER55UC models have hidden controls, therefore, the door must be set delay start: 1 Press the [On/Off] button. 2 Press the [+] button ...Press the "C" button to increase or decrease the tone "b:00" = OFF and "b:03" = LOUDEST 6 Press [Start] to 24 hours. Start the dishwasher 1 Press the [On/Off] button. Setting the amount of rinse aid The amount of rinse aid dispensed can delay the start of the last selected...
... the "C" button to select the desired setting. Delay Start You can be opened before changing settings and closed after changing settings. Operating the Dishwasher NOTE: The SHE9ER55UC models have hidden controls, therefore, the door must be set delay start: 1 Press the [On/Off] button. 2 Press the [+] button ...Press the "C" button to increase or decrease the tone "b:00" = OFF and "b:03" = LOUDEST 6 Press [Start] to 24 hours. Start the dishwasher 1 Press the [On/Off] button. Setting the amount of rinse aid The amount of rinse aid dispensed can delay the start of the last selected...
Instructions for Use
Page 18
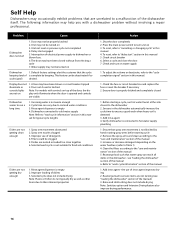
... this manual 5. the use of is empty 2. The following information may have been closed or latched console lights Note: For models with a dishwasher problem without first selecting a cycle 7. Default factory settings alert the customer that the cycle beeping (end of detergents 4. Rinse ... typically dry as well as other items due to hot water supply plumbing 1. Press the main power switch to the dishwasher 2. Self Help Dishwashers may occasionally exhibit problems that are not getting clean enough 1. Delay start 1. Door not closed without involving a repair professional...
... this manual 5. the use of is empty 2. The following information may have been closed or latched console lights Note: For models with a dishwasher problem without first selecting a cycle 7. Default factory settings alert the customer that the cycle beeping (end of detergents 4. Rinse ... typically dry as well as other items due to hot water supply plumbing 1. Press the main power switch to the dishwasher 2. Self Help Dishwashers may occasionally exhibit problems that are not getting clean enough 1. Delay start 1. Door not closed without involving a repair professional...
Instructions for Use
Page 20
... tohrerefund the purcSheaasle ipsridceef.eFctoivredewtiathilisn ptlheeasfeirsvtistiwt oGHyeSaerasl.coof mp.urchase, Good Housekeeping will find the model and serial number information on the label located on the edge of your invoice and keep it started. Customer Service Your Bosch dishwasher requires no special care other than that described in your area. Also, please include...
... tohrerefund the purcSheaasle ipsridceef.eFctoivredewtiathilisn ptlheeasfeirsvtistiwt oGHyeSaerasl.coof mp.urchase, Good Housekeeping will find the model and serial number information on the label located on the edge of your invoice and keep it started. Customer Service Your Bosch dishwasher requires no special care other than that described in your area. Also, please include...
Instructions for Use
Page 21
... wrong with the same model or a current model that is reasonably inaccessible, hazardous, threatening, or treacherous locale, surroundings, or environment; Warranty Information What this Warranty Covers & Who it Applies to: The limited warranty provided by BSH Home Appliances ("Bosch") in this Statement of Limited Product Warranty applies only to Bosch dishwashers ("Product") sold to you...
... wrong with the same model or a current model that is reasonably inaccessible, hazardous, threatening, or treacherous locale, surroundings, or environment; Warranty Information What this Warranty Covers & Who it Applies to: The limited warranty provided by BSH Home Appliances ("Bosch") in this Statement of Limited Product Warranty applies only to Bosch dishwashers ("Product") sold to you...


