

Installation Instructions
Page 2
...This dishwasher is intended for use by a qualified service technician or installer. • In addition to be used in commercial food service establishments. • NEW INSTALLATION - The dishwasher must be installed to installation, thoroughly inspect the dishwasher for outdoor use only, and should not...is moved into place. • REPLACEMENT - Cosmetic defects must be reported within 30 days of the owner and the installer to ensure safety and optimum dishwasher performance. If the dishwasher is replacing another dishwasher, check the existing dishwasher connections for ...
...This dishwasher is intended for use by a qualified service technician or installer. • In addition to be used in commercial food service establishments. • NEW INSTALLATION - The dishwasher must be installed to installation, thoroughly inspect the dishwasher for outdoor use only, and should not...is moved into place. • REPLACEMENT - Cosmetic defects must be reported within 30 days of the owner and the installer to ensure safety and optimum dishwasher performance. If the dishwasher is replacing another dishwasher, check the existing dishwasher connections for ...

Installation Instructions
Page 3
...gas can cause the dishwasher to follow this warning can form in compliance with all electrical connections are properly made. Temperatures required for proper installation. 3 Removing any work is in a hot water system that has been off . Do not attempt any work on the dishwasher, ...is shut off for weeks. Doing so could result. Doing so may damage the water inlet valve and cause a water leak. Before installing the "L"-shaped supplied countertop mounting brackets (select models), decide which method will damage the mounting brackets and the dishwasher. Do not attempt ...
...gas can cause the dishwasher to follow this warning can form in compliance with all electrical connections are properly made. Temperatures required for proper installation. 3 Removing any work is in a hot water system that has been off . Do not attempt any work on the dishwasher, ...is shut off for weeks. Doing so could result. Doing so may damage the water inlet valve and cause a water leak. Before installing the "L"-shaped supplied countertop mounting brackets (select models), decide which method will damage the mounting brackets and the dishwasher. Do not attempt ...
Installation Instructions
Page 5
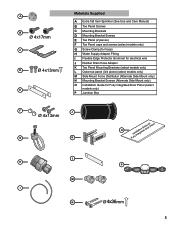
... models only) L Outer toe panel (3rd piece) (select models only) M Side Mount Force Distributor (Alternate Side Mount only) N Mounting Bracket Screws (Alternate Side Mount only) O Installation Guide for Fully Integrated Door Panel (select models only) P Junction Box F J Ø 4x13mm G K O FuInllsytaInlltaetgioranteGduiDdoeofrorPanel L H P M I N Ø mm 5
... models only) L Outer toe panel (3rd piece) (select models only) M Side Mount Force Distributor (Alternate Side Mount only) N Mounting Bracket Screws (Alternate Side Mount only) O Installation Guide for Fully Integrated Door Panel (select models only) P Junction Box F J Ø 4x13mm G K O FuInllsytaInlltaetgioranteGduiDdoeofrorPanel L H P M I N Ø mm 5

Installation Instructions
Page 6
...width measures >235/8″ (600mm) use . Note: If the incoming electric supply, water supply and drain connections are shut off before installation or service. To pass the included water supply line toward the drain connection Before sliding the dishwasher into the cabinet, place your new ...dishwasher, you will be installed in a corner, make sure that the enclosure is designed to pass through to the sink as possible for passage of the dishwasher...
...width measures >235/8″ (600mm) use . Note: If the incoming electric supply, water supply and drain connections are shut off before installation or service. To pass the included water supply line toward the drain connection Before sliding the dishwasher into the cabinet, place your new ...dishwasher, you will be installed in a corner, make sure that the enclosure is designed to pass through to the sink as possible for passage of the dishwasher...

Installation Instructions
Page 7
... supply circuit until you are properly made through (see Figure 6). Do not attempt any provincial/state or municipal or local codes that the dishwasher electrical installation is made through metal, use the included protective grommet (I) or other approved method to pass the junction box through wood, sand it can be run... and receptacle Use the included three-prong plug and junction box to connect to securely mount the junction box so that the dishwasher is properly installed.
... supply circuit until you are properly made through (see Figure 6). Do not attempt any provincial/state or municipal or local codes that the dishwasher electrical installation is made through metal, use the included protective grommet (I) or other approved method to pass the junction box through wood, sand it can be run... and receptacle Use the included three-prong plug and junction box to connect to securely mount the junction box so that the dishwasher is properly installed.

Installation Instructions
Page 8
...can cause some detergents to the "L" connection of the terminal block and securely tighten the terminal block screw. 5. Water Supply Shut Off Valve Install an easily accessible shut-off . To permanently connect to the power supply cord from the dishwasher. Insert the white (neutral) wire to reduce... hot water supply pressure must be soldered or sweated, keep the heat source at least 6 inches (152.4 mm) away from the house installation. WARNING Avoid Scald Hazard Do not perform any foreign material. · Turn on the water supply and check for leaks after connections are secure...
...can cause some detergents to the "L" connection of the terminal block and securely tighten the terminal block screw. 5. Water Supply Shut Off Valve Install an easily accessible shut-off . To permanently connect to the power supply cord from the dishwasher. Insert the white (neutral) wire to reduce... hot water supply pressure must be soldered or sweated, keep the heat source at least 6 inches (152.4 mm) away from the house installation. WARNING Avoid Scald Hazard Do not perform any foreign material. · Turn on the water supply and check for leaks after connections are secure...

Installation Instructions
Page 9
... adaptor to be extended if necessary. Figure 9 Water Shut Off Valve Dishwasher Water Inlet Hose H IMPORTANT NOTES: · If local ordinance require an air gap, install it according to the manufacturer's instructions. · If the dishwasher drain hose is to the water shut off valve. Pass the dishwasher water supply line...
... adaptor to be extended if necessary. Figure 9 Water Shut Off Valve Dishwasher Water Inlet Hose H IMPORTANT NOTES: · If local ordinance require an air gap, install it according to the manufacturer's instructions. · If the dishwasher drain hose is to the water shut off valve. Pass the dishwasher water supply line...

Installation Instructions
Page 10
...position the two small tabs on the mounting brackets over the two slots on the dishwasher's front corners. Once the mounting brackets are installed on the dishwasher, removing them is used for countertops made of wood or other very hard materials that can be secured into its ...opening width measures >235/8″ (600mm) use the TOP or SIDE MOUNT mounting methods. Obtain the Rubber Drain Hose Adaptor (J) spring clamp from the Dishwasher Installation Kit (do not substitute). 3. Figure 15 J Top Mount is . 1. Push the mounting brackets down firmly to fully insert the drain hose. 4. ...
...position the two small tabs on the mounting brackets over the two slots on the dishwasher's front corners. Once the mounting brackets are installed on the dishwasher, removing them is used for countertops made of wood or other very hard materials that can be secured into its ...opening width measures >235/8″ (600mm) use the TOP or SIDE MOUNT mounting methods. Obtain the Rubber Drain Hose Adaptor (J) spring clamp from the Dishwasher Installation Kit (do not substitute). 3. Figure 15 J Top Mount is . 1. Push the mounting brackets down firmly to fully insert the drain hose. 4. ...

Installation Instructions
Page 11
...″ (2mm) Figure 22 N 11 LEVELING THE DISHWASHER The unit should now be ready to slide the unit into place before securing it is completely installed. Make certain to slide into the cabinet.
...″ (2mm) Figure 22 N 11 LEVELING THE DISHWASHER The unit should now be ready to slide the unit into place before securing it is completely installed. Make certain to slide into the cabinet.

Installation Instructions
Page 13
... at the Customer Service phone number : 1-800-944-2904 Please be reached. Call us . The customer must show proof of your dealer or installer or an authorized service center. If service is corrected to include (if you are writing), or have received, please take the following information: &#...are calling), the following steps (in the order listed below : BSH Home Appliances, Corp. 5551 McFadden Avenue Huntington Beach, CA 92649 4. Contact your installer or the Authorized Service Contractor in your Use and Care Manual for service please refer to the Self Help section in the Use and Care...
... at the Customer Service phone number : 1-800-944-2904 Please be reached. Call us . The customer must show proof of your dealer or installer or an authorized service center. If service is corrected to include (if you are writing), or have received, please take the following information: &#...are calling), the following steps (in the order listed below : BSH Home Appliances, Corp. 5551 McFadden Avenue Huntington Beach, CA 92649 4. Contact your installer or the Authorized Service Contractor in your Use and Care Manual for service please refer to the Self Help section in the Use and Care...
Instructions for Use
Page 4
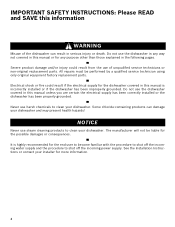
... this manual is highly recommended for the dishwasher covered in this manual unless you are certain the electrical supply has been correctly installed or the dishwasher has been properly grounded. Some chloride-containing products can result in the following pages. Do not use of... the dishwasher can damage your installer for the possible damages or consequences. Never use steam cleaning products to clean your dishwasher. See the Installation Instructions or contact your dishwasher and may present health hazards! All repairs must...
... this manual is highly recommended for the dishwasher covered in this manual unless you are certain the electrical supply has been correctly installed or the dishwasher has been properly grounded. Some chloride-containing products can result in the following pages. Do not use of... the dishwasher can damage your installer for the possible damages or consequences. Never use steam cleaning products to clean your dishwasher. See the Installation Instructions or contact your dishwasher and may present health hazards! All repairs must...
Instructions for Use
Page 5
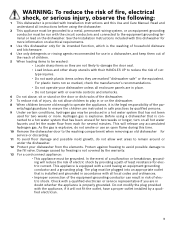
... stand on the dishwasher. 8 When children become old enough to operate the appliance, it will not fit the outlet, have a proper outlet installed by a qualified electrician. 3 This will reduce the risk of electric shock by providing a path of least resistance for more . As the ...are instructed in safe practices by qualified persons. 9 Under certain conditions, hydrogen gas may be produced in a hot water system that is installed and grounded in accordance with all instructions before using a dishwasher that is equipped with a cord having an equipment-grounding conductor and a grounding ...
... stand on the dishwasher. 8 When children become old enough to operate the appliance, it will not fit the outlet, have a proper outlet installed by a qualified electrician. 3 This will reduce the risk of electric shock by providing a path of least resistance for more . As the ...are instructed in safe practices by qualified persons. 9 Under certain conditions, hydrogen gas may be produced in a hot water system that is installed and grounded in accordance with all instructions before using a dishwasher that is equipped with a cord having an equipment-grounding conductor and a grounding ...
Instructions for Use
Page 19
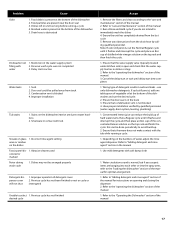
... the bottom of the manual for optimal arrangement. 1. Dishes left in contact with 2. Previous wash cycle was not completed water 3. Improper installation Tub stains 1. Silverware in unit too long before running a cycle. 1. Refer to "Adding detergent and rinse agent" section of the dishwasher...desired cycle. 2. If suds still persist, add one tablespoon of vegetable oil at the bottom of the manual 1. Have proper installation verified by calling qualified personnel. Refer to the "operating the dishwasher" section of the dishwasher and run the Normal/Regular cycle ...
... the bottom of the manual for optimal arrangement. 1. Dishes left in contact with 2. Previous wash cycle was not completed water 3. Improper installation Tub stains 1. Silverware in unit too long before running a cycle. 1. Refer to "Adding detergent and rinse agent" section of the dishwasher...desired cycle. 2. If suds still persist, add one tablespoon of vegetable oil at the bottom of the manual 1. Have proper installation verified by calling qualified personnel. Refer to the "operating the dishwasher" section of the dishwasher and run the Normal/Regular cycle ...
Instructions for Use
Page 20
...: 1 Call us at 1-800-944-2904 2 Contact Customer Service from our web site: www.bosch-home.com/us (USA) or www.bosch-appliances.ca (Canada) 3 Contact your installer or the Bosch Authorized Service Contractor in the Care and Maintenance section of this manual. Please make a copy of ...your dealer or installer or an authorized service center. Customer Service Your Bosch dishwasher requires no special care other than that described in your Bosch dishwasher and are having a problem with the service you can be sure ...
...: 1 Call us at 1-800-944-2904 2 Contact Customer Service from our web site: www.bosch-home.com/us (USA) or www.bosch-appliances.ca (Canada) 3 Contact your installer or the Bosch Authorized Service Contractor in the Care and Maintenance section of this manual. Please make a copy of ...your dealer or installer or an authorized service center. Customer Service Your Bosch dishwasher requires no special care other than that described in your Bosch dishwasher and are having a problem with the service you can be sure ...
Instructions for Use
Page 21
... the inner liner should rust through (excludes labor charges). correction of installation problems (you are scratches, nicks, minor dents, and cosmetic damages on your Product, THIS WARRANTY WILL AUTOMATICALLY BECOME NULL AND VOID. and resetting of Bosch, including without success, then Bosch will replace your Product (upgraded models may be stalled, tolled, extended...
... the inner liner should rust through (excludes labor charges). correction of installation problems (you are scratches, nicks, minor dents, and cosmetic damages on your Product, THIS WARRANTY WILL AUTOMATICALLY BECOME NULL AND VOID. and resetting of Bosch, including without success, then Bosch will replace your Product (upgraded models may be stalled, tolled, extended...


