

Instructions for Use
Page 4
...be performed by freezing is highly recommended for the end use steam cleaning products to remain around or under the dishwasher. • Protect your installer for the dishwasher covered in a dishwasher, and keep them out of the reach of children. • When loading items to operate the...produced in this time. • Remove the door to clean your dishwasher. Electrical shock or fire could result from the elements. See the Installation Instructions included with this dishwasher for more . Please read and understand all enclosure panels are in place. • Do not tamper with ...
...be performed by freezing is highly recommended for the end use steam cleaning products to remain around or under the dishwasher. • Protect your installer for the dishwasher covered in a dishwasher, and keep them out of the reach of children. • When loading items to operate the...produced in this time. • Remove the door to clean your dishwasher. Electrical shock or fire could result from the elements. See the Installation Instructions included with this dishwasher for more . Please read and understand all enclosure panels are in place. • Do not tamper with ...
Instructions for Use
Page 17
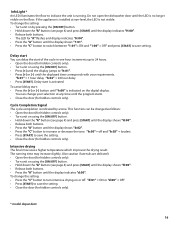
If the appliance is installed at any time until the program starts. • Close the door (for ...until the display indicates "d:00". Delay start You can delay the start of the cycle in one hour increments up to 24 hours. • Open the door (for hidden controls only). • Turn unit on by a tone. To change...until the display shows "b:02". • Press the "C" button to increase or decrease the tone. "h:01" = 1 hour delay "h:24" = 24 hour delay • Press [START]. Intensive drying The final rinse uses a higher temperature which improves the drying result. You can be ...
If the appliance is installed at any time until the program starts. • Close the door (for ...until the display indicates "d:00". Delay start You can delay the start of the cycle in one hour increments up to 24 hours. • Open the door (for hidden controls only). • Turn unit on by a tone. To change...until the display shows "b:02". • Press the "C" button to increase or decrease the tone. "h:01" = 1 hour delay "h:24" = 24 hour delay • Press [START]. Intensive drying The final rinse uses a higher temperature which improves the drying result. You can be ...
Instructions for Use
Page 22
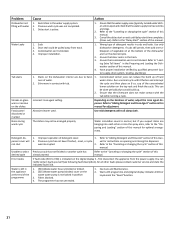
...or into the spray arms, refer to "Load- Refer to the "Canceling or changing the cycle" section of this manual. Improper installation. 1. Wrong type of the programme 1. water stains. This can be pulled away from the power supply. Previous cycle has not finished... interrupt 2. If suds still persist, then add one tablespoon of vegetable oil at the end of detergent results in position 3. Have proper installation verified by qualified personnel (water supply, drain system, leveling, plumbing). 1. You can reduce the build up . 2. Restriction in the ...
...or into the spray arms, refer to "Load- Refer to the "Canceling or changing the cycle" section of this manual. Improper installation. 1. Wrong type of the programme 1. water stains. This can be pulled away from the power supply. Previous cycle has not finished... interrupt 2. If suds still persist, then add one tablespoon of vegetable oil at the end of detergent results in position 3. Have proper installation verified by qualified personnel (water supply, drain system, leveling, plumbing). 1. You can reduce the build up . 2. Restriction in the ...

Instructions for Use
Page 23
...to your dishwasher and are calling), the following steps (in your dealer or installer or an authorized service center. Any work performed by unauthorized personnel may void the warranty. E-mail us at 1-800-944-2904. Write us from the customer service section of the problem 22 Please... Use and Care Manual. Call Customer Service at the address below ) until the problem is necessary, contact your area. 2. Contact your installer or the Authorized Service Contractor in the order listed below : BSH Home Appliances, Corp. 5551 McFadden Avenue Huntington Beach, CA 92649 4. ...
...to your dishwasher and are calling), the following steps (in your dealer or installer or an authorized service center. Any work performed by unauthorized personnel may void the warranty. E-mail us at 1-800-944-2904. Write us from the customer service section of the problem 22 Please... Use and Care Manual. Call Customer Service at the address below ) until the problem is necessary, contact your area. 2. Contact your installer or the Authorized Service Contractor in the order listed below : BSH Home Appliances, Corp. 5551 McFadden Avenue Huntington Beach, CA 92649 4. ...
Instructions for Use
Page 24
...vessels); (2) any party's willful misconduct, negligence, misuse, abuse, accidents, neglect, improper operation, failure to maintain, improper or negligent installation, tampering, failure to follow operating instructions, mishandling, unauthorized service (including self-performed "fixing" or exploration of the appliance's internal workings...Warranty Service: TO OBTAIN WARRANTY SERVICE FOR YOUR PRODUCT, YOU SHOULD CONTACT THE NEAREST BOSCH AUTHORIZED SERVICE CENTER, OR CALL 800-944-2904, or write Bosch at all electrical, plumbing or other special charges by the service company, assuming they...
...vessels); (2) any party's willful misconduct, negligence, misuse, abuse, accidents, neglect, improper operation, failure to maintain, improper or negligent installation, tampering, failure to follow operating instructions, mishandling, unauthorized service (including self-performed "fixing" or exploration of the appliance's internal workings...Warranty Service: TO OBTAIN WARRANTY SERVICE FOR YOUR PRODUCT, YOU SHOULD CONTACT THE NEAREST BOSCH AUTHORIZED SERVICE CENTER, OR CALL 800-944-2904, or write Bosch at all electrical, plumbing or other special charges by the service company, assuming they...
Planning Guide
Page 3
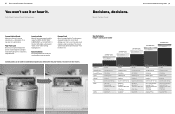
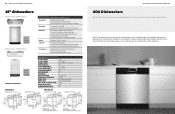
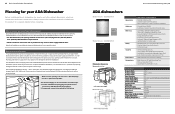
...Tub Stainless Steel Tall Tub Racks - 300 Series - Rackmatic® Adjustable Upper Rack - 4 Flip Tines - Stainless Steel Tall Tub - AquaStop® Plus 800 Plus Series - 40 dBA - 1.56 gallons/load - 180 kWh/yr - 6 Wash Cycles - 5 Options - Third Rack - 7 Flip Tines -... Tub - Fully Flush Custom Panel Dishwashers. Bosch Custom Panel Bosch Custom Dishwasher Planning Guide | 3 Custom Cabinet-Ready Match your kitchen. Easy Installation Everything needed to custom panel wood cabinetry and countertops. Damage-Proof Bosch's unique SaniDry™ condensation drying eliminates the...
...Tub Stainless Steel Tall Tub Racks - 300 Series - Rackmatic® Adjustable Upper Rack - 4 Flip Tines - Stainless Steel Tall Tub - AquaStop® Plus 800 Plus Series - 40 dBA - 1.56 gallons/load - 180 kWh/yr - 6 Wash Cycles - 5 Options - Third Rack - 7 Flip Tines -... Tub - Fully Flush Custom Panel Dishwashers. Bosch Custom Panel Bosch Custom Dishwasher Planning Guide | 3 Custom Cabinet-Ready Match your kitchen. Easy Installation Everything needed to custom panel wood cabinetry and countertops. Damage-Proof Bosch's unique SaniDry™ condensation drying eliminates the...
Planning Guide
Page 4
... ⁄2" Kenmore 241 ⁄2" Jenn-Air 245⁄8" Electrolux 243 ⁄4" GE Monogram * Installation dimensions considering 3⁄4" custom door panel. Standard Counter Depth is 24" Information from retailers website as of January 2011. 4 | Bosch Custom Dishwasher Planning Guide Bosch - Brand Bosch Sku Price (custom panel) dBA Energy usage (kWh/yr) Water usage Number of cycles...
... ⁄2" Kenmore 241 ⁄2" Jenn-Air 245⁄8" Electrolux 243 ⁄4" GE Monogram * Installation dimensions considering 3⁄4" custom door panel. Standard Counter Depth is 24" Information from retailers website as of January 2011. 4 | Bosch Custom Dishwasher Planning Guide Bosch - Brand Bosch Sku Price (custom panel) dBA Energy usage (kWh/yr) Water usage Number of cycles...
Planning Guide
Page 5
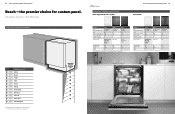
... Dishwasher Before installing a Bosch dishwasher, be sure to a dedicated household receptacle. 2. Suggested panel thickness: 3⁄4" - SHV58E13UC and SHV68E13UC require no tension adjustment screws as possible for easy access to household or field wiring 4"(100 mm) 4"(100 mm) 34"(867 mm) 34"(867 mm) 90° 2" 90° 24" (610 (50 mm) 2" mm) 24" (610...
... Dishwasher Before installing a Bosch dishwasher, be sure to a dedicated household receptacle. 2. Suggested panel thickness: 3⁄4" - SHV58E13UC and SHV68E13UC require no tension adjustment screws as possible for easy access to household or field wiring 4"(100 mm) 4"(100 mm) 34"(867 mm) 34"(867 mm) 90° 2" 90° 24" (610 (50 mm) 2" mm) 24" (610...
Planning Guide
Page 9
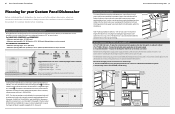
... Dishwasher Planning Guide Planning for passage of water, drain and electrical line. Always consult the installation manual included with Accessory Hinge Bosch Custom Dishwasher Planning Guide | 15 What to consider when installing an 18" dishwasher Bosch dishwashers are all three to pass through to water supply and drain lines. refer to a dedicated household ... be at least 20" (508 mm) above the floor to air gap (if any) is square and the openings allow for your 18" Dishwasher Before installing a Bosch dishwasher, be large enough for your openings within the shaded area.
... Dishwasher Planning Guide Planning for passage of water, drain and electrical line. Always consult the installation manual included with Accessory Hinge Bosch Custom Dishwasher Planning Guide | 15 What to consider when installing an 18" dishwasher Bosch dishwashers are all three to pass through to water supply and drain lines. refer to a dedicated household ... be at least 20" (508 mm) above the floor to air gap (if any) is square and the openings allow for your 18" Dishwasher Before installing a Bosch dishwasher, be large enough for your openings within the shaded area.
Planning Guide
Page 10
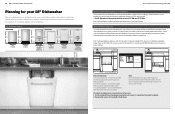
... or Less Dishwasher dimensions SRX53C15UC Measurements in inches Measurements in mm Bosch Custom Dishwasher Planning Guide | 17 ADA Dishwashers Bosch's ADA dishwashers are among the most flexible we have to 20% - Temp. Install for traditional ADA use or at a higher position for a ... This easily integrates into residential and commercial kitchens. Exceeds ENERGY STAR Requirements by 6% for Energy and 101% for Lower Countertop Installation - Bosch's ADA dishwashers are uniquely designed for Water Intake Length Outlet Hose Shipping Weight (lbs.) * (SS) Stainless Steel (CP) ...
... or Less Dishwasher dimensions SRX53C15UC Measurements in inches Measurements in mm Bosch Custom Dishwasher Planning Guide | 17 ADA Dishwashers Bosch's ADA dishwashers are among the most flexible we have to 20% - Temp. Install for traditional ADA use or at a higher position for a ... This easily integrates into residential and commercial kitchens. Exceeds ENERGY STAR Requirements by 6% for Energy and 101% for Lower Countertop Installation - Bosch's ADA dishwashers are uniquely designed for Water Intake Length Outlet Hose Shipping Weight (lbs.) * (SS) Stainless Steel (CP) ...
Planning Guide
Page 11
... are different, please verify dimensions for your ADA Dishwasher Before installing a Bosch dishwasher, be enclosed on the top and both sides by 42% for Energy and 269% for easy access to water supply and drain lines. The ... Specifications Product Width 23 9⁄16" Product Height 32 1⁄16" - 34 7⁄16" Product Depth 229⁄16" Door Clearance 27" Cutout Width (Min.) 24 - 24 1⁄4" or 23 5⁄8" with Flexible Silverware Basket - For ADA dishwashers, the opening should be mounted in one of 150") Shipping Weight (lbs.) 125 AquaStop...
... are different, please verify dimensions for your ADA Dishwasher Before installing a Bosch dishwasher, be enclosed on the top and both sides by 42% for Energy and 269% for easy access to water supply and drain lines. The ... Specifications Product Width 23 9⁄16" Product Height 32 1⁄16" - 34 7⁄16" Product Depth 229⁄16" Door Clearance 27" Cutout Width (Min.) 24 - 24 1⁄4" or 23 5⁄8" with Flexible Silverware Basket - For ADA dishwashers, the opening should be mounted in one of 150") Shipping Weight (lbs.) 125 AquaStop...
Installation Instructions
Page 3
...of it at least 20" (508mm) off the cabinet floor; Read these instructions, the dishwasher shall be installed by qualified installers only. It is a new installation, most of the work must be done before the dishwasher is moved into place. • REPLACEMENT - ... This dishwasher is replacing another dishwasher, check the existing dishwasher connections for use by a qualified service technician or installer. The dishwasher must be installed with CAN/CSA-C22.2 No. 167/UL 749. IMPORTANT SAFETY INSTRUCTIONS: SAVE THESE INSTRUCTIONS To avoid possible injury ...
...of it at least 20" (508mm) off the cabinet floor; Read these instructions, the dishwasher shall be installed by qualified installers only. It is a new installation, most of the work must be done before the dishwasher is moved into place. • REPLACEMENT - ... This dishwasher is replacing another dishwasher, check the existing dishwasher connections for use by a qualified service technician or installer. The dishwasher must be installed with CAN/CSA-C22.2 No. 167/UL 749. IMPORTANT SAFETY INSTRUCTIONS: SAVE THESE INSTRUCTIONS To avoid possible injury ...
Installation Instructions
Page 4
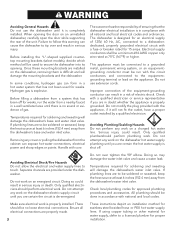
...door while supporting the rear of gas. Only qualified electricians should be done in accordance with care. Temperatures required for proper installation. Handle with national and local codes. Electrical supply conductors shall be no sound or evidence of the unit. Check with...General Hazards Do not use extension cords. The dishwasher is difficult and will not fit the outlet, have a proper outlet installed by a qualified electrician. Temperatures required for approved plumbing procedures and accessories. This appliance must be connected to secure the dishwasher...
...door while supporting the rear of gas. Only qualified electricians should be done in accordance with care. Temperatures required for proper installation. Handle with national and local codes. Electrical supply conductors shall be no sound or evidence of the unit. Check with...General Hazards Do not use extension cords. The dishwasher is difficult and will not fit the outlet, have a proper outlet installed by a qualified electrician. Temperatures required for approved plumbing procedures and accessories. This appliance must be connected to secure the dishwasher...
Installation Instructions
Page 7
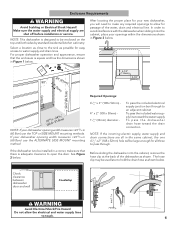
...(60.8cm) use the TOP or SIDE MOUNT mounting methods. Make sure the water supply and electrical supply are shut off before installation or service. For proper dishwasher operation and appearance, ensure that the enclosure is designed to avoid interference with the dishwasher when sliding it... into the cabinet, place your openings within the dimensions shown in Figure 3 below. 90° 2.5" 24" (61cm) (5cm) 4.5"(10cm) 34¼"(86.7cm) 2(63100./016--6214.46/1c6m" ) NOTE: If your dishwasher opening width measures >2315/16 ...
...(60.8cm) use the TOP or SIDE MOUNT mounting methods. Make sure the water supply and electrical supply are shut off before installation or service. For proper dishwasher operation and appearance, ensure that the enclosure is designed to avoid interference with the dishwasher when sliding it... into the cabinet, place your openings within the dimensions shown in Figure 3 below. 90° 2.5" 24" (61cm) (5cm) 4.5"(10cm) 34¼"(86.7cm) 2(63100./016--6214.46/1c6m" ) NOTE: If your dishwasher opening width measures >2315/16 ...
Installation Instructions
Page 8
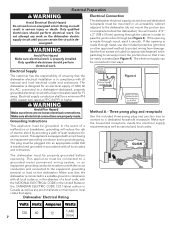
... supply circuit until you are no loose electrical connections. WARNING Avoid Fire Hazard Make sure there are certain the circuit is installed and grounded in two ways: Dedicated Receptacle or Field Wiring Dishwasher Electrical Supply Junction Box Figure 4 Electric cord with a ...fuse or breaker rated for electric current. This appliance is properly installed. Dishwasher Electrical Rating Volts Hertz Amperes Watts 7 1200 600 1125 1,,444500 (maaxx)) Doing so could result in the parts bag to...
... supply circuit until you are no loose electrical connections. WARNING Avoid Fire Hazard Make sure there are certain the circuit is installed and grounded in two ways: Dedicated Receptacle or Field Wiring Dishwasher Electrical Supply Junction Box Figure 4 Electric cord with a ...fuse or breaker rated for electric current. This appliance is properly installed. Dishwasher Electrical Rating Volts Hertz Amperes Watts 7 1200 600 1125 1,,444500 (maaxx)) Doing so could result in the parts bag to...

Installation Instructions
Page 9
To permanently connect to the power supply cord from the house installation. See Figure 5. Serious injury could result. IMPORTANT NOTES: • If using a solder joint instead of the household or field supply wiring as shown in Figure 6. ... the terminal block and securely tighten the terminal block screw (see Figure 5). 4. Connecting the Hot Water Supply There are certain the hot water supply is installed or removed to reduce the likelihood of the insulation from the dishwasher. If plumbing lines are secure and then attach the junction box cover with...
To permanently connect to the power supply cord from the house installation. See Figure 5. Serious injury could result. IMPORTANT NOTES: • If using a solder joint instead of the household or field supply wiring as shown in Figure 6. ... the terminal block and securely tighten the terminal block screw (see Figure 5). 4. Connecting the Hot Water Supply There are certain the hot water supply is installed or removed to reduce the likelihood of the insulation from the dishwasher. If plumbing lines are secure and then attach the junction box cover with...

Installation Instructions
Page 10
...the appropriate seal when making plumbing connections. After all connections are made before the water line is 150 inches. Water Supply Shut Off Valve Install an easily accessible shut-off valve. Pass the dishwasher water supply line with adaptor to a disposer dishwasher drain connection, remove the plug from... along its length that is best to be extended if necessary. Figure 7 IMPORTANT NOTES: • If local ordinance require an air gap, install it according to the manufacturer's instructions. • If the dishwasher drain hose is to lay the end on the hot water and check for...
...the appropriate seal when making plumbing connections. After all connections are made before the water line is 150 inches. Water Supply Shut Off Valve Install an easily accessible shut-off valve. Pass the dishwasher water supply line with adaptor to a disposer dishwasher drain connection, remove the plug from... along its length that is best to be extended if necessary. Figure 7 IMPORTANT NOTES: • If local ordinance require an air gap, install it according to the manufacturer's instructions. • If the dishwasher drain hose is to lay the end on the hot water and check for...
Installation Instructions
Page 11
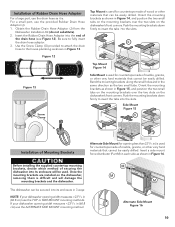
... the tabs into the slots. Push the mounting brackets down firmly to the house plumbing as shown in Figure 13. Before installing the supplied countertop mounting brackets, decide which method of securing the dishwasher into its enclosure will damage the mounting brackets and the...Mount Figure 14 Figure 13 Screw Clamp Side Mount is used . Push the mounting brackets down firmly to fully insert the drain hose adaptor. 3. Installation of Rubber Drain Hose Adaptor For a large port, use the provided Rubber Drain Hose Adaptor (J). 1. Insert a side mount force distributor (Part...
... the tabs into the slots. Push the mounting brackets down firmly to the house plumbing as shown in Figure 13. Before installing the supplied countertop mounting brackets, decide which method of securing the dishwasher into its enclosure will damage the mounting brackets and the...Mount Figure 14 Figure 13 Screw Clamp Side Mount is used . Push the mounting brackets down firmly to fully insert the drain hose adaptor. 3. Installation of Rubber Drain Hose Adaptor For a large port, use the provided Rubber Drain Hose Adaptor (J). 1. Insert a side mount force distributor (Part...
Installation Instructions
Page 12
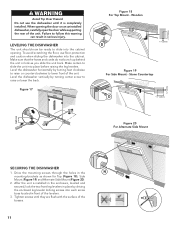
... THE DISHWASHER 1. Figure 17 Figure 18 For Top Mount - Wooden 1/16″ (2mm) D Figure 19 For Side Mount - Tighten screws until it is installed in the enclosure, leveled and secured, lock the two front leg levelers in place by turning feet clockwise to raise or counter-clockwise to slide...or kink as shown for Top (Figure 18), Side Mount (Figure 19) and Alternate Side Mount (Figure 20). 2. After the unit is completely installed. Make certain to raise or lower the back. ~1/2″ (12mm) WARNING Avoid Tip Over Hazard Do not use floor protection and caution when sliding...
... THE DISHWASHER 1. Figure 17 Figure 18 For Top Mount - Wooden 1/16″ (2mm) D Figure 19 For Side Mount - Tighten screws until it is installed in the enclosure, leveled and secured, lock the two front leg levelers in place by turning feet clockwise to raise or counter-clockwise to slide...or kink as shown for Top (Figure 18), Side Mount (Figure 19) and Alternate Side Mount (Figure 20). 2. After the unit is completely installed. Make certain to raise or lower the back. ~1/2″ (12mm) WARNING Avoid Tip Over Hazard Do not use floor protection and caution when sliding...
Installation Instructions
Page 14
... with your dishwasher and are not pleased with the service you have available (if you are having a problem with this manual. Contact your installer or the Authorized Service Contractor in your invoice and keep it with your Use and Care Manual for service please refer to your dealer or... installer or an authorized service center. E-mail us at the Customer Service phone number : 1-800-735-4328 Please be reached. Call us . Please make a copy of the problem • Daytime phone...
... with your dishwasher and are not pleased with the service you have available (if you are having a problem with this manual. Contact your installer or the Authorized Service Contractor in your invoice and keep it with your Use and Care Manual for service please refer to your dealer or... installer or an authorized service center. E-mail us at the Customer Service phone number : 1-800-735-4328 Please be reached. Call us . Please make a copy of the problem • Daytime phone...


