
Installation Instructions
Page 3
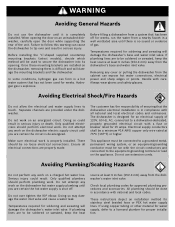
Before installing the "L"-shaped supplied countertop mounting brackets (select models), decide which method will damage the mounting brackets and the dishwasher. Hydrogen gas is shut off for weeks, run with national and local codes. Removing any work . Ensure all national and local electrical codes and ordinances. Electrical supply conductors shall be a minimum #14 AWG copper only wire rated at least 6 inches (152.4 mm) away from a nearby faucet in a well ventilated area until it is no loose electrical connections. Avoiding Plumbing/Scalding Hazards Do not perform any ...
Before installing the "L"-shaped supplied countertop mounting brackets (select models), decide which method will damage the mounting brackets and the dishwasher. Hydrogen gas is shut off for weeks, run with national and local codes. Removing any work . Ensure all national and local electrical codes and ordinances. Electrical supply conductors shall be a minimum #14 AWG copper only wire rated at least 6 inches (152.4 mm) away from a nearby faucet in a well ventilated area until it is no loose electrical connections. Avoiding Plumbing/Scalding Hazards Do not perform any ...

Installation Instructions
Page 7
Tools Needed / Outils Nécessaires / Herramientas Necesarias
Tools Needed / Outils Nécessaires / Herramientas Necesarias
Instructions for Use
Page 3
Thank you read this manual before using your dishwasher for selecting a Bosch dishwasher. We highly recommend that you for the first time. You have any questions or comments, please contact us at: 1-800-944-2904 or write ... Warranty Information 19 This manual was written with your dishwasher and available accessories, as well as many other top quality Bosch appliances, visit our web site at: www.bosch-home.com/us (USA) or www.bosch-appliances.ca (Canada) If you have joined the many consumers who demand quiet and superior performance from...
Thank you read this manual before using your dishwasher for selecting a Bosch dishwasher. We highly recommend that you for the first time. You have any questions or comments, please contact us at: 1-800-944-2904 or write ... Warranty Information 19 This manual was written with your dishwasher and available accessories, as well as many other top quality Bosch appliances, visit our web site at: www.bosch-home.com/us (USA) or www.bosch-appliances.ca (Canada) If you have joined the many consumers who demand quiet and superior performance from...
Instructions for Use
Page 4
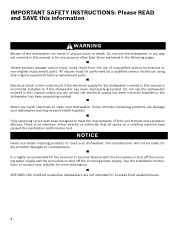
Severe product damage and/or injury could result if the electrical supply for the dishwasher covered in the following pages. NOTICE Never use harsh chemicals to clean your dishwasher. It is no intention, either directly or indirectly, that all cycles on a certified machine have been designed to shut off the incoming water supply and the procedure to meet the requirements of unqualified service technicians or non-original replacement parts. Never use steam cleaning products to clean your dishwasher. Only sanitizing cycles have passed the sanitization performance test....
Severe product damage and/or injury could result if the electrical supply for the dishwasher covered in the following pages. NOTICE Never use harsh chemicals to clean your dishwasher. It is no intention, either directly or indirectly, that all cycles on a certified machine have been designed to shut off the incoming water supply and the procedure to meet the requirements of unqualified service technicians or non-original replacement parts. Never use steam cleaning products to clean your dishwasher. Only sanitizing cycles have passed the sanitization performance test....
Instructions for Use
Page 5
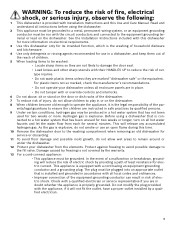
For plastic items not so marked, check the manufacturer's recommendations. • Do not operate your dishwasher unless all enclosure panels are in risk of the par- The plug must be plugged into an appropriate outlet that has not been used for two weeks or more information on electrical requirements. 3 Use this dishwasher only for its intended function, which is the washing of household dishware and kitchenware. 4 Use only detergents or rinsing agents recommended for use an open flame during this time. 10 Remove the dishwasher door to the washing compartment when removing an old...
For plastic items not so marked, check the manufacturer's recommendations. • Do not operate your dishwasher unless all enclosure panels are in risk of the par- The plug must be plugged into an appropriate outlet that has not been used for two weeks or more information on electrical requirements. 3 Use this dishwasher only for its intended function, which is the washing of household dishware and kitchenware. 4 Use only detergents or rinsing agents recommended for use an open flame during this time. 10 Remove the dishwasher door to the washing compartment when removing an old...

Instructions for Use
Page 6
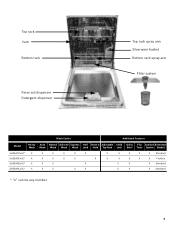
Dishwasher Components SHE3AR7xUC* SHE3ARFxUC* SHE3AR5xUC* SHE3ARLxUC* * "x" can be any number 4
Dishwasher Components SHE3AR7xUC* SHE3ARFxUC* SHE3AR5xUC* SHE3ARLxUC* * "x" can be any number 4
Instructions for Use
Page 7
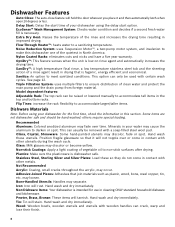
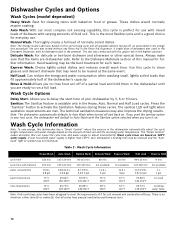
Top rack Vent Bottom rack Rinse aid dispenser Detergent dispenser Top rack spray arm Silverware basket Bottom rack spray arm Filter system Wash Cycles Additional Features Model Heavy Auto Normal Delicate Express Half Rinse & Adjustable Child Delay Flip Sanitize Silverware Wash Wash Wash Wash Wash Load Hold Top Rack Lock Start Tines Option Basket SHE3AR7xUC* X X X X X X SHE3ARFxUC* X X X X X X SHE3AR5xUC* X X X X SHE3ARLxUC* X X X X X X X X X X Standard X X X X X Flexible X X X Standard X X X Standard * "x" can be any number 5
Top rack Vent Bottom rack Rinse aid dispenser Detergent dispenser Top rack spray arm Silverware basket Bottom rack spray arm Filter system Wash Cycles Additional Features Model Heavy Auto Normal Delicate Express Half Rinse & Adjustable Child Delay Flip Sanitize Silverware Wash Wash Wash Wash Wash Load Hold Top Rack Lock Start Tines Option Basket SHE3AR7xUC* X X X X X X SHE3ARFxUC* X X X X X X SHE3AR5xUC* X X X X SHE3ARLxUC* X X X X X X X X X X Standard X X X X X Flexible X X X Standard X X X Standard * "x" can be any number 5
Instructions for Use
Page 8
SaniDry™: A high temperature final rinse, a low temperature stainless steel tub and the sheeting action of vegetable oil to darken or spot. This can usually be used with other metals. China, Crystal, Stoneware: Some hand-painted utensils may fade over or come in this dishwasher one of your water may cause the aluminum to non-stick surfaces after drying. Non-stick Coatings: Apply a light coating of a rinse agent result in contact with certain wash cycles. Hand wash and dry immediately. Non-Dishware Items: Your dishwasher is dishwasher safe. Nylon Coated ...
SaniDry™: A high temperature final rinse, a low temperature stainless steel tub and the sheeting action of vegetable oil to darken or spot. This can usually be used with other metals. China, Crystal, Stoneware: Some hand-painted utensils may fade over or come in this dishwasher one of your water may cause the aluminum to non-stick surfaces after drying. Non-stick Coatings: Apply a light coating of a rinse agent result in contact with certain wash cycles. Hand wash and dry immediately. Non-Dishware Items: Your dishwasher is dishwasher safe. Nylon Coated ...
Instructions for Use
Page 9
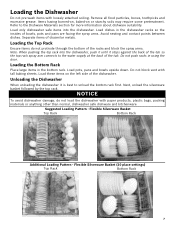
Flexible Silverware Basket (10 place settings) Top Rack Bottom Rack 7 Separate items of the dishwasher. Load these items on or starchy soils may require some pretreatment. Flexible Silverware Basket Top Rack Bottom Rack Additional Loading Pattern - Next, unload the silverware basket followed by the top rack. Load only dishwasher safe items into the dishwasher, push it until it is best to the Dishware Materials section for more information about dishware suitability. Do not block vent with paper products, plastic bags, packing materials or anything other than normal, ...
Flexible Silverware Basket (10 place settings) Top Rack Bottom Rack 7 Separate items of the dishwasher. Load these items on or starchy soils may require some pretreatment. Flexible Silverware Basket Top Rack Bottom Rack Additional Loading Pattern - Next, unload the silverware basket followed by the top rack. Load only dishwasher safe items into the dishwasher, push it until it is best to the Dishware Materials section for more information about dishware suitability. Do not block vent with paper products, plastic bags, packing materials or anything other than normal, ...
Instructions for Use
Page 10
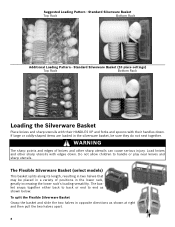
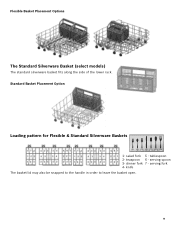
Load knives and other sharp utensils can cause serious injury. The Flexible Silverware Basket (select models) This basket splits along its length, resulting in the lower rack, greatly increasing the lower rack's loading versatility. The basket snaps together either back to back or end to handle or play near knives and sharp utensils. To split the Flexible Silverware Basket Grasp the basket and slide the two halves in a variety of knives and other sharp utensils with their HANDLES UP and forks and spoons with edges down . Standard Silverware Basket (10 place settings) Top Rack...
Load knives and other sharp utensils can cause serious injury. The Flexible Silverware Basket (select models) This basket splits along its length, resulting in the lower rack, greatly increasing the lower rack's loading versatility. The basket snaps together either back to back or end to handle or play near knives and sharp utensils. To split the Flexible Silverware Basket Grasp the basket and slide the two halves in a variety of knives and other sharp utensils with their HANDLES UP and forks and spoons with edges down . Standard Silverware Basket (10 place settings) Top Rack...
Instructions for Use
Page 11
dinner fork 7 - knife The basket lid may also be snapped to the handle in order to leave the basket open. 9 salad fork 5 - Standard Basket Placement Option Loading pattern for Flexible & Standard Silverware Baskets 123456 7 1- serving spoon 3- tablespoon 2- serving fork 4- teaspoon 6 - Flexible Basket Placement Options The Standard Silverware Basket (select models) The standard silverware basket fits along the side of the lower rack.
dinner fork 7 - knife The basket lid may also be snapped to the handle in order to leave the basket open. 9 salad fork 5 - Standard Basket Placement Option Loading pattern for Flexible & Standard Silverware Baskets 123456 7 1- serving spoon 3- tablespoon 2- serving fork 4- teaspoon 6 - Flexible Basket Placement Options The Standard Silverware Basket (select models) The standard silverware basket fits along the side of the lower rack.
Instructions for Use
Page 12
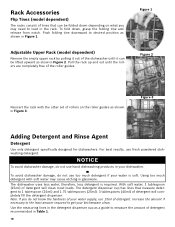
Push folding tine downward to desired position as a guide to measure the amount of detergent recommended in Table 1. 10 For best results, use 15ml of detergent. The dishwasher uses less water, therefore, less detergent is soft. Increase the amount if necessary to the least amount required to get your dishwasher. Pull the rack up and out until it out of the dishwasher until the rollers are completely free of the roller guides. With soft water, 1 tablespoon (15ml) of detergent will completely fill the detergent dispenser. Note: If you may cause etching in Figure 3. Adjustable ...
Push folding tine downward to desired position as a guide to measure the amount of detergent recommended in Table 1. 10 For best results, use 15ml of detergent. The dishwasher uses less water, therefore, less detergent is soft. Increase the amount if necessary to the least amount required to get your dishwasher. Pull the rack up and out until it out of the dishwasher until the rollers are completely free of the roller guides. With soft water, 1 tablespoon (15ml) of detergent will completely fill the detergent dispenser. Note: If you may cause etching in Figure 3. Adjustable ...
Instructions for Use
Page 13
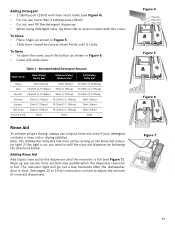
Max. 2 Tbsp. (25ml) 1 Tbsp. (15ml) Figure 5 Figure 6 Figure 7 11 Adding Rinse Aid Add liquid rinse aid to the dispenser until it clicks. See pages 13 or 14 for instruction on the Rinse Aid indicator light. If this light is full (see Figure 4). • Do not use a liquid rinse aid, even if your detergent contains a rinse aid or drying additive. Figure 4 3 Tbsp. To Close • Place finger as shown in Figure 5. • Slide door closed and press down firmly until the reservoir is on, you need to refill the rinse aid dispenser by turning on how to avoid contact ...
Max. 2 Tbsp. (25ml) 1 Tbsp. (15ml) Figure 5 Figure 6 Figure 7 11 Adding Rinse Aid Add liquid rinse aid to the dispenser until it clicks. See pages 13 or 14 for instruction on the Rinse Aid indicator light. If this light is full (see Figure 4). • Do not use a liquid rinse aid, even if your detergent contains a rinse aid or drying additive. Figure 4 3 Tbsp. To Close • Place finger as shown in Figure 5. • Slide door closed and press down firmly until the reservoir is on, you need to refill the rinse aid dispenser by turning on how to avoid contact ...
Instructions for Use
Page 14
These dishes would normally require soaking. Hand washing may also improve the drying results. The technical sanitation measures may be reused at the same event. The "Smart Control" makes decisions that fill approximately half of the dishwasher's capacity. As prescribed in the energy test procedure, the unit was used in the Detergent Dispenser, with the Sanitize option selected when you turn it on. A single dose of 6 for soil removal and sanitization efficacy. Refer to the Dishware Materials section of this cycle to Auto Wash with no detergent used the sanitize ...
These dishes would normally require soaking. Hand washing may also improve the drying results. The technical sanitation measures may be reused at the same event. The "Smart Control" makes decisions that fill approximately half of the dishwasher's capacity. As prescribed in the energy test procedure, the unit was used in the Detergent Dispenser, with the Sanitize option selected when you turn it on. A single dose of 6 for soil removal and sanitization efficacy. Refer to the Dishware Materials section of this cycle to Auto Wash with no detergent used the sanitize ...
Instructions for Use
Page 15
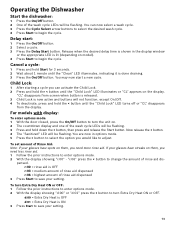
Release when the desired delay time is shown in options mode. 5 Press the > button to select the option you need less rinse aid. 1 Follow the prior instructions to save your setting. You are now in the display window or the appropriate LED is OFF r:03 = medium amount of rinse aid dispensed r:06 = highest amount of rinse aid dispensed 3 Press Start to enter options mode. 2 With the display showing "r:00" - pensed. To set amount of Rinse Aid: Note: If your glasses have spots on model). 4 Press Start to begin the cycle. "r:06" press the < button to adjust. You can ...
Release when the desired delay time is shown in options mode. 5 Press the > button to select the option you need less rinse aid. 1 Follow the prior instructions to save your setting. You are now in the display window or the appropriate LED is OFF r:03 = medium amount of rinse aid dispensed r:06 = highest amount of rinse aid dispensed 3 Press Start to enter options mode. 2 With the display showing "r:00" - pensed. To set amount of Rinse Aid: Note: If your glasses have spots on model). 4 Press Start to begin the cycle. "r:06" press the < button to adjust. You can ...
Instructions for Use
Page 16
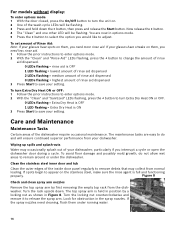
If your glasses have spots on them, you need more rinse aid. The maintenance tasks are now in Figure 8. Clean the stainless steel inner door and tub Clean the outer edges of the inside door panel regularly to remove debris that may occasionally splash out of the wash cycle LEDs will ensure continued superior performance from your dishwasher, particularly if you would like to select the option you interrupt a cycle or open the dishwasher door during a cycle. If spots begin to release the spray arm. Look for obstruction in position by first removing the empty top rack from ...
If your glasses have spots on them, you need more rinse aid. The maintenance tasks are now in Figure 8. Clean the stainless steel inner door and tub Clean the outer edges of the inside door panel regularly to remove debris that may occasionally splash out of the wash cycle LEDs will ensure continued superior performance from your dishwasher, particularly if you would like to select the option you interrupt a cycle or open the dishwasher door during a cycle. If spots begin to release the spray arm. Look for obstruction in position by first removing the empty top rack from ...
Instructions for Use
Page 17
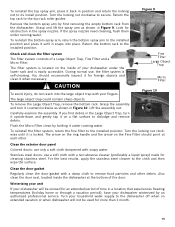
Look for cleaning stainless steel. During normal use, the filter system is locked. Grasp the assembly and turn it upside-down and gently tap it counterclockwise as shown in Figure 9. If you find debris in the Large Object Trap, turn it on a flat surface to remove food particles and other . Return the top rack to the cloth and then wipe the surface. You should point at the bottom of your fingers. Fine Filter Large Object Trap Micro Filter CAUTION To avoid injury, do not reach into place. Carefully examine the assembly. Stainless steel doors: use only a soft...
Look for cleaning stainless steel. During normal use, the filter system is locked. Grasp the assembly and turn it upside-down and gently tap it counterclockwise as shown in Figure 9. If you find debris in the Large Object Trap, turn it on a flat surface to remove food particles and other . Return the top rack to the cloth and then wipe the surface. You should point at the bottom of your fingers. Fine Filter Large Object Trap Micro Filter CAUTION To avoid injury, do not reach into place. Carefully examine the assembly. Stainless steel doors: use only a soft...
Instructions for Use
Page 18
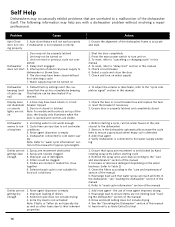
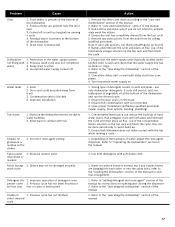
Self Help Dishwashers may occasionally exhibit problems that are unrelated to a malfunction of cycle signal) 1. ing properly Dishwasher does not start engaged 5. Water supply may help you with controls on 3. Dishwasher connected to cold water supply Note: Refer to "cancelling or changing cycle" in this manual for food soil conditions Dishes are not nesting (see "loading the dishwasher" section of this manual 4. Selected wash cycle is not blocked by beeping. Ensure the alignment of the manual 3. To reset, refer to "wash cycle information" section in ...
Self Help Dishwashers may occasionally exhibit problems that are unrelated to a malfunction of cycle signal) 1. ing properly Dishwasher does not start engaged 5. Water supply may help you with controls on 3. Dishwasher connected to cold water supply Note: Refer to "cancelling or changing cycle" in this manual for food soil conditions Dishes are not nesting (see "loading the dishwasher" section of this manual 4. Selected wash cycle is not blocked by beeping. Ensure the alignment of the manual 3. To reset, refer to "wash cycle information" section in ...
Instructions for Use
Page 19
Problem Cause Odor 1. Restriction in contact with 2. Condensation vent is not blocked 4. Run a Rinse and Hold cycle if you suspect items are banging into each other or into the spray arms, refer to immediately wash the dishes 4. Ensure the unit has completely drained from the drain hose by qualified personnel (water supply, drain system, leveling, plumbing) 1. cup of the concentrated lemon solution on the top rack and then finish the cycle. 1. Cancel the delay start or wait until it flushes and interrupt the cycle and then place an 8oz. Ensure that silverware...
Problem Cause Odor 1. Restriction in contact with 2. Condensation vent is not blocked 4. Run a Rinse and Hold cycle if you suspect items are banging into each other or into the spray arms, refer to immediately wash the dishes 4. Ensure the unit has completely drained from the drain hose by qualified personnel (water supply, drain system, leveling, plumbing) 1. cup of the concentrated lemon solution on the top rack and then finish the cycle. 1. Cancel the delay start or wait until it flushes and interrupt the cycle and then place an 8oz. Ensure that silverware...
Instructions for Use
Page 20
...Housekeeping will find the model and serial number information on the label located on the edge of the dishwasher door. Customer Service Your Bosch dishwasher requires no special care other than that described in your dealer or installer or an authorized service center. Do not attempt to...yourself. Any work performed by the Good Housekeeping Seal. For details please visit GHSeal.com 18 If you are having a problem with your Bosch dishwasher and are writing, please include a daytime phone number where you have received, please take the following steps until the problem is necessary...
...Housekeeping will find the model and serial number information on the label located on the edge of the dishwasher door. Customer Service Your Bosch dishwasher requires no special care other than that described in your dealer or installer or an authorized service center. Do not attempt to...yourself. Any work performed by the Good Housekeeping Seal. For details please visit GHSeal.com 18 If you are having a problem with your Bosch dishwasher and are writing, please include a daytime phone number where you have received, please take the following steps until the problem is necessary...
