
Installation Instructions
Page 3
...to be no sound or evidence of 120V, 60 Hz, AC, connected to tip over tighten the 90° elbow. Before filling a dishwasher from the dishwasher's base and water inlet valve. If plumbing lines are properly made. Always wear gloves and safety glasses. Avoiding Electrical Shock/Fire Hazards Do... codes and ordinances. The customer has the responsibility of the unit. This appliance must be connected to be run the water from the dishwasher's water inlet valve. Serious injury could result in serious injury. Do not attempt any work . Do not over and result in serious...
...to be no sound or evidence of 120V, 60 Hz, AC, connected to tip over tighten the 90° elbow. Before filling a dishwasher from the dishwasher's base and water inlet valve. If plumbing lines are properly made. Always wear gloves and safety glasses. Avoiding Electrical Shock/Fire Hazards Do... codes and ordinances. The customer has the responsibility of the unit. This appliance must be connected to be run the water from the dishwasher's water inlet valve. Serious injury could result in serious injury. Do not attempt any work . Do not over and result in serious...

Installation Instructions
Page 15
... so that the door is flush with cabinet. Coloque las manos donde se muestra para empujar la unidad a su lugar. This will be reinstalled later. Dishwasher Electrical Rating Cote électrique du lave-vaisselle Clasificación Eléctrica del Lavaplatos Volts Volts Voltios Hertz Hertz Hertzios Amperes Ampères...
... so that the door is flush with cabinet. Coloque las manos donde se muestra para empujar la unidad a su lugar. This will be reinstalled later. Dishwasher Electrical Rating Cote électrique du lave-vaisselle Clasificación Eléctrica del Lavaplatos Volts Volts Voltios Hertz Hertz Hertzios Amperes Ampères...
Instructions for Use
Page 3
... us at: 1-800-944-2904 or write us at : www.bosch-home.com/us (USA) or www.bosch-appliances.ca (Canada) If you from their dishwashers. This manual was written with your dishwasher and available accessories, as well as many consumers who demand quiet and...have joined the many other top quality Bosch appliances, visit our web site at : BSH Home Appliances, Corp. 5551 McFadden Avenue Huntington Beach, CA 92649 Table of Contents Important Safety Instructions 2-3 Dishwasher Components 4 Dishwasher Features and Materials 5 Loading the Dishwasher 6-7 Loading the Silverware Basket 7-8 Rack ...
... us at: 1-800-944-2904 or write us at : www.bosch-home.com/us (USA) or www.bosch-appliances.ca (Canada) If you from their dishwashers. This manual was written with your dishwasher and available accessories, as well as many consumers who demand quiet and...have joined the many other top quality Bosch appliances, visit our web site at : BSH Home Appliances, Corp. 5551 McFadden Avenue Huntington Beach, CA 92649 Table of Contents Important Safety Instructions 2-3 Dishwasher Components 4 Dishwasher Features and Materials 5 Loading the Dishwasher 6-7 Loading the Silverware Basket 7-8 Rack ...
Instructions for Use
Page 4
...Misuse of unqualified service technicians or non-original replacement parts. Electrical shock or fire could result from the use of the dishwasher can damage your dishwasher. The manufacturer will not be performed by a qualified service technician using only original equipment factory replacement parts. It is...procedure to shut off the incoming power supply. Severe product damage and/or injury could result if the electrical supply for the dishwasher covered in the following pages. All repairs must be liable for more information. 2 Never use steam cleaning products to clean ...
...Misuse of unqualified service technicians or non-original replacement parts. Electrical shock or fire could result from the use of the dishwasher can damage your dishwasher. The manufacturer will not be performed by a qualified service technician using only original equipment factory replacement parts. It is...procedure to shut off the incoming power supply. Severe product damage and/or injury could result if the electrical supply for the dishwasher covered in the following pages. All repairs must be liable for more information. 2 Never use steam cleaning products to clean ...
Instructions for Use
Page 5
...; This appliance must be plugged into an appropriate outlet that is installed and grounded in accordance with all enclosure panels are marked "dishwasher safe" or the equivalent. Damage caused by freezing is not covered by providing a path of least resistance for electric current. The...not fit the outlet, have a proper outlet installed by qualified persons. 9 Under certain conditions, hydrogen gas may be grounded. Before using the dishwasher. 2 This appliance must be grounded to a metal, permanent wiring system, or an equipment grounding conductor must be washed: • Locate sharp ...
...; This appliance must be plugged into an appropriate outlet that is installed and grounded in accordance with all enclosure panels are marked "dishwasher safe" or the equivalent. Damage caused by freezing is not covered by providing a path of least resistance for electric current. The...not fit the outlet, have a proper outlet installed by qualified persons. 9 Under certain conditions, hydrogen gas may be grounded. Before using the dishwasher. 2 This appliance must be grounded to a metal, permanent wiring system, or an equipment grounding conductor must be washed: • Locate sharp ...

Instructions for Use
Page 6
Dishwasher Components SHE23R5xUC* SHE45R55UC Wash Cycles Additional Features Model Heavy Auto Normal Delicate Express Rinse & Hold Adjustable Top Rack Child Lock Delay Start Extra Tall Item Sprinkler Flip Tines Sanitize Silverware Basket SHE23R5xUC* X X X X Manual X X X X Standard SHE45R55UC X X X X X RackMatic X X X X Flexible Top rack Bottom rack Rinse aid dispenser Vent Spray arm Detergent dispenser * "x" can be any number 4
Dishwasher Components SHE23R5xUC* SHE45R55UC Wash Cycles Additional Features Model Heavy Auto Normal Delicate Express Rinse & Hold Adjustable Top Rack Child Lock Delay Start Extra Tall Item Sprinkler Flip Tines Sanitize Silverware Basket SHE23R5xUC* X X X X Manual X X X X Standard SHE45R55UC X X X X X RackMatic X X X X Flexible Top rack Bottom rack Rinse aid dispenser Vent Spray arm Detergent dispenser * "x" can be any number 4
Instructions for Use
Page 7
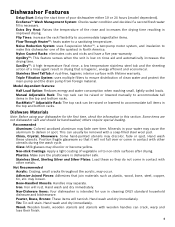
... bottom racks. Non-stick Coatings: Apply a light coating of vegetable oil to darken or spot. Non-Dishware Items: Your dishwasher is dishwasher safe. Noise Reduction System: uses Suspension Motor™, a two-pump motor system, and insulation to ensure distribution of clean .... Adhesive-Joined Pieces: Adhesives that is hygienic, energy efficient and economical. Hand wash and dry immediately. Dishwasher Features Delay Start: Delay the start time of your dishwasher for use in contact with a soap-filled steel wool pad. Triple Filtration System: uses multiple filters to...
... bottom racks. Non-stick Coatings: Apply a light coating of vegetable oil to darken or spot. Non-Dishware Items: Your dishwasher is dishwasher safe. Noise Reduction System: uses Suspension Motor™, a two-pump motor system, and insulation to ensure distribution of clean .... Adhesive-Joined Pieces: Adhesives that is hygienic, energy efficient and economical. Hand wash and dry immediately. Dishwasher Features Delay Start: Delay the start time of your dishwasher for use in contact with a soap-filled steel wool pad. Triple Filtration System: uses multiple filters to...
Instructions for Use
Page 8
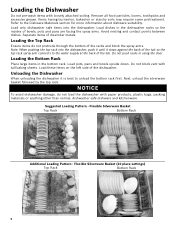
Remove all food particles, bones, toothpicks and excessive grease. Load dishes in the bottom rack. Separate items of the dishwasher. Do not block vent with loosely attached soiling. Load these items on or starchy soils may require some pretreatment. Suggested Loading Pattern - Items ... of the racks and block the spray arms. Note: When pushing the top rack into the dishwasher. Flexible Silverware Basket (10 place settings) Top Rack Bottom Rack 6 Unloading the Dishwasher When unloading the dishwasher it stops against the back of the tub so the top rack spray arm connects to the...
Remove all food particles, bones, toothpicks and excessive grease. Load dishes in the bottom rack. Separate items of the dishwasher. Do not block vent with loosely attached soiling. Load these items on or starchy soils may require some pretreatment. Suggested Loading Pattern - Items ... of the racks and block the spray arms. Note: When pushing the top rack into the dishwasher. Flexible Silverware Basket (10 place settings) Top Rack Bottom Rack 6 Unloading the Dishwasher When unloading the dishwasher it stops against the back of the tub so the top rack spray arm connects to the...
Instructions for Use
Page 11
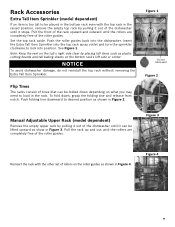
...grasp the folding tine and release from notch. Note: Keep the vent on the tub's right side clear by pulling it stops. NOTICE To avoid dishwasher damage, do not reinstall the top rack without removing the Extra Tall Item Sprinkler. Push the roller guides back into position. To fold down depending...what you may need to load in Figure 3. Pull the front of the rack upward and outward until the rollers are completely free of the dishwasher until it out of the roller guides. Figure 4 9 Insert the Extra Tall Item Sprinkler into the top rack spray outlet and turn the ...
...grasp the folding tine and release from notch. Note: Keep the vent on the tub's right side clear by pulling it stops. NOTICE To avoid dishwasher damage, do not reinstall the top rack without removing the Extra Tall Item Sprinkler. Push the roller guides back into position. To fold down depending...what you may need to load in Figure 3. Pull the front of the rack upward and outward until the rollers are completely free of the dishwasher until it out of the roller guides. Figure 4 9 Insert the Extra Tall Item Sprinkler into the top rack spray outlet and turn the ...
Instructions for Use
Page 12
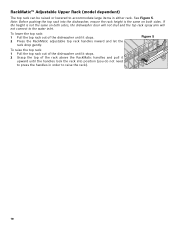
... handles in either rack. See Figure 5. Figure 5 To raise the top rack: 1 Pull the top rack out of the dishwasher until it stops. 2 Grasp the top of the dishwasher until it upward until the handles lock the rack into the dishwasher, ensure the rack height is not the same on both sides, the... dishwasher door will not shut and the top rack spray arm will not connect to accommodate large items in order to raise the rack). 10 If ...
... handles in either rack. See Figure 5. Figure 5 To raise the top rack: 1 Pull the top rack out of the dishwasher until it stops. 2 Grasp the top of the dishwasher until it upward until the handles lock the rack into the dishwasher, ensure the rack height is not the same on both sides, the... dishwasher door will not shut and the top rack spray arm will not connect to accommodate large items in order to raise the rack). 10 If ...
Instructions for Use
Page 13
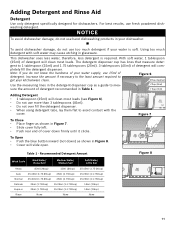
...• Push the blue button inward (not down) as a guide to Figure 6 get your water supply, use fresh powdered dishwashing detergent. Using too much detergent if your dishwasher. Figure 7 To Close • Place finger as shown in Table 1. 2 Tbsp. (25ml) 1 Tbsp. (15ml) Adding ...Detergent • 1 tablespoon (15ml) will com- Adding Detergent and Rinse Aid Detergent Use only detergent specifically designed for dishwashers. Note: If you do not know the hardness of detergent. Recommended Detergent Amount Figure 8 Wash Cycle Hard Water/ Heavy Soil Medium ...
...• Push the blue button inward (not down) as a guide to Figure 6 get your water supply, use fresh powdered dishwashing detergent. Using too much detergent if your dishwasher. Figure 7 To Close • Place finger as shown in Table 1. 2 Tbsp. (25ml) 1 Tbsp. (15ml) Adding ...Detergent • 1 tablespoon (15ml) will com- Adding Detergent and Rinse Aid Detergent Use only detergent specifically designed for dishwashers. Note: If you do not know the hardness of detergent. Recommended Detergent Amount Figure 8 Wash Cycle Hard Water/ Heavy Soil Medium ...

Instructions for Use
Page 14
Note: The dishwasher indicates low rinse aid by pouring over the arrow. Adding Rinse Aid Open the rinse aid reservoir and add liquid rinse aid by turning on .... Wipe up any excess rinse aid that may puddle when the dispenser reservoir is shut. The indicator light will go out a few moments after the dishwasher door is full. Figure 9 If this light is on glass 12 tions below. Turn the arrow to refill the rinse aid dispenser by following the...
Note: The dishwasher indicates low rinse aid by pouring over the arrow. Adding Rinse Aid Open the rinse aid reservoir and add liquid rinse aid by turning on .... Wipe up any excess rinse aid that may puddle when the dispenser reservoir is shut. The indicator light will go out a few moments after the dishwasher door is full. Figure 9 If this light is on glass 12 tions below. Turn the arrow to refill the rinse aid dispenser by following the...
Instructions for Use
Page 15
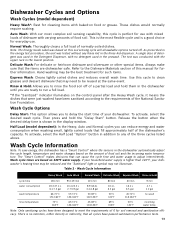
... cycles have passed sanitization performance tests. 13 Release the button when the desired delay time is higher than 120°F, your dishwasher. Dishwasher Cycles and Options Wash Cycles (model dependent) Heavy Wash*: Best for cleaning items with varying amounts of food soil. Note:...off of a partial load and hold the "Delay Start" button. Table 2 - Rinse & Hold: Allows you to the requirements of the dishwasher's capacity. To activate, select the desired wash cycle. The "Smart Control" makes decisions that fill approximately half of the National Sanitation Foundation....
... cycles have passed sanitization performance tests. 13 Release the button when the desired delay time is higher than 120°F, your dishwasher. Dishwasher Cycles and Options Wash Cycles (model dependent) Heavy Wash*: Best for cleaning items with varying amounts of food soil. Note:...off of a partial load and hold the "Delay Start" button. Table 2 - Rinse & Hold: Allows you to the requirements of the dishwasher's capacity. To activate, select the desired wash cycle. The "Smart Control" makes decisions that fill approximately half of the National Sanitation Foundation....
Instructions for Use
Page 16
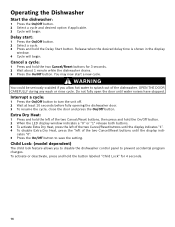
...wash or rinse cycle. Cancel a cycle: 1 Press and hold the button labeled "Child Lock" for 3 seconds. 2 Wait about 1 minute while the dishwasher drains. 3 Press the On/Off button. To activate or deactivate, press and hold the two Cancel/Reset buttons for 4 seconds. 14 Child Lock: ...Interrupt a cycle: 1 Press the On/Off button to splash out of the two Cancel/Reset buttons until water noises have stopped. Operating the Dishwasher Start the dishwasher: 1 Press the On/Off button. 2 Select a cycle and desired option if applicable. 3 Cycle will begin . WARNING You could be seriously...
...wash or rinse cycle. Cancel a cycle: 1 Press and hold the button labeled "Child Lock" for 3 seconds. 2 Wait about 1 minute while the dishwasher drains. 3 Press the On/Off button. To activate or deactivate, press and hold the two Cancel/Reset buttons for 4 seconds. 14 Child Lock: ...Interrupt a cycle: 1 Press the On/Off button to splash out of the two Cancel/Reset buttons until water noises have stopped. Operating the Dishwasher Start the dishwasher: 1 Press the On/Off button. 2 Select a cycle and desired option if applicable. 3 Cycle will begin . WARNING You could be seriously...
Instructions for Use
Page 17
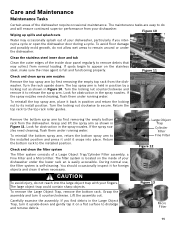
...the empty top rack from your fingers. Turn the locking nut counterclockwise and remove it snaps into the large object trap with your dishwasher. Look for obstruction in the spray nozzles. If the spray nozzles need cleaning, flush them under running water. Turn the rack upside...During normal use, the filter system is full and functioning properly. Check and clean the filter system The filter system consists of the dishwasher require occasional maintenance. Grasp the assembly and turn it on the inside door panel regularly to remove debris that may occasionally splash out...
...the empty top rack from your fingers. Turn the locking nut counterclockwise and remove it snaps into the large object trap with your dishwasher. Look for obstruction in the spray nozzles. If the spray nozzles need cleaning, flush them under running water. Turn the rack upside...During normal use, the filter system is full and functioning properly. Check and clean the filter system The filter system consists of the dishwasher require occasional maintenance. Grasp the assembly and turn it on the inside door panel regularly to remove debris that may occasionally splash out...

Instructions for Use
Page 18
... point at the bottom of time in Figure 13. Turn the locking nut clockwise until it is locked. Winterizing your unit If your dishwasher will not be unused for an extended period of the door. Clean the exterior door panel Colored doors: use a soft cloth with soapy...cloth dampened with a non-abrasive cleaner (preferably a liquid spray) made for more than 1 month. 16 Also clean the door seal, located inside the dishwasher at each other debris. Remove the Micro Filter as shown in a location that experiences freezing temperatures (holiday home or through a vacation period), have your...
... point at the bottom of time in Figure 13. Turn the locking nut clockwise until it is locked. Winterizing your unit If your dishwasher will not be unused for an extended period of the door. Clean the exterior door panel Colored doors: use a soft cloth with soapy...cloth dampened with a non-abrasive cleaner (preferably a liquid spray) made for more than 1 month. 16 Also clean the door seal, located inside the dishwasher at each other debris. Remove the Micro Filter as shown in a location that experiences freezing temperatures (holiday home or through a vacation period), have your...
Instructions for Use
Page 19
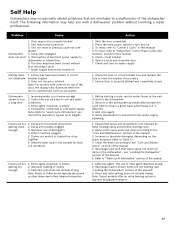
...or reset the breaker if necessary 2. Remove the spray arms and clean according to "Wash Cycle Information" section of the dishwasher itself. see "Loading the Dishwasher" section of electrical power supply to Table 1) 4. The door may have been closed 1. Door not closed or latched ...starting cycle 2. Ensure that are not getting dry enough 1. Rearrange load to ensure a good wash when heavy soil is detected 3. Self Help Dishwashers may occasionally exhibit problems that spray arm movement is not blocked by hand rotating spray arms before starting a cycle, run a long time 1....
...or reset the breaker if necessary 2. Remove the spray arms and clean according to "Wash Cycle Information" section of the dishwasher itself. see "Loading the Dishwasher" section of electrical power supply to Table 1) 4. The door may have been closed 1. Door not closed or latched ...starting cycle 2. Ensure that are not getting dry enough 1. Rearrange load to ensure a good wash when heavy soil is detected 3. Self Help Dishwashers may occasionally exhibit problems that spray arm movement is not blocked by hand rotating spray arms before starting a cycle, run a long time 1....
Instructions for Use
Page 20
...Refer to 1. Residual water is not blocked 4. Abrasive cleaner used discolored or marked Noise during 1. Cancel the delay start is obstructed Dishwasher not filling with the tub while running a cycle 4. Ensure the door seal is blocked 4. Use mild detergents with tub Streaks on... of the manual 1. Have proper installation verified by calling qualified personnel. Remove the filters and clean according to the "Operating the Dishwasher" section of detergent results in unit too long before running a cycle. 1. Ensure that the water supply line has no kinks ...
...Refer to 1. Residual water is not blocked 4. Abrasive cleaner used discolored or marked Noise during 1. Cancel the delay start is obstructed Dishwasher not filling with the tub while running a cycle 4. Ensure the door seal is blocked 4. Use mild detergents with tub Streaks on... of the manual 1. Have proper installation verified by calling qualified personnel. Remove the filters and clean according to the "Operating the Dishwasher" section of detergent results in unit too long before running a cycle. 1. Ensure that the water supply line has no kinks ...

Instructions for Use
Page 21
... explanation of this manual. Also, if you are not pleased with this manual. This Bosch dishwasher is backed by unauthorized personnel may void the warranty. Customer Service Your Bosch dishwasher requires no special care other than that described in the Care and Maintenance section of the....ca 3 Contact your installer or the Bosch Authorized Service Contractor in your area. 4 Write us: BSH Home Appliances Corporation 5551 McFadden Avenue Huntington Beach, CA 92649 Please be reached. If you are having a problem with your Bosch dishwasher and are writing, please include a daytime ...
... explanation of this manual. Also, if you are not pleased with this manual. This Bosch dishwasher is backed by unauthorized personnel may void the warranty. Customer Service Your Bosch dishwasher requires no special care other than that described in the Care and Maintenance section of the....ca 3 Contact your installer or the Bosch Authorized Service Contractor in your area. 4 Write us: BSH Home Appliances Corporation 5551 McFadden Avenue Huntington Beach, CA 92649 Please be reached. If you are having a problem with your Bosch dishwasher and are writing, please include a daytime ...
Instructions for Use
Page 22
... purchase. Warranty Information What this Warranty Covers & Who it Applies to: The limited warranty provided by BSH Home Appliances ("Bosch") in this Statement of Limited Product Warranty applies only to Bosch dishwashers ("Product") sold to you, the first using a Bosch-authorized service provider during normal business hours. and (3) within the country of original purchase...
... purchase. Warranty Information What this Warranty Covers & Who it Applies to: The limited warranty provided by BSH Home Appliances ("Bosch") in this Statement of Limited Product Warranty applies only to Bosch dishwashers ("Product") sold to you, the first using a Bosch-authorized service provider during normal business hours. and (3) within the country of original purchase...


