
Instructions for Use
Page 4
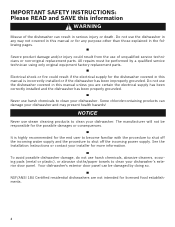
...not covered in serious injury or death. NSF/ANSI 184 Certified residential dishwashers are certain the electrical supply has been correctly installed and the dishwasher has been properly grounded. IMPORTANT SAFETY INSTRUCTIONS: Please READ and SAVE this information WARNING Misuse of unqualified ... procedure to clean your dishwasher and may present health hazards! See the Installation Instructions or contact your dishwasher. The manufacturer will not be responsible for more information. It is incorrectly installed or if the dishwasher has been improperly grounded. Do not use harsh ...
...not covered in serious injury or death. NSF/ANSI 184 Certified residential dishwashers are certain the electrical supply has been correctly installed and the dishwasher has been properly grounded. IMPORTANT SAFETY INSTRUCTIONS: Please READ and SAVE this information WARNING Misuse of unqualified ... procedure to clean your dishwasher and may present health hazards! See the Installation Instructions or contact your dishwasher. The manufacturer will not be responsible for more information. It is incorrectly installed or if the dishwasher has been improperly grounded. Do not use harsh ...
Instructions for Use
Page 5
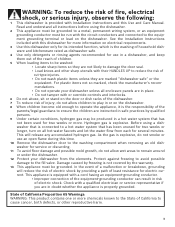
...the appliance is properly grounded. This will reduce the risk of electric shock by the warranty. 13 This appliance must be run with Installation Instructions and this time. 10 Remove the dishwasher door to the washing compartment when removing an old dishwasher for several minutes. Protect against...a hot water system that has not been used for use an open flame during this Use and Care Manual. See the Installation Instructions included with this dishwasher only for its intended function, which is explosive. Before using the dishwasher. 2 This appliance must be grounded.
...the appliance is properly grounded. This will reduce the risk of electric shock by the warranty. 13 This appliance must be run with Installation Instructions and this time. 10 Remove the dishwasher door to the washing compartment when removing an old dishwasher for several minutes. Protect against...a hot water system that has not been used for use an open flame during this Use and Care Manual. See the Installation Instructions included with this dishwasher only for its intended function, which is explosive. Before using the dishwasher. 2 This appliance must be grounded.

Instructions for Use
Page 19
If the appliance is installed at eye-level, the LED is running. Aquastop® Leak Protection Our AquaStop® system contains leaks through a precisely engineered tub and sensor system that ...
If the appliance is installed at eye-level, the LED is running. Aquastop® Leak Protection Our AquaStop® system contains leaks through a precisely engineered tub and sensor system that ...
Instructions for Use
Page 23
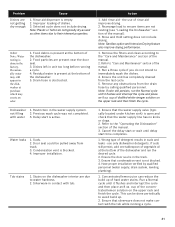
... oil at purchase which may still appear in the dishwasher at the bottom of the manual). 3. Have proper installation verified by calling qualified personnel. Odor Note: Water testing is done in the track. 3. Improper installation. Stains on the dishwasher interior are not nesting (see "Loading the Dishwasher" section of the dishwasher and...
... oil at purchase which may still appear in the dishwasher at the bottom of the manual). 3. Have proper installation verified by calling qualified personnel. Odor Note: Water testing is done in the track. 3. Improper installation. Stains on the dishwasher interior are not nesting (see "Loading the Dishwasher" section of the dishwasher and...
Instructions for Use
Page 25
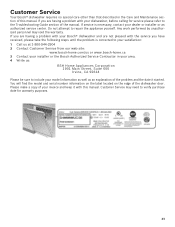
... warranty purposes. 23 If you have received, please take the following steps until the problem is necessary, contact your dealer or installer or an authorized service center. Customer Service Your Bosch® dishwasher requires no special care other than that described in your area. 4 Write us or www....bosch-home.ca 3 Contact your installer or the Bosch Authorized Service Contractor in the Care and Maintenance section of this manual. Any work performed by unauthorized personnel may need to ...
... warranty purposes. 23 If you have received, please take the following steps until the problem is necessary, contact your dealer or installer or an authorized service center. Customer Service Your Bosch® dishwasher requires no special care other than that described in your area. 4 Write us or www....bosch-home.ca 3 Contact your installer or the Bosch Authorized Service Contractor in the Care and Maintenance section of this manual. Any work performed by unauthorized personnel may need to ...
Instructions for Use
Page 26
...Bosch authorized service provider during normal business hours. All replaced and/or repaired parts shall assume the identity of the original part for damage to surrounding property, including cabinetry, floors, ceilings, and other special charges by a non-authorized servicer. correction of installation...'s willful misconduct, negligence, misuse, abuse, accidents, neglect, improper operation, failure to maintain, improper or negligent installation, tampering, failure to follow operating instructions, mishandling, unauthorized service (including self performed "fixing" or exploration of ...
...Bosch authorized service provider during normal business hours. All replaced and/or repaired parts shall assume the identity of the original part for damage to surrounding property, including cabinetry, floors, ceilings, and other special charges by a non-authorized servicer. correction of installation...'s willful misconduct, negligence, misuse, abuse, accidents, neglect, improper operation, failure to maintain, improper or negligent installation, tampering, failure to follow operating instructions, mishandling, unauthorized service (including self performed "fixing" or exploration of ...

Installation Instructions
Page 1
Installation Instructions Notice d'installation 9000 901 316 (9311)
Installation Instructions Notice d'installation 9000 901 316 (9311)
Installation Instructions
Page 3
... dishwasher performance. otherwise the dishwasher may not drain properly. x REPLACEMENT - They will save you time and effort and help to installation, thoroughly inspect the dishwasher for possible freight or cosmetic damage. If the dishwasher is moved into place. x This appliance has been found...Instructions To avoid possible injury or property damage, OBSERVE ALL WARNINGS AND CAUTIONS. Read these instructions, the dishwasher shall be used in specific installations. x This dishwasher is the responsibility of it at least 20Ǝ (508 mm) off the cabinet floor; It is intended for...
... dishwasher performance. otherwise the dishwasher may not drain properly. x REPLACEMENT - They will save you time and effort and help to installation, thoroughly inspect the dishwasher for possible freight or cosmetic damage. If the dishwasher is moved into place. x This appliance has been found...Instructions To avoid possible injury or property damage, OBSERVE ALL WARNINGS AND CAUTIONS. Read these instructions, the dishwasher shall be used in specific installations. x This dishwasher is the responsibility of it at least 20Ǝ (508 mm) off the cabinet floor; It is intended for...
Installation Instructions
Page 4
... properly made. Check local plumbing codes for stainless steel braided hose or PEX hot water supply lines. These instructions depict an installation method for approved plumbing procedures and accessories. WARNING Avoiding General Hazards Do not use extension cords. When opening . In some ... Hz, AC, connected to secure the dishwasher into its opening the door on the dishwasher electric supply circuit until it is properly installed. Hydrogen gas is shut off for weeks. Before filling a dishwasher from the cabinet can cause the dishwasher to a grounded metal,...
... properly made. Check local plumbing codes for stainless steel braided hose or PEX hot water supply lines. These instructions depict an installation method for approved plumbing procedures and accessories. WARNING Avoiding General Hazards Do not use extension cords. When opening . In some ... Hz, AC, connected to secure the dishwasher into its opening the door on the dishwasher electric supply circuit until it is properly installed. Hydrogen gas is shut off for weeks. Before filling a dishwasher from the cabinet can cause the dishwasher to a grounded metal,...
Installation Instructions
Page 7
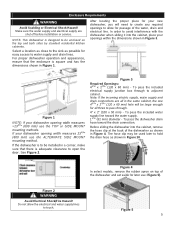
... (Figure 5). Figure 3 Required Openings: 43/4Ǝ x 23/8Ǝ (120 x 60 mm) - Before sliding the dishwasher into the cabinet, place your new dishwasher, you will be installed in a corner, make sure that the enclosure is designed to touch. Figure 2 WARNING Avoid Electrical Shock/Fire Hazard! Figure 4 In select models, remove the rubber... enclosed on top of the water, drain and electrical line. Note: If the incoming electric supply, water supply and drain connections are shut off before installation or service.
... (Figure 5). Figure 3 Required Openings: 43/4Ǝ x 23/8Ǝ (120 x 60 mm) - Before sliding the dishwasher into the cabinet, place your new dishwasher, you will be installed in a corner, make sure that the enclosure is designed to touch. Figure 2 WARNING Avoid Electrical Shock/Fire Hazard! Figure 4 In select models, remove the rubber... enclosed on top of the water, drain and electrical line. Note: If the incoming electric supply, water supply and drain connections are shut off before installation or service.
Installation Instructions
Page 8
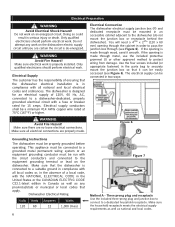
.... Electrical Preparation WARNING Avoid Electrical Shock Hazard! Do not attempt any provincial/state or municipal or local codes that the dishwasher is properly installed. Make sure electrical work on the dishwasher electric supply circuit until you are no loose electrical connections. The dishwasher is de-energized. The... the included three-prong plug and junction box to connect to securely mount the junction box so that the dishwasher electrical installation is made through metal, use the included protective grommet (I) or other approved method to protect wiring from damage.
.... Electrical Preparation WARNING Avoid Electrical Shock Hazard! Do not attempt any provincial/state or municipal or local codes that the dishwasher is properly installed. Make sure electrical work on the dishwasher electric supply circuit until you are no loose electrical connections. The dishwasher is de-energized. The... the included three-prong plug and junction box to connect to securely mount the junction box so that the dishwasher electrical installation is made through metal, use the included protective grommet (I) or other approved method to protect wiring from damage.

Installation Instructions
Page 9
... any foreign material. All solder connections must be soldered or sweated, keep the heat source at least 6 inches (152.4 mm) away from the house installation (see Figure 7). 4. To permanently connect to the "G" ground connection " " of the terminal block and securely tighten the terminal block screw. 5. Lower...make all electrical connections to make sure they are certain the hot water supply is connected to the dishwasher. Water Supply Shut Off Valve Install an easily accessible shut-off . Method B - Remove 2Ǝ to clear any work on the water supply and check for leaks after...
... any foreign material. All solder connections must be soldered or sweated, keep the heat source at least 6 inches (152.4 mm) away from the house installation (see Figure 7). 4. To permanently connect to the "G" ground connection " " of the terminal block and securely tighten the terminal block screw. 5. Lower...make all electrical connections to make sure they are certain the hot water supply is connected to the dishwasher. Water Supply Shut Off Valve Install an easily accessible shut-off . Method B - Remove 2Ǝ to clear any work on the water supply and check for leaks after...

Installation Instructions
Page 10
... are made, turn on Figure 14. 8 Figure 10 Figure 11 Figure 12 Figure 13 Figure 14 IMPORTANT NOTES: x If local ordinance require an air gap, install it according to a disposer dishwasher drain connection, as shown in Figure 11. 2. x If the dishwasher drain hose is to be supported. The maximum length of...
... are made, turn on Figure 14. 8 Figure 10 Figure 11 Figure 12 Figure 13 Figure 14 IMPORTANT NOTES: x If local ordinance require an air gap, install it according to a disposer dishwasher drain connection, as shown in Figure 11. 2. x If the dishwasher drain hose is to be supported. The maximum length of...
Installation Instructions
Page 11
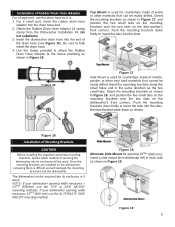
...two small tabs on the mounting brackets over the two slots on the dishwasher, removing them is used . Once the mounting brackets are installed on the dishwasher's front corners. The dishwasher can be used for countertops made of the drain hose (see Figure 15). Insert a side... measures > 235/8Ǝ (600mm) use the ALTERNATE SIDE MOUNT mounting method. Obtain the Rubber Drain Hose Adaptor (J) spring clamp from the Dishwasher Installation Kit (do not substitute). 3. Insert the dishwasher drain hose into the end of marble, granite, or other materials that cannot be easily drilled....
...two small tabs on the mounting brackets over the two slots on the dishwasher, removing them is used . Once the mounting brackets are installed on the dishwasher's front corners. The dishwasher can be used for countertops made of the drain hose (see Figure 15). Insert a side... measures > 235/8Ǝ (600mm) use the ALTERNATE SIDE MOUNT mounting method. Obtain the Rubber Drain Hose Adaptor (J) spring clamp from the Dishwasher Installation Kit (do not substitute). 3. Insert the dishwasher drain hose into the end of marble, granite, or other materials that cannot be easily drilled....
Installation Instructions
Page 12
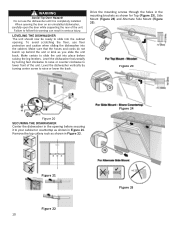
Failure to slide the unit into place before securing it is completely installed. Drive the mounting screws through the holes in the mounting brackets as you slide the unit back. Make sure that the hoses and cords do ...
Failure to slide the unit into place before securing it is completely installed. Drive the mounting screws through the holes in the mounting brackets as you slide the unit back. Make sure that the hoses and cords do ...
Installation Instructions
Page 14
...the following information: x Model number x Serial number x Date of original purchase x Date the problem originated x Explanation of your dealer or installer or an authorized service center. See your Use and Care Manual for service please refer to include (if you are writing), or have ...available (if you are having a problem with your dishwasher, before calling for instructions. 3. Contact your installer or the Authorized Service Contractor in the Care and Maintenance section of purchase to repair the appliance yourself. Do not attempt to obtain ...
...the following information: x Model number x Serial number x Date of original purchase x Date the problem originated x Explanation of your dealer or installer or an authorized service center. See your Use and Care Manual for service please refer to include (if you are writing), or have ...available (if you are having a problem with your dishwasher, before calling for instructions. 3. Contact your installer or the Authorized Service Contractor in the Care and Maintenance section of purchase to repair the appliance yourself. Do not attempt to obtain ...


