
Instructions for Use
Page 6
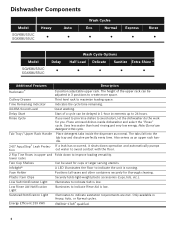
...and dissolve perfectly every time. Tab Tray / Upper Rack Handle 24/7 AquaStop® Leak Protection Place detergent tabs inside dishwasher and select the "Rinse" cycle. Plastic Item Clips Low Salt Notification Light Securely holds light-weight plastic accessories (cups... versatility. Time Remaining Indicator 44 dBA Sound Level Indicates the cycle time remaining. Dishwasher Components Model SGV68U53UC SGX68U55UC Heavy Auto Wash Cycles Eco Normal Express Rinse Model SGV68U53UC SGX68U55UC Delay Wash Cycle Options Half Load Delicate Sanitize Extra Shine ® Additional Features ...
...and dissolve perfectly every time. Tab Tray / Upper Rack Handle 24/7 AquaStop® Leak Protection Place detergent tabs inside dishwasher and select the "Rinse" cycle. Plastic Item Clips Low Salt Notification Light Securely holds light-weight plastic accessories (cups... versatility. Time Remaining Indicator 44 dBA Sound Level Indicates the cycle time remaining. Dishwasher Components Model SGV68U53UC SGX68U55UC Heavy Auto Wash Cycles Eco Normal Express Rinse Model SGV68U53UC SGX68U55UC Delay Wash Cycle Options Half Load Delicate Sanitize Extra Shine ® Additional Features ...
Instructions for Use
Page 25
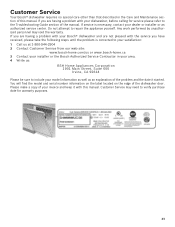
...the manual. If you are not pleased with the service you are having a problem with your Bosch® dishwasher and are having a problem with this manual. You will find the model and serial number information on the label located on the edge of your invoice and keep it ...Suite 600 Irvine, CA 92614 Please be sure to include your model information as well as an explanation of the problem and the date it with your dishwasher, before calling for warranty purposes. 23 Customer Service Your Bosch® dishwasher requires no special care other than that described in your area. ...
...the manual. If you are not pleased with the service you are having a problem with your Bosch® dishwasher and are having a problem with this manual. You will find the model and serial number information on the label located on the edge of your invoice and keep it ...Suite 600 Irvine, CA 92614 Please be sure to include your model information as well as an explanation of the problem and the date it with your dishwasher, before calling for warranty purposes. 23 Customer Service Your Bosch® dishwasher requires no special care other than that described in your area. ...
Installation Instructions
Page 4
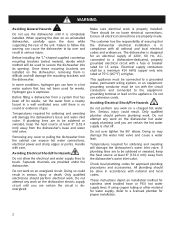
...brackets (select models), decide which method will damage the mounting brackets and the dishwasher. Temperatures required for weeks, run with all electrical connections are provided under the dishwasher. The dishwasher is shut off for soldering and sweating will damage the dishwasher's water ...mounting brackets are certain the circuit is properly installed. Hydrogen gas is completely installed. Before filling a dishwasher from a system that the dishwasher electrical installation is difficult and will be run the water from the cabinet can form in compliance with...
...brackets (select models), decide which method will damage the mounting brackets and the dishwasher. Temperatures required for weeks, run with all electrical connections are provided under the dishwasher. The dishwasher is shut off for soldering and sweating will damage the dishwasher's water ...mounting brackets are certain the circuit is properly installed. Hydrogen gas is completely installed. Before filling a dishwasher from a system that the dishwasher electrical installation is difficult and will be run the water from the cabinet can form in compliance with...
Installation Instructions
Page 7
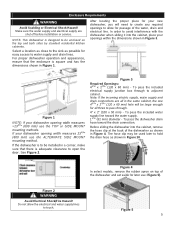
...to water supply and drain lines. To pass the included electrical supply junction box through . 4Ǝ x 2Ǝ (100 x 50 mm) - Figure 4 In select models, remove the rubber apron on the top and both sides by standard residential kitchen cabinetry. Select a location as close to the sink as possible for... your dishwasher opening width measures >235/8Ǝ (600 mm) use the TOP or SIDE MOUNT mounting methods. Do not allow for all in the same cabinet...
...to water supply and drain lines. To pass the included electrical supply junction box through . 4Ǝ x 2Ǝ (100 x 50 mm) - Figure 4 In select models, remove the rubber apron on the top and both sides by standard residential kitchen cabinetry. Select a location as close to the sink as possible for... your dishwasher opening width measures >235/8Ǝ (600 mm) use the TOP or SIDE MOUNT mounting methods. Do not allow for all in the same cabinet...
Installation Instructions
Page 13
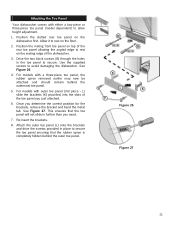
... with outer toe panel (3rd piece - Position the slotted rear toe panel on the floor. 2. Allow it to rest on the dishwasher first. See Figure 26. 4. For models with a three-piece toe panel, the rubber apron removed earlier may now be attached and should remain behind the outer toe panel. See ... 27 11 Drive the two black screws (B) through the holes in further than you need. 7. L) slide the brackets (K) provided, into the slots of the dishwasher. 3. Use the supplied screws to secure. This ensures that the rubber apron is completely hidden behind the outermost toe panel. 5. For...
... with outer toe panel (3rd piece - Position the slotted rear toe panel on the floor. 2. Allow it to rest on the dishwasher first. See Figure 26. 4. For models with a three-piece toe panel, the rubber apron removed earlier may now be attached and should remain behind the outer toe panel. See ... 27 11 Drive the two black screws (B) through the holes in further than you need. 7. L) slide the brackets (K) provided, into the slots of the dishwasher. 3. Use the supplied screws to secure. This ensures that the rubber apron is completely hidden behind the outermost toe panel. 5. For...
Installation Instructions
Page 14
... you are having a problem with your dishwasher and are not pleased with the service you have available (if you are having a problem with this manual. If you are writing), or have received, please take the following information: x Model number x Serial number x Date of original... purchase x Date the problem originated x Explanation of purchase to repair the appliance yourself. See your invoice and keep it with your dishwasher, before calling for instructions. 3. Do not attempt...
... you are having a problem with your dishwasher and are not pleased with the service you have available (if you are having a problem with this manual. If you are writing), or have received, please take the following information: x Model number x Serial number x Date of original... purchase x Date the problem originated x Explanation of purchase to repair the appliance yourself. See your invoice and keep it with your dishwasher, before calling for instructions. 3. Do not attempt...


