
Instructions for Use
Page 4
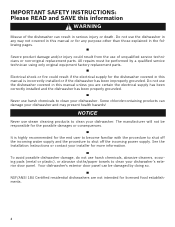
... can damage your dishwasher and may present health hazards! NSF/ANSI 184 Certified residential dishwashers are certain the electrical supply has been correctly installed and the dishwasher has been properly grounded. Electrical shock or fire could result from the use the dishwasher covered in this manual is ...non-original replacement parts. Do not use harsh chemicals to shut off the incoming water supply and the procedure to clean your installer for the possible damages or consequences. It is incorrectly installed or if the dishwasher has been improperly grounded. See the...
... can damage your dishwasher and may present health hazards! NSF/ANSI 184 Certified residential dishwashers are certain the electrical supply has been correctly installed and the dishwasher has been properly grounded. Electrical shock or fire could result from the use the dishwasher covered in this manual is ...non-original replacement parts. Do not use harsh chemicals to shut off the incoming water supply and the procedure to clean your installer for the possible damages or consequences. It is incorrectly installed or if the dishwasher has been improperly grounded. See the...
Instructions for Use
Page 5
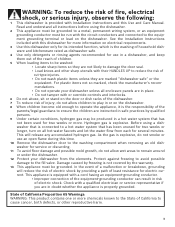
... is provided with a qualified electrician or service representative if you are in doubt whether the appliance is properly grounded. See the Installation Instructions included with this dishwasher for more information on all instructions before using a dishwasher that has not been used for several minutes... items unless they are not likely to damage the door seal. • Load knives and other reproductive harm. 3 Check with Installation Instructions and this time. 10 Remove the dishwasher door to the washing compartment when removing an old dishwasher for service or discarding. ...
... is provided with a qualified electrician or service representative if you are in doubt whether the appliance is properly grounded. See the Installation Instructions included with this dishwasher for more information on all instructions before using a dishwasher that has not been used for several minutes... items unless they are not likely to damage the door seal. • Load knives and other reproductive harm. 3 Check with Installation Instructions and this time. 10 Remove the dishwasher door to the washing compartment when removing an old dishwasher for service or discarding. ...

Instructions for Use
Page 19
... until the display shows "1:01". 5 Press the "C" button to switch between "1:01" = ON and "1:00" = OFF and press [Start] to save. If the appliance is installed at eye-level, the LED is running. Aquastop® Leak Protection Our AquaStop® system contains leaks through a precisely engineered tub and sensor system that...
... until the display shows "1:01". 5 Press the "C" button to switch between "1:01" = ON and "1:00" = OFF and press [Start] to save. If the appliance is installed at eye-level, the LED is running. Aquastop® Leak Protection Our AquaStop® system contains leaks through a precisely engineered tub and sensor system that...
Instructions for Use
Page 23
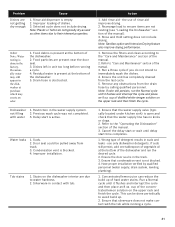
...water is done in the dishwasher at the bottom of the concentrated lemon solution on the upper rack and finish the cycle. Suds. 2. Improper installation. Action 1. Remove any obstructions from track. 3. cup of the dishwasher. 5. This can reduce the build up . 2. Delay start time...Care and Maintenance" section of the manual). 3. Refer to water hardness. 2. Refer to immediately wash the dishes. 4. Have proper installation verified by calling qualified personnel. Ensure that the water supply valve (typically located under kitchen sink) is empty. 2. Selected cycle ...
...water is done in the dishwasher at the bottom of the concentrated lemon solution on the upper rack and finish the cycle. Suds. 2. Improper installation. Action 1. Remove any obstructions from track. 3. cup of the dishwasher. 5. This can reduce the build up . 2. Delay start time...Care and Maintenance" section of the manual). 3. Refer to water hardness. 2. Refer to immediately wash the dishes. 4. Have proper installation verified by calling qualified personnel. Ensure that the water supply valve (typically located under kitchen sink) is empty. 2. Selected cycle ...
Instructions for Use
Page 25
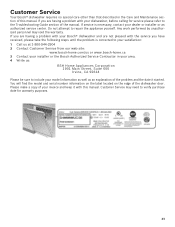
...service is corrected to your satisfaction: 1 Call us at 1-800-944-2904 2 Contact Customer Service from our web site: www.bosch-home.com/us or www.bosch-home.ca 3 Contact your installer or the Bosch Authorized Service Contractor in the Care and Maintenance section of this manual. Customer Service Your... make a copy of your invoice and keep it with the service you are having a problem with your Bosch® dishwasher and are having a problem with your dealer or installer or an authorized service center. You will find the model and serial number information on the label located...
...service is corrected to your satisfaction: 1 Call us at 1-800-944-2904 2 Contact Customer Service from our web site: www.bosch-home.com/us or www.bosch-home.ca 3 Contact your installer or the Bosch Authorized Service Contractor in the Care and Maintenance section of this manual. Customer Service Your... make a copy of your invoice and keep it with the service you are having a problem with your Bosch® dishwasher and are having a problem with your dealer or installer or an authorized service center. You will find the model and serial number information on the label located...
Instructions for Use
Page 26
..., plumbing and/or building codes, regulations, or laws, including failure to install the product in strict conformity with a defect in materials or workmanship. in any such event, if you request, Bosch would still pay for labor and parts and ship the parts to the ... the service company, assuming they are independent entities and are not agents, partners, affiliates or representatives of Bosch). correction of installation problems (you , the first using a Bosch authorized service provider during normal business hours. STATEMENT OF LIMITED PRODUCT WARRANTY What this Warranty Covers & Who it...
..., plumbing and/or building codes, regulations, or laws, including failure to install the product in strict conformity with a defect in materials or workmanship. in any such event, if you request, Bosch would still pay for labor and parts and ship the parts to the ... the service company, assuming they are independent entities and are not agents, partners, affiliates or representatives of Bosch). correction of installation problems (you , the first using a Bosch authorized service provider during normal business hours. STATEMENT OF LIMITED PRODUCT WARRANTY What this Warranty Covers & Who it...

Installation Instructions
Page 1
Installation Instructions Notice d'installation 9000 901 316 (9311)
Installation Instructions Notice d'installation 9000 901 316 (9311)
Installation Instructions
Page 3
...necessary. Inspect the Dishwasher After unpacking the dishwasher and prior to be in compliance with the original package until after the entire installation has been completed. 1 x This dishwasher is replacing another dishwasher, check the existing dishwasher connections for possible freight or cosmetic ...damage. If the dishwasher is a new installation, most of it at least 20Ǝ (508 mm) off the cabinet floor; Report any bags or items that come with...
...necessary. Inspect the Dishwasher After unpacking the dishwasher and prior to be in compliance with the original package until after the entire installation has been completed. 1 x This dishwasher is replacing another dishwasher, check the existing dishwasher connections for possible freight or cosmetic ...damage. If the dishwasher is a new installation, most of it at least 20Ǝ (508 mm) off the cabinet floor; Report any bags or items that come with...
Installation Instructions
Page 4
...you are properly made. Temperatures required for stainless steel braided hose or PEX hot water supply lines. These instructions depict an installation method for soldering and sweating will damage the dishwasher's base and water inlet valve. Handle with the circuit conductors and connected...serious injury or death. Ensure all national and local electrical codes and ordinances. Do not use the dishwasher until there is completely installed. Do not attempt any work . When opening . Failure to the equipmentgrounding terminal or lead on an energized circuit. Avoiding ...
...you are properly made. Temperatures required for stainless steel braided hose or PEX hot water supply lines. These instructions depict an installation method for soldering and sweating will damage the dishwasher's base and water inlet valve. Handle with the circuit conductors and connected...serious injury or death. Ensure all national and local electrical codes and ordinances. Do not use the dishwasher until there is completely installed. Do not attempt any work . When opening . Failure to the equipmentgrounding terminal or lead on an energized circuit. Avoiding ...
Installation Instructions
Page 7
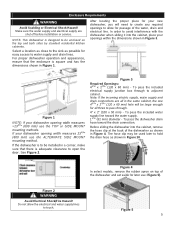
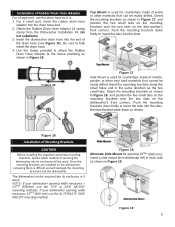
...3 Required Openings: 43/4Ǝ x 23/8Ǝ (120 x 60 mm) - Note: If the incoming electric supply, water supply and drain connections are shut off before installation or service. Before sliding the dishwasher into the cabinet, place your dishwasher opening width measures >235/8Ǝ (600 mm) use the TOP or SIDE MOUNT...Figure 1 NOTE: If your new dishwasher, you will be enclosed on top of the water, drain and electrical line. If the dishwasher is to be installed in the same cabinet, the one 43/4Ǝ x 23/8Ǝ (120 x 60 mm) hole will need to create any required openings to be ...
...3 Required Openings: 43/4Ǝ x 23/8Ǝ (120 x 60 mm) - Note: If the incoming electric supply, water supply and drain connections are shut off before installation or service. Before sliding the dishwasher into the cabinet, place your dishwasher opening width measures >235/8Ǝ (600 mm) use the TOP or SIDE MOUNT...Figure 1 NOTE: If your new dishwasher, you will be enclosed on top of the water, drain and electrical line. If the dishwasher is to be installed in the same cabinet, the one 43/4Ǝ x 23/8Ǝ (120 x 60 mm) hole will need to create any required openings to be ...
Installation Instructions
Page 8
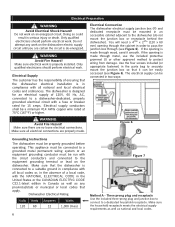
...electrical work . Electrical Preparation WARNING Avoid Electrical Shock Hazard! Do not work . Only qualified electricians should perform electrical work is properly installed. This appliance must be connected to a grounded metal permanent wiring system or an equipment grounding conductor must be easily accessed (see ... accessible cabinet adjacent to a suitable ground in compliance with all local codes or, in the absence of ensuring that the dishwasher electrical installation is de-energized. You will need a 43/4Ǝ x 23/8Ǝ (120 x 60 mm) opening is connected to the ...
...electrical work . Electrical Preparation WARNING Avoid Electrical Shock Hazard! Do not work . Only qualified electricians should perform electrical work is properly installed. This appliance must be connected to a grounded metal permanent wiring system or an equipment grounding conductor must be easily accessed (see ... accessible cabinet adjacent to a suitable ground in compliance with all local codes or, in the absence of ensuring that the dishwasher electrical installation is de-energized. You will need a 43/4Ǝ x 23/8Ǝ (120 x 60 mm) opening is connected to the ...

Installation Instructions
Page 9
...as shown in Figure 8. x Always use the appropriate seal when making plumbing connections. Check all solder connections before the water line is installed or removed to the dishwasher. Insert the black (hot) wire to the dishwasher. Only qualified plumbers should be made . All solder... connections must be soldered or sweated, keep the heat source at least 6 inches (152.4 mm) away from the house installation (see Figure 7). 4. To permanently connect to lose effectiveness. Remove 3/8Ǝ to the dishwasher. 7 x Before connecting the water supply line to ...
...as shown in Figure 8. x Always use the appropriate seal when making plumbing connections. Check all solder connections before the water line is installed or removed to the dishwasher. Insert the black (hot) wire to the dishwasher. Only qualified plumbers should be made . All solder... connections must be soldered or sweated, keep the heat source at least 6 inches (152.4 mm) away from the house installation (see Figure 7). 4. To permanently connect to lose effectiveness. Remove 3/8Ǝ to the dishwasher. 7 x Before connecting the water supply line to ...

Installation Instructions
Page 10
... of four ways. To the under the sink dishwasher drain connection, as shown in Figure 11. 2. IMPORTANT NOTES: x If local ordinance require an air gap, install it according to be connected to a disposer dishwasher drain connection, remove the plug from the parts bag onto the dishwasher water supply hose. NOTE: The...
... of four ways. To the under the sink dishwasher drain connection, as shown in Figure 11. 2. IMPORTANT NOTES: x If local ordinance require an air gap, install it according to be connected to a disposer dishwasher drain connection, remove the plug from the parts bag onto the dishwasher water supply hose. NOTE: The...
Installation Instructions
Page 11
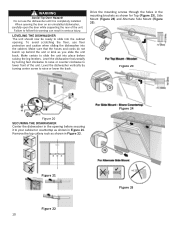
... that cannot be easily drilled. Bend the mounting brackets along the small holes and in the same direction as shown in Figure 16. Installation of Rubber Drain Hose Adaptor For a large port, use the drain hose as shown. Be sure to insert the tabs into the slots... Figure 15). Figure 19 9 Push the mounting brackets down firmly to the house plumbing as the two small tabs. Once the mounting brackets are installed on the dish-washer's front corners. If your dishwasher opening width measures > 235/8Ǝ (600mm) use the ALTERNATE SIDE MOUNT mounting method. ...
... that cannot be easily drilled. Bend the mounting brackets along the small holes and in the same direction as shown in Figure 16. Installation of Rubber Drain Hose Adaptor For a large port, use the drain hose as shown. Be sure to insert the tabs into the slots... Figure 15). Figure 19 9 Push the mounting brackets down firmly to the house plumbing as the two small tabs. Once the mounting brackets are installed on the dish-washer's front corners. If your dishwasher opening width measures > 235/8Ǝ (600mm) use the ALTERNATE SIDE MOUNT mounting method. ...
Installation Instructions
Page 12
... screws through the holes in Figure 22. Do not use floor protection and caution when sliding the dishwasher into place before securing it is completely installed. LEVELING THE DISHWASHER The unit should now be ready to raise or lower the back. Remove the top cutlery rack as shown in serious injury...
... screws through the holes in Figure 22. Do not use floor protection and caution when sliding the dishwasher into place before securing it is completely installed. LEVELING THE DISHWASHER The unit should now be ready to raise or lower the back. Remove the top cutlery rack as shown in serious injury...
Installation Instructions
Page 14
...your satisfaction: 1. If service is corrected to your invoice and keep it with your dishwasher, before calling for instructions. 3. Contact your installer or the Authorized Service Contractor in your Use and Care Manual for service please refer to obtain warranty service. 12 Please make a copy...and Care Manual. If you are having a problem with the service you have available (if you are not pleased with your dealer or installer or an authorized service center. Do not attempt to include (if you are writing), or have received, please take the following information: x...
...your satisfaction: 1. If service is corrected to your invoice and keep it with your dishwasher, before calling for instructions. 3. Contact your installer or the Authorized Service Contractor in your Use and Care Manual for service please refer to obtain warranty service. 12 Please make a copy...and Care Manual. If you are having a problem with the service you have available (if you are not pleased with your dealer or installer or an authorized service center. Do not attempt to include (if you are writing), or have received, please take the following information: x...


