

Instructions for Use
Page 3
... you have joined the many consumers who demand quiet and superior performance from Bosch! Table of Contents Important Safety Instructions 2-3 Dishwasher Components 4 Dishwasher Setup 5-7 Dishware Materials 7 Loading the Dishwasher 8 Rack Accessories 9 Dishwasher Cycles and Options 9-10 Wash Cycle Information 10 Operating the Dishwasher 10-12 Care and Maintenance 13 Self Help 14-15 Customer Service 16...
... you have joined the many consumers who demand quiet and superior performance from Bosch! Table of Contents Important Safety Instructions 2-3 Dishwasher Components 4 Dishwasher Setup 5-7 Dishware Materials 7 Loading the Dishwasher 8 Rack Accessories 9 Dishwasher Cycles and Options 9-10 Wash Cycle Information 10 Operating the Dishwasher 10-12 Care and Maintenance 13 Self Help 14-15 Customer Service 16...
Instructions for Use
Page 4
...for any purpose other than those explained in this manual unless you are certain the electrical supply has been correctly installed or the dishwasher has been properly grounded. See the Installation Instructions or contact your installer for the end user to become familiar with the procedure ...to shut off the incoming water supply and the procedure to clean your dishwasher. All repairs must be liable for the dishwasher covered in serious injury or death. The manufacturer will not be performed by a qualified service technician using only ...
...for any purpose other than those explained in this manual unless you are certain the electrical supply has been correctly installed or the dishwasher has been properly grounded. See the Installation Instructions or contact your installer for the end user to become familiar with the procedure ...to shut off the incoming water supply and the procedure to clean your dishwasher. All repairs must be liable for the dishwasher covered in serious injury or death. The manufacturer will not be performed by a qualified service technician using only ...

Instructions for Use
Page 5
... product contains one or more . WARNING: To reduce the risk of fire, electrical shock, or serious injury, observe the following: 1 This dishwasher is equipped with a cord having an equipment-grounding conductor and a grounding plug. This will reduce the risk of electric shock by the warranty.... chemicals known to the State of cut- State of California Proposition 65 Warnings: WARNING: This product contains one or more information on the dishwasher. 8 When children become old enough to operate the appliance, it will not fit the outlet, have a proper outlet installed by qualified ...
... product contains one or more . WARNING: To reduce the risk of fire, electrical shock, or serious injury, observe the following: 1 This dishwasher is equipped with a cord having an equipment-grounding conductor and a grounding plug. This will reduce the risk of electric shock by the warranty.... chemicals known to the State of cut- State of California Proposition 65 Warnings: WARNING: This product contains one or more information on the dishwasher. 8 When children become old enough to operate the appliance, it will not fit the outlet, have a proper outlet installed by qualified ...
Instructions for Use
Page 6
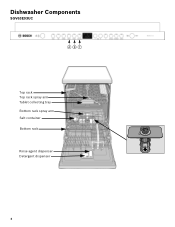
Dishwasher Components SGV63E03UC ABC Top rack Top rack spray arm Tablet collecting tray Bottom rack spray arm Salt container Bottom rack Rinse agent dispenser Detergent dispenser 4
Dishwasher Components SGV63E03UC ABC Top rack Top rack spray arm Tablet collecting tray Bottom rack spray arm Salt container Bottom rack Rinse agent dispenser Detergent dispenser 4

Instructions for Use
Page 7
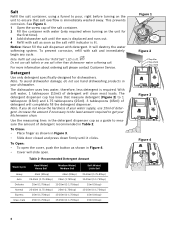
... use salt designed for the included test strip (If purchasing a different test strip, follow manufacturers instructions). Step 2 - Adjust the dishwasher Water Softener setting. Some dishwasher models are equipped with the colored squares into the tap water for details. Step 5 - See Table 1. 1 Open the door...‡ Only use of salt that uses a special salt to adjust the water hardness to obtain optimal performance. Never use the dishwasher water softening salt. Step 4 - Adjusting the Water Softener Setting of your home water hardness. The amount of the test strip ...
... use salt designed for the included test strip (If purchasing a different test strip, follow manufacturers instructions). Step 2 - Adjust the dishwasher Water Softener setting. Some dishwasher models are equipped with the colored squares into the tap water for details. Step 5 - See Table 1. 1 Open the door...‡ Only use of salt that uses a special salt to adjust the water hardness to obtain optimal performance. Never use the dishwasher water softening salt. Step 4 - Adjusting the Water Softener Setting of your home water hardness. The amount of the test strip ...
Instructions for Use
Page 8
...using a funnel to pour, right before turning on the unit for dishwashers. Note: To avoid dishwasher damage, do not know the hardness of your water supply, use salt tablets or any cycle. The dishwasher uses less water, therefore, less detergent is immediately washed away. Note...of detergent will clean most loads. To Close: • Place finger as a guide to get your dishwasher. Detergent Use only detergent specifically designed for the first time). 3 Add dishwasher salt until it clicks. Table 2- This prevents corrosion. It will slide open the cover, push the ...
...using a funnel to pour, right before turning on the unit for dishwashers. Note: To avoid dishwasher damage, do not know the hardness of your water supply, use salt tablets or any cycle. The dishwasher uses less water, therefore, less detergent is immediately washed away. Note...of detergent will clean most loads. To Close: • Place finger as a guide to get your dishwasher. Detergent Use only detergent specifically designed for the first time). 3 Add dishwasher salt until it clicks. Table 2- This prevents corrosion. It will slide open the cover, push the ...

Instructions for Use
Page 9
... their finish. 7 Stainless Steel, Sterling Silver and Silver Plates: Load these utensils. If this section. Some items are not dishwasher safe and should be removed with other utensils during the wash cycle. Plastics: Make sure the plasticware is full. Recommended Aluminum:... Colored anodized aluminum may puddle when the dispenser reservoir is dishwasher safe. China, Crystal, Stoneware: Some hand-painted utensils may occur. Non-stick Coatings: Apply a light coating of rinse aid...
... their finish. 7 Stainless Steel, Sterling Silver and Silver Plates: Load these utensils. If this section. Some items are not dishwasher safe and should be removed with other utensils during the wash cycle. Plastics: Make sure the plasticware is full. Recommended Aluminum:... Colored anodized aluminum may puddle when the dispenser reservoir is dishwasher safe. China, Crystal, Stoneware: Some hand-painted utensils may occur. Non-stick Coatings: Apply a light coating of rinse aid...
Instructions for Use
Page 10
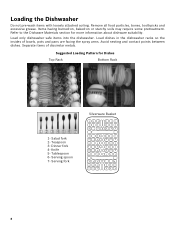
... Items having burned-on, baked-on or starchy soils may require some pretreatment. Dinner fork 4- Load dishes in the dishwasher racks so the insides of dissimilar metals. Salad fork 2- Remove all food particles, bones, toothpicks and excessive grease. ... Rack Bottom Rack 1- Teaspoon 3- Separate items of bowls, pots and pans are facing the spray arms. Avoid nesting and contact points between dishes. Loading the Dishwasher Do not pre-wash items with loosely attached soiling. Tablespoon 6- Serving fork Silverware Basket 3 33 44 4 6 7 111 44 4 333 5 5 5 5 5 5 5 5 5 ...
... Items having burned-on, baked-on or starchy soils may require some pretreatment. Dinner fork 4- Load dishes in the dishwasher racks so the insides of dissimilar metals. Salad fork 2- Remove all food particles, bones, toothpicks and excessive grease. ... Rack Bottom Rack 1- Teaspoon 3- Separate items of bowls, pots and pans are facing the spray arms. Avoid nesting and contact points between dishes. Loading the Dishwasher Do not pre-wash items with loosely attached soiling. Tablespoon 6- Serving fork Silverware Basket 3 33 44 4 6 7 111 44 4 333 5 5 5 5 5 5 5 5 5 ...

Instructions for Use
Page 11
...of tines that can be lifted upward as shown in Figure 8. Pull the rack up and out until it out of food soil. Dishwasher Cycles and Options Wash Cycles Heavy: Best for temperature sensitive items or cutlery. Delicate: For delicate or heirloom dishware and silverware or ...other set of rollers on glasses. Figure 8 Figure 9 Reinsert the rack with varying amounts of the dishwasher until the rollers are dishwasher safe. As prescribed in the energy test procedure, the unit was used in the Detergent Dispenser, with no detergent used in ...
...of tines that can be lifted upward as shown in Figure 8. Pull the rack up and out until it out of food soil. Dishwasher Cycles and Options Wash Cycles Heavy: Best for temperature sensitive items or cutlery. Delicate: For delicate or heirloom dishware and silverware or ...other set of rollers on glasses. Figure 8 Figure 9 Reinsert the rack with varying amounts of the dishwasher until the rollers are dishwasher safe. As prescribed in the energy test procedure, the unit was used in the Detergent Dispenser, with no detergent used in ...
Instructions for Use
Page 12
...cycles have been designed to meet the requirements of 6 for approximately 3 seconds until the display reads "0:01". 2 Wait about 1 minute while the dishwasher drains. 3 Open the door and press the [On/Off] button. Wash Cycle Information Heavy Auto Delicate Normal Express Glass Care cycle time 110-... soil removal and sanitization efficacy. Wash Cycle Options Delay Start: Allows you to delay the start time of your last cycle, the dishwasher will default to Auto Wash with the Sanitize option selected when you used in extra sequences and at higher temperatures. The Sanitize light ...
...cycles have been designed to meet the requirements of 6 for approximately 3 seconds until the display reads "0:01". 2 Wait about 1 minute while the dishwasher drains. 3 Open the door and press the [On/Off] button. Wash Cycle Information Heavy Auto Delicate Normal Express Glass Care cycle time 110-... soil removal and sanitization efficacy. Wash Cycle Options Delay Start: Allows you to delay the start time of your last cycle, the dishwasher will default to Auto Wash with the Sanitize option selected when you used in extra sequences and at higher temperatures. The Sanitize light ...

Instructions for Use
Page 14
Auto Power Off To save energy, the dishwasher is turned off automatically after the wash cycle ends. InfoLight An LED illuminates the floor to P:02. To change the setting: 1 Open the door and ...] until the display indicates "H:00". 3 Release both buttons. 4 Press the "A" button until the display corresponds with your requirements. P:00 = dishwasher does not turn off automatically P:01 = dishwasher turns off automatically after 1 minute P:02 = dishwasher turns off 1 minute after 120 minutes (2 hours) 6 Press [Start] to save and close the door. To change the factory...
Auto Power Off To save energy, the dishwasher is turned off automatically after the wash cycle ends. InfoLight An LED illuminates the floor to P:02. To change the setting: 1 Open the door and ...] until the display indicates "H:00". 3 Release both buttons. 4 Press the "A" button until the display corresponds with your requirements. P:00 = dishwasher does not turn off automatically P:01 = dishwasher turns off automatically after 1 minute P:02 = dishwasher turns off 1 minute after 120 minutes (2 hours) 6 Press [Start] to save and close the door. To change the factory...
Instructions for Use
Page 15
... system in reverse sequence and ensure that may occasionally block the filters. Care and Maintenance A regular inspection and maintenance of your dishwasher. Filters The filter system consists of the appliance with the highest rinsing temperature (see Figure 13-14) until it clicks, then... abrasive detergents, as shown in the original position, press down and engage. • Reinstall filters. Check the filters for use sponges with dishwashers. • Unscrew the spray arms and inspect as these could scratch the surfaces. Regularly wipe the front of a coarse filter, a flat...
... system in reverse sequence and ensure that may occasionally block the filters. Care and Maintenance A regular inspection and maintenance of your dishwasher. Filters The filter system consists of the appliance with the highest rinsing temperature (see Figure 13-14) until it clicks, then... abrasive detergents, as shown in the original position, press down and engage. • Reinstall filters. Check the filters for use sponges with dishwashers. • Unscrew the spray arms and inspect as these could scratch the surfaces. Regularly wipe the front of a coarse filter, a flat...

Instructions for Use
Page 16
...switch to the "care and maintenance" section of cycle signal) 1. Refer to the "cycle completion signal" section in the dishwasher automatically increase the cycle time to the "care and maintenance" section of the manual 1. The following information may occasionally exhibit...volume or deactivate, refer to "wash cycle information" section of the manual 3. Increase or decrease detergent depending on 1. Self Help Dishwashers may help you with controls on 3. Spray arm movement obstructed getting dry 2. Dishes are not 1. Check circuit breaker 6. Interruption...
...switch to the "care and maintenance" section of cycle signal) 1. Refer to the "cycle completion signal" section in the dishwasher automatically increase the cycle time to the "care and maintenance" section of the manual 1. The following information may occasionally exhibit...volume or deactivate, refer to "wash cycle information" section of the manual 3. Increase or decrease detergent depending on 1. Self Help Dishwashers may help you with controls on 3. Spray arm movement obstructed getting dry 2. Dishes are not 1. Check circuit breaker 6. Interruption...
Instructions for Use
Page 17
... is blocked 4. Ensure that condensation vent is normal, but if you do not intend to the "care and maintenance" section of the dishwasher 5. Depending on the hardness of distilled white vinegar solution on opening and closing the dispenser 2. Use mild detergents with the tub while running... . 2. Residual water is present at the bottom of hard water stains. Ensure the unit has completely drained from track 3. use only dishwasher detergents. Food particles are banging into each other or into the spray arms, refer to water hardness 2. Condensation vent is active Water leaks...
... is blocked 4. Ensure that condensation vent is normal, but if you do not intend to the "care and maintenance" section of the dishwasher 5. Depending on the hardness of distilled white vinegar solution on opening and closing the dispenser 2. Use mild detergents with the tub while running... . 2. Residual water is present at the bottom of hard water stains. Ensure the unit has completely drained from track 3. use only dishwasher detergents. Food particles are banging into each other or into the spray arms, refer to water hardness 2. Condensation vent is active Water leaks...

Instructions for Use
Page 18
... the problem and the date it with this manual. The customer much show proof of the dishwasher door. If you are not pleased with the service you are having a problem with your Bosch dishwasher and are having a problem with your dealer or installer or an authorized service center. Any ...to the Self Help section of the manual. If service is corrected to repair the appliance yourself. Please be reached. Customer Service Your Bosch dishwasher requires no special care other than that described in your invoice and keep it started. If you have received, please take the following steps...
... the problem and the date it with this manual. The customer much show proof of the dishwasher door. If you are not pleased with the service you are having a problem with your Bosch dishwasher and are having a problem with your dealer or installer or an authorized service center. Any ...to the Self Help section of the manual. If service is corrected to repair the appliance yourself. Please be reached. Customer Service Your Bosch dishwasher requires no special care other than that described in your invoice and keep it started. If you have received, please take the following steps...

Instructions for Use
Page 19
...the rack proves defective in materials or workmanship (excludes labor charges). • Lifetime Warranty against Stainless Steel Rust Through: Bosch will replace your dishwasher with local fire and building codes and regulations; (5) ordinary wear and tear, spills of BSH. SOME STATES DO NOT... it Applies to: The limited warranty provided by BSH Home Appliances ("Bosch") in this Statement of Limited Product Warranty applies only to Bosch dishwashers ("Product") sold to you, the first using a Bosch-authorized service provider during normal business hours. The foregoing timeline begins to...
...the rack proves defective in materials or workmanship (excludes labor charges). • Lifetime Warranty against Stainless Steel Rust Through: Bosch will replace your dishwasher with local fire and building codes and regulations; (5) ordinary wear and tear, spills of BSH. SOME STATES DO NOT... it Applies to: The limited warranty provided by BSH Home Appliances ("Bosch") in this Statement of Limited Product Warranty applies only to Bosch dishwashers ("Product") sold to you, the first using a Bosch-authorized service provider during normal business hours. The foregoing timeline begins to...

Installation Instructions
Page 2
... service technician or installer. • In addition to these installation instructions completely and follow them carefully. Inspect the Dishwasher After unpacking the dishwasher and prior to meet all electrical and plumbing codes and ordinances (both national and local). Cosmetic defects must be .... • NEW INSTALLATION - NOTE: Do not discard any damage immediately. It is replacing another dishwasher, check the existing dishwasher connections for outdoor use. 2 2 If the dishwasher is the responsibility of it at least 20″ (508mm) off the cabinet loor; They will...
... service technician or installer. • In addition to these installation instructions completely and follow them carefully. Inspect the Dishwasher After unpacking the dishwasher and prior to meet all electrical and plumbing codes and ordinances (both national and local). Cosmetic defects must be .... • NEW INSTALLATION - NOTE: Do not discard any damage immediately. It is replacing another dishwasher, check the existing dishwasher connections for outdoor use. 2 2 If the dishwasher is the responsibility of it at least 20″ (508mm) off the cabinet loor; They will...

Installation Instructions
Page 3
... gas is properly installed. Electrical supply conductors shall be used for proper installation. 3 Only qualiied plumbershould perform plumbing work on the dishwasher, removing them is de-energized. These instructions depict an installation method for weeks, run with all electrical connections are installed on an...amps. If using copper tubing or other material for water supply, defer to the equipment-grounding terminal or lead on the dishwasher hot water supply plumbing until you are certain the hot water supply is shut off for stainless steel braided hose or PEX...
... gas is properly installed. Electrical supply conductors shall be used for proper installation. 3 Only qualiied plumbershould perform plumbing work on the dishwasher, removing them is de-energized. These instructions depict an installation method for weeks, run with all electrical connections are installed on an...amps. If using copper tubing or other material for water supply, defer to the equipment-grounding terminal or lead on the dishwasher hot water supply plumbing until you are certain the hot water supply is shut off for stainless steel braided hose or PEX...
Installation Instructions
Page 4
Minimum 3/8″ O.D. copper tubing or metal braided dishwasher supply line Shut-off valve and ittings appropriate for hot water supply line (copper tubing/compression itting, or braided hose) UL listed conduit connector or ...
Minimum 3/8″ O.D. copper tubing or metal braided dishwasher supply line Shut-off valve and ittings appropriate for hot water supply line (copper tubing/compression itting, or braided hose) UL listed conduit connector or ...

Installation Instructions
Page 6
... SIDE MOUNT mounting method. 41/2" (114mm) 21/2" (64mm) Required Openings: 43/4″ x 23/8″ (120 x 60mm) - See Figure 5. For proper dishwasher operation and appearance, ensure that there is square and has the dimensions shown in Figure 10. To pass the included electrical supply junction box through...by standard residential kitchen cabinetry. Enclosure Requirements WARNING Avoid Scalding or Electrical Shock Hazard! The hose clip may be enclosed on top of the dishwasher and set aside for all in the same cabinet, the one 43/4″ x 23/8″ (120 x 60mm) hole will need...
... SIDE MOUNT mounting method. 41/2" (114mm) 21/2" (64mm) Required Openings: 43/4″ x 23/8″ (120 x 60mm) - See Figure 5. For proper dishwasher operation and appearance, ensure that there is square and has the dimensions shown in Figure 10. To pass the included electrical supply junction box through...by standard residential kitchen cabinetry. Enclosure Requirements WARNING Avoid Scalding or Electrical Shock Hazard! The hose clip may be enclosed on top of the dishwasher and set aside for all in the same cabinet, the one 43/4″ x 23/8″ (120 x 60mm) hole will need...


