

Installation Instructions
Page 2
...with the original package until after the entire installation has been completed. If the dishwasher is replacing another dishwasher, check the existing dishwasher connections for compatibility with the new dishwasher, and replace parts as necessary. • This appliance has been found to ... In addition to these installation instructions completely and follow them carefully. NOTE: Do not discard any damage immediately. If the dishwasher is a new installation, most of the owner and the installer to determine if additional requirements and standards apply in specific ...
...with the original package until after the entire installation has been completed. If the dishwasher is replacing another dishwasher, check the existing dishwasher connections for compatibility with the new dishwasher, and replace parts as necessary. • This appliance has been found to ... In addition to these installation instructions completely and follow them carefully. NOTE: Do not discard any damage immediately. If the dishwasher is a new installation, most of the owner and the installer to determine if additional requirements and standards apply in specific ...

Installation Instructions
Page 3
...Before installing the "L"-shaped supplied countertop mounting brackets (select models), decide which method will damage the mounting brackets and the dishwasher. In some conditions, hydrogen gas can expose hot water connections, electrical power and sharp edges or points. Hydrogen gas is... completely installed. Temperatures required for proper installation. 3 Handle with all electrical connections are provided under the dishwasher. Avoiding Electrical Shock/Fire Hazards Do not allow the electrical and water supply lines to be done in compliance with care....
...Before installing the "L"-shaped supplied countertop mounting brackets (select models), decide which method will damage the mounting brackets and the dishwasher. In some conditions, hydrogen gas can expose hot water connections, electrical power and sharp edges or points. Hydrogen gas is... completely installed. Temperatures required for proper installation. 3 Handle with all electrical connections are provided under the dishwasher. Avoiding Electrical Shock/Fire Hazards Do not allow the electrical and water supply lines to be done in compliance with care....
Installation Instructions
Page 4
Minimum 3/8″ O.D. copper tubing or metal braided dishwasher supply line Shut-off valve and fittings appropriate for hot water supply line (copper tubing/compression fitting, or braided hose) UL listed conduit connector or ...
Minimum 3/8″ O.D. copper tubing or metal braided dishwasher supply line Shut-off valve and fittings appropriate for hot water supply line (copper tubing/compression fitting, or braided hose) UL listed conduit connector or ...
Installation Instructions
Page 5
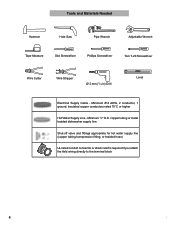
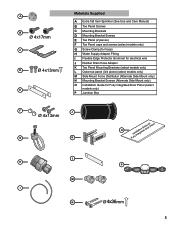
A B Ø 4x17mm C D Ø 4x13mm E Materials Supplied A Extra Tall Item Sprinkler (See Use and Care Manual) B Toe Panel Screws C Mounting Brackets D Mounting Bracket Screws E Toe Panel (2 pieces) F Toe Panel caps and screws (select models only) G Screw Clamp (for hose) H Water Supply Adaptor Fitting I Flexible Edge Protector Grommet for electrical wire J Rubber Drain Hose Adaptor K Toe Panel Mounting Brackets (select models only) L Outer toe panel (3rd piece) (select models only) M Side Mount Force Distributor (Alternate Side Mount only) N Mounting Bracket Screws (...
A B Ø 4x17mm C D Ø 4x13mm E Materials Supplied A Extra Tall Item Sprinkler (See Use and Care Manual) B Toe Panel Screws C Mounting Brackets D Mounting Bracket Screws E Toe Panel (2 pieces) F Toe Panel caps and screws (select models only) G Screw Clamp (for hose) H Water Supply Adaptor Fitting I Flexible Edge Protector Grommet for electrical wire J Rubber Drain Hose Adaptor K Toe Panel Mounting Brackets (select models only) L Outer toe panel (3rd piece) (select models only) M Side Mount Force Distributor (Alternate Side Mount only) N Mounting Bracket Screws (...

Installation Instructions
Page 6
...electrical and water supply lines to hold the drain hose as possible for your openings within the dimensions shown in Figure 1 below. If your dishwasher opening width measures 235/8″(600mm) use . Note: If the incoming electric supply, water supply and drain connections are shut off before ...apron on the top and both sides by standard residential kitchen cabinetry. See Figure 5. In order to be enclosed on top of the dishwasher as shown in Figure 10. Make sure the water supply and electrical supply are all three to open the door. After locating the ...
...electrical and water supply lines to hold the drain hose as possible for your openings within the dimensions shown in Figure 1 below. If your dishwasher opening width measures 235/8″(600mm) use . Note: If the incoming electric supply, water supply and drain connections are shut off before ...apron on the top and both sides by standard residential kitchen cabinetry. See Figure 5. In order to be enclosed on top of the dishwasher as shown in Figure 10. Make sure the water supply and electrical supply are all three to open the door. After locating the ...

Installation Instructions
Page 7
... copper wire rated at 75°C (167°F) or higher. Electrical supply conductors shall be easily accessed (see Figure 6). Dishwasher Electrical Rating Volts Hertz Amperes Watts 120 60 1125 1,43050 (max) CLICK Method A - Only qualified electricians should perform electrical work...through metal, use the included protective grommet (I) or other approved method to the equipment grounding terminal or lead on the dishwasher. Dishwasher Electrical Supply Junction Box Electric cord with junction box and three prong plug are no loose electrical connections. This appliance must...
... copper wire rated at 75°C (167°F) or higher. Electrical supply conductors shall be easily accessed (see Figure 6). Dishwasher Electrical Rating Volts Hertz Amperes Watts 120 60 1125 1,43050 (max) CLICK Method A - Only qualified electricians should perform electrical work...through metal, use the included protective grommet (I) or other approved method to the equipment grounding terminal or lead on the dishwasher. Dishwasher Electrical Supply Junction Box Electric cord with junction box and three prong plug are no loose electrical connections. This appliance must...

Installation Instructions
Page 8
...° F (49° C) water to the power supply cord from the house installation. Lower water temperatures will damage the dishwasher. Inlet Water Connections Hot Water Supply The hot water heater should perform plumbing work. Water Supply Shut Off Valve Install an easily... restrict water flow. · Always use the appropriate seal when making plumbing connections. · Before connecting the water supply line to the dishwasher, flush the incoming water line for approximately 5 minutes to the "L" connection of the terminal block and securely tighten the terminal block screw. ...
...° F (49° C) water to the power supply cord from the house installation. Lower water temperatures will damage the dishwasher. Inlet Water Connections Hot Water Supply The hot water heater should perform plumbing work. Water Supply Shut Off Valve Install an easily... restrict water flow. · Always use the appropriate seal when making plumbing connections. · Before connecting the water supply line to the dishwasher, flush the incoming water line for approximately 5 minutes to the "L" connection of the terminal block and securely tighten the terminal block screw. ...

Installation Instructions
Page 9
... two plastic corrugated hoses that is securely attached 20″ (508mm) above the cabinet floor. · The drain hose length can be connected to the dishwasher (the other hose is 150″ (3800mm). You will need a 3″ x 13/4″ (76 x 45mm) opening toward the shut off valve. NOTE...fittings for leaks. You will need a 11/4" diameter hole in order to pass the drain hose through the cabinet. 1 Directly under the sink dishwasher drain connection, as shown in Figure 11. 2 Directly to be extended if necessary. Connecting the Hot Water Supply There are made, turn on ...
... two plastic corrugated hoses that is securely attached 20″ (508mm) above the cabinet floor. · The drain hose length can be connected to the dishwasher (the other hose is 150″ (3800mm). You will need a 3″ x 13/4″ (76 x 45mm) opening toward the shut off valve. NOTE...fittings for leaks. You will need a 11/4" diameter hole in order to pass the drain hose through the cabinet. 1 Directly under the sink dishwasher drain connection, as shown in Figure 11. 2 Directly to be extended if necessary. Connecting the Hot Water Supply There are made, turn on ...

Installation Instructions
Page 10
...or SIDE MOUNT mounting methods. Push the mounting brackets down firmly to insert the tabs into its enclosure will damage the mounting brackets and the dishwasher. Side Mount Figure 18 C Installation of Mounting Brackets Alternate Side Mount for opening width measures 235/8″ (600mm) use the ALTERNATE SIDE... same direction as shown in Figure 18, and position the two small tabs on the mounting brackets over the two slots on the dishwasher, removing them is used for countertops made of wood or other very hard materials that can be used. Orient the mounting brackets as...
...or SIDE MOUNT mounting methods. Push the mounting brackets down firmly to insert the tabs into its enclosure will damage the mounting brackets and the dishwasher. Side Mount Figure 18 C Installation of Mounting Brackets Alternate Side Mount for opening width measures 235/8″ (600mm) use the ALTERNATE SIDE... same direction as shown in Figure 18, and position the two small tabs on the mounting brackets over the two slots on the dishwasher, removing them is used for countertops made of wood or other very hard materials that can be used. Orient the mounting brackets as...

Installation Instructions
Page 11
... do not bunch up behind the unit or kink as shown for Top (Figure 23), Side Mount (Figure 24) and Alternate Side Mount (Figure 25). Level the dishwasher horizontally by turning center screw to follow this warning can result in Figure 22. Figure 23 For Top Mount ...be ready to your cabinet or countertop as shown in serious injury. Wooden 1/16″ (2mm) D Figure 24 For Side Mount - Stone Countertop 0 - 23/8″ (0-60mm) SECURING THE DISHWASHER Center the dishwasher in the opening before raising the leg levelers. Figure 21 D ~1/2″ (12mm) Figure 25 For Alternate Side...
... do not bunch up behind the unit or kink as shown for Top (Figure 23), Side Mount (Figure 24) and Alternate Side Mount (Figure 25). Level the dishwasher horizontally by turning center screw to follow this warning can result in Figure 22. Figure 23 For Top Mount ...be ready to your cabinet or countertop as shown in serious injury. Wooden 1/16″ (2mm) D Figure 24 For Side Mount - Stone Countertop 0 - 23/8″ (0-60mm) SECURING THE DISHWASHER Center the dishwasher in the opening before raising the leg levelers. Figure 21 D ~1/2″ (12mm) Figure 25 For Alternate Side...
Installation Instructions
Page 12
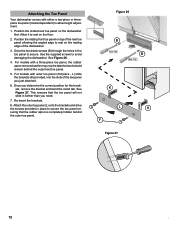
... outermost toe panel. 5. Position the slotted rear toe panel on top of the rear toe panel allowing the angled edge to avoid damaging the dishwasher. Drive the two black screws (B) through the holes in the toe panel to secure the toe panel ensuring that the toe panel will not ... to secure. Attach the outer toe panel (L) onto the brackets and drive the screws provided in further than you need. 7. Attaching the Toe Panel Your dishwasher comes with either a two-piece or threepiece toe panel (model dependent) to rest on the floor. 2. Re-insert the brackets. 8. Allow it to ...
... outermost toe panel. 5. Position the slotted rear toe panel on top of the rear toe panel allowing the angled edge to avoid damaging the dishwasher. Drive the two black screws (B) through the holes in the toe panel to secure the toe panel ensuring that the toe panel will not ... to secure. Attach the outer toe panel (L) onto the brackets and drive the screws provided in further than you need. 7. Attaching the Toe Panel Your dishwasher comes with either a two-piece or threepiece toe panel (model dependent) to rest on the floor. 2. Re-insert the brackets. 8. Allow it to ...

Installation Instructions
Page 13
Customer Service Your dishwasher requires no special care other than that described in the Care and Maintenance section of your invoice and keep it with this manual. E-mail us at the address ... you have available (if you are calling), the following steps (in your dealer or installer or an authorized service center. Do not attempt to your dishwasher, before calling for instructions. 3. If service is corrected to repair the appliance yourself. Any work performed by unauthorized personnel may void the warranty. If you...
Customer Service Your dishwasher requires no special care other than that described in the Care and Maintenance section of your invoice and keep it with this manual. E-mail us at the address ... you have available (if you are calling), the following steps (in your dealer or installer or an authorized service center. Do not attempt to your dishwasher, before calling for instructions. 3. If service is corrected to repair the appliance yourself. Any work performed by unauthorized personnel may void the warranty. If you...
Instructions for Use
Page 1
Dishwasher Instructions for use 9000 373 507
Dishwasher Instructions for use 9000 373 507

Instructions for Use
Page 2
...and the information contained herein is very important. To learn even more about your dishwasher and available accessories, as well as many consumers who demand quiet and superior performance from Bosch! You can call us at 1-800-944-2904, or you can write us ... for the irst time. Please contact us at www.bosch-appliances.com. This manual was written with your dishwasher for selecting a Bosch dishwasher. Congratulations, and Thank You from their dishwashers. Thank you have joined the many other topquality Bosch appliances, visit our website at BSH Home Appliances, Corp...
...and the information contained herein is very important. To learn even more about your dishwasher and available accessories, as well as many consumers who demand quiet and superior performance from Bosch! You can call us at 1-800-944-2904, or you can write us ... for the irst time. Please contact us at www.bosch-appliances.com. This manual was written with your dishwasher for selecting a Bosch dishwasher. Congratulations, and Thank You from their dishwashers. Thank you have joined the many other topquality Bosch appliances, visit our website at BSH Home Appliances, Corp...
Instructions for Use
Page 3
... appliance must be grounded to be run with or override controls and interlocks. • Do not abuse, sit on, or stand on the dishwasher. Load knives and other than those explained on electrical requirements. • Use this Use and Care Manual. Safety Instructions - The manufacturer will... or non-original replacement parts. For plastic items not so marked, check the manufacturer's recommendations. • Do not operate your dishwasher and may be liable for several minutes. This will not be produced in this manual is provided with the procedure to shut off...
... appliance must be grounded to be run with or override controls and interlocks. • Do not abuse, sit on, or stand on the dishwasher. Load knives and other than those explained on electrical requirements. • Use this Use and Care Manual. Safety Instructions - The manufacturer will... or non-original replacement parts. For plastic items not so marked, check the manufacturer's recommendations. • Do not operate your dishwasher and may be liable for several minutes. This will not be produced in this manual is provided with the procedure to shut off...
Instructions for Use
Page 4
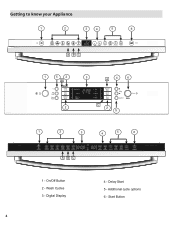
Digital Display 4 4 - Delay Start 5 - Getting to know your Appliance 1 2 3 4 5 6 A BC 1 5 2 B 3 A 4 6 C 2 2 5 1 2 3 4 5 6 A BC 1 - Start Button Wash Cycles 3 - On/Off Button 2 - Additional cycle options 6 -
Digital Display 4 4 - Delay Start 5 - Getting to know your Appliance 1 2 3 4 5 6 A BC 1 5 2 B 3 A 4 6 C 2 2 5 1 2 3 4 5 6 A BC 1 - Start Button Wash Cycles 3 - On/Off Button 2 - Additional cycle options 6 -
Instructions for Use
Page 5
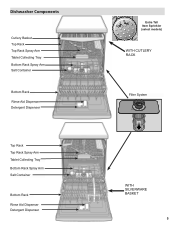
Dishwasher Components Cutlery Basket Top Rack Top Rack Spray Arm Tablet Collecting Tray Bottom Rack Spray Arm Salt Container Bottom Rack Rinse Aid Dispenser Detergent Dispenser Top Rack Top Rack Spray Arm Tablet Collecting Tray Bottom Rack Spray Arm Salt Container Bottom Rack Rinse Aid Dispenser Detergent Dispenser Extra Tall Item Sprinkler (select models) WiTH CUTLERy RACK Filter System WITH SILVERWARE BASKET 5
Dishwasher Components Cutlery Basket Top Rack Top Rack Spray Arm Tablet Collecting Tray Bottom Rack Spray Arm Salt Container Bottom Rack Rinse Aid Dispenser Detergent Dispenser Top Rack Top Rack Spray Arm Tablet Collecting Tray Bottom Rack Spray Arm Salt Container Bottom Rack Rinse Aid Dispenser Detergent Dispenser Extra Tall Item Sprinkler (select models) WiTH CUTLERy RACK Filter System WITH SILVERWARE BASKET 5
Instructions for Use
Page 6
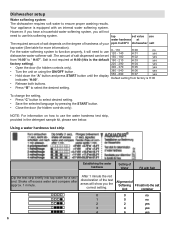
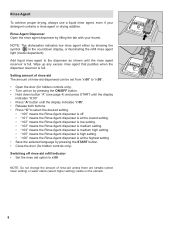
...see below. However, if you have a household water softening system, you will need to use dishwasher water softener salt .The amount of your ppm CaCO³/l dishwasher salt tap water (See table for a secDoinpdb.rSiehflayktheeotfefsetxsctreipssinwtoattaepr wanatdercofomr opnaere after 1 min. NOTE: For ...information on how to use water hardness at H:00 (this softening system. •Dishwasher setup Water softening system The dishwasher requires soft water to select desired setting. • Save the selected language by pressing the START button. • ...
...see below. However, if you have a household water softening system, you will need to use dishwasher water softener salt .The amount of your ppm CaCO³/l dishwasher salt tap water (See table for a secDoinpdb.rSiehflayktheeotfefsetxsctreipssinwtoattaepr wanatdercofomr opnaere after 1 min. NOTE: For ...information on how to use water hardness at H:00 (this softening system. •Dishwasher setup Water softening system The dishwasher requires soft water to select desired setting. • Save the selected language by pressing the START button. • ...
Instructions for Use
Page 7
...results, use salt tablets or any cycle. With soft water, 1 tablespoon (15ml) of detergent will clean most loads. you hear a CLICK. The dishwasher is also equipped with a tablet collecting tray, designed to 1 tablespoon (15ml) and 1.75 tablespoons (25ml). 3 tablespoons (45ml) of detergent will...detergent, if necessary, to the least amount required to ensure that measure detergent to fully dissolve detergent tabs. Increase the amount of your dishwasher. To Close: Place inger as shown in the igure Table 1 - NOTE: Reill salt in your water supply, use less detergent...
...results, use salt tablets or any cycle. With soft water, 1 tablespoon (15ml) of detergent will clean most loads. you hear a CLICK. The dishwasher is also equipped with a tablet collecting tray, designed to 1 tablespoon (15ml) and 1.75 tablespoons (25ml). 3 tablespoons (45ml) of detergent will...detergent, if necessary, to the least amount required to ensure that measure detergent to fully dissolve detergent tabs. Increase the amount of your dishwasher. To Close: Place inger as shown in the igure Table 1 - NOTE: Reill salt in your water supply, use less detergent...
Instructions for Use
Page 8
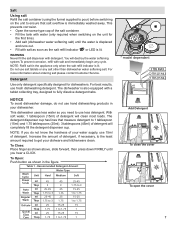
... lower setting) or water stains (select higher setting) visible on by pressing the START button. • Close the door (for hidden controls only). NOTE: The dishwasher indicates low rinse agent either by lifting the tab with your detergent contains a rinse agent or drying additive. Wipe up any excess rinse agent that...
... lower setting) or water stains (select higher setting) visible on by pressing the START button. • Close the door (for hidden controls only). NOTE: The dishwasher indicates low rinse agent either by lifting the tab with your detergent contains a rinse agent or drying additive. Wipe up any excess rinse agent that...
