Installation Instructions
Page 12
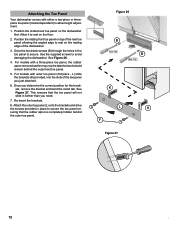
... it to secure the toe panel ensuring that the toe panel will not slide in further than you need. 7. Use the supplied screws to allow height adjustment. 1. Attach the outer toe panel (L) onto the brackets and drive the screws provided in the toe panel to rest on the floor. 2. Attaching...panel allowing the angled edge to secure. Drive the two black screws (B) through the holes in place to rest on the mating edge of the dishwasher. 3. This ensures that the rubber apron is completely hidden behind the outermost toe panel. 5. Position the slotted rear toe panel on the...
... it to secure the toe panel ensuring that the toe panel will not slide in further than you need. 7. Use the supplied screws to allow height adjustment. 1. Attach the outer toe panel (L) onto the brackets and drive the screws provided in the toe panel to rest on the floor. 2. Attaching...panel allowing the angled edge to secure. Drive the two black screws (B) through the holes in place to rest on the mating edge of the dishwasher. 3. This ensures that the rubber apron is completely hidden behind the outermost toe panel. 5. Position the slotted rear toe panel on the...
Instructions for Use
Page 12
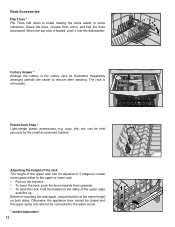
... the sides of the upper rack can be held securely by the small accessories holders. Adjusting the height of the rack The height of the upper edge and lift it up. Otherwise, the appliance door cannot be closed and the upper spray arm will not be adjusted in ... cutlery rack as illustrated. When the top rack is loaded, push it is removable. Before re-inserting the rack again, ensure that it into the dishwasher. 1 2 Cutlery drawer * Arrange the cutlery in the upper or lower rack. • Pull out the top rack. • To lower the rack, push the lever...
... the sides of the upper rack can be held securely by the small accessories holders. Adjusting the height of the rack The height of the upper edge and lift it up. Otherwise, the appliance door cannot be closed and the upper spray arm will not be adjusted in ... cutlery rack as illustrated. When the top rack is loaded, push it is removable. Before re-inserting the rack again, ensure that it into the dishwasher. 1 2 Cutlery drawer * Arrange the cutlery in the upper or lower rack. • Pull out the top rack. • To lower the rack, push the lever...

Installation Instructions
Page 12
... The rubber piece should remain behind the outer toe panel. For models with a three-piece toe panel(select models) to avoid damaging the dishwasher. This ensures that the toe panel wont slide in further than you determine the correct position for the brackets , remove the bracket and bend... the metal tab. Re-insert the brackets. 6. See Page 5 12 Use the supplied screws to allow height adjustment. 1. See Figure 20. Figure 19 Figure 20 A (K) (L) - Position the slotted rear toe panel on the loor. 2. Allow it to rest ...
... The rubber piece should remain behind the outer toe panel. For models with a three-piece toe panel(select models) to avoid damaging the dishwasher. This ensures that the toe panel wont slide in further than you determine the correct position for the brackets , remove the bracket and bend... the metal tab. Re-insert the brackets. 6. See Page 5 12 Use the supplied screws to allow height adjustment. 1. See Figure 20. Figure 19 Figure 20 A (K) (L) - Position the slotted rear toe panel on the loor. 2. Allow it to rest ...

Instructions for Use
Page 13
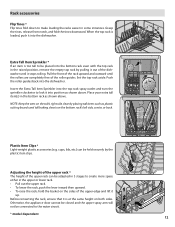
... and lift it up. Extra Tall Item Sprinkler * If an item is at the same height on both sides. Pull the front of the rack upward and outward until the rollers are completely free of the dishwasher until it into the bottom rack even with the top rack in 3 stages to the... water circuit. * model dependent 12 Insert the Extra Tall Item Sprinkler into the dishwasher. cups, lids, etc.) can be connected to create more space either in some instances. Grasp the tines, release from notch, and fold the tines downward...
... and lift it up. Extra Tall Item Sprinkler * If an item is at the same height on both sides. Pull the front of the rack upward and outward until the rollers are completely free of the dishwasher until it into the bottom rack even with the top rack in 3 stages to the... water circuit. * model dependent 12 Insert the Extra Tall Item Sprinkler into the dishwasher. cups, lids, etc.) can be connected to create more space either in some instances. Grasp the tines, release from notch, and fold the tines downward...
Instructions for Use
Page 13
... in 3 stages to the water circuit. * model dependent 12 Push the roller guides back into the dishwasher. NOTE: Keep the vent on both sides. Extra Tall Item Sprinkler * If an item is at the same height on the tub's right side clear by the plastic item clips. Set the top rack aside... the upper rack * The height of the roller guides. Place your extra tall item(s) in some instances. When the top rack is loaded, push it is too tall to lock it up. Before reinserting the rack, ensure that it into the dishwasher. Grasp the tines, release from notch, and fold the tines...
... in 3 stages to the water circuit. * model dependent 12 Push the roller guides back into the dishwasher. NOTE: Keep the vent on both sides. Extra Tall Item Sprinkler * If an item is at the same height on the tub's right side clear by the plastic item clips. Set the top rack aside... the upper rack * The height of the roller guides. Place your extra tall item(s) in some instances. When the top rack is loaded, push it is too tall to lock it up. Before reinserting the rack, ensure that it into the dishwasher. Grasp the tines, release from notch, and fold the tines...
