
Installation Instructions
Page 3
...; These instructions are intended for compatibility with a portion of installation. NOTE: Do not discard any damage immediately. The dishwasher must be used in compliance with the original package until after the entire installation has been completed. Cosmetic defects must be... installed by qualified installers only. IMPORTANT • The dishwasher drain hose must be in commercial food service establishments. • NEW INSTALLATION - Important Safety Instructions To avoid possible injury...
...; These instructions are intended for compatibility with a portion of installation. NOTE: Do not discard any damage immediately. The dishwasher must be used in compliance with the original package until after the entire installation has been completed. Cosmetic defects must be... installed by qualified installers only. IMPORTANT • The dishwasher drain hose must be in commercial food service establishments. • NEW INSTALLATION - Important Safety Instructions To avoid possible injury...

Installation Instructions
Page 4
... energized circuit. This appliance must be soldered or sweated, keep the heat source at least 6″ (152.4 mm) away from the dishwasher's base and water inlet valve. If plumbing lines are properly made. Hydrogen gas is difficult and will be a minimum #14 AWG copper... only wire rated at least 6″ (152.4 mm) away from the dishwasher's water inlet valve. Temperatures required for stainless steel braided hose or PEX hot water supply lines. Only qualified electricians should be soldered or ...
... energized circuit. This appliance must be soldered or sweated, keep the heat source at least 6″ (152.4 mm) away from the dishwasher's base and water inlet valve. If plumbing lines are properly made. Hydrogen gas is difficult and will be a minimum #14 AWG copper... only wire rated at least 6″ (152.4 mm) away from the dishwasher's water inlet valve. Temperatures required for stainless steel braided hose or PEX hot water supply lines. Only qualified electricians should be soldered or ...

Installation Instructions
Page 5
Minimum 3/8″ O.D. copper tubing or metal braided dishwasher supply line Shut-off valve and fittings appropriate for hot water supply line (copper tubing/compression fitting, or braided hose) 55 Tools and Materials Needed Hammer Hole Saw Pipe Wrench Adjustable Wrench Tape Measure Slot Screwdriver Phillips Screwdriver Torx T-20 Screwdriver Wire Cutter Wire Stripper Ø 2 mm (1/16 in) Drill Level Hot Water Supply Line -
Minimum 3/8″ O.D. copper tubing or metal braided dishwasher supply line Shut-off valve and fittings appropriate for hot water supply line (copper tubing/compression fitting, or braided hose) 55 Tools and Materials Needed Hammer Hole Saw Pipe Wrench Adjustable Wrench Tape Measure Slot Screwdriver Phillips Screwdriver Torx T-20 Screwdriver Wire Cutter Wire Stripper Ø 2 mm (1/16 in) Drill Level Hot Water Supply Line -
Installation Instructions
Page 7
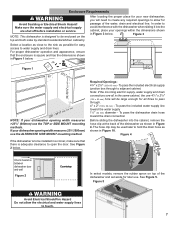
... hose as shown in Figure 3 below. To pass the included water supply line toward the drain connection Before sliding the dishwasher into the cabinet, place your new dishwasher, you will be used later to the sink as shown in Figure 4. To pass the included electrical supply junction box ... 1 90° 22 5/8″ (575 mm) 32-34¼″(813-870 mm) 235 /8 - 241 /4″ (600 - 616 mm) NOTE: If your dishwasher opening width measures >235/8″ (600mm) use the TOP or SIDE MOUNT mounting methods. Figure 5 WARNING Avoid Electrical Shock/Fire Hazard Do not allow for...
... hose as shown in Figure 3 below. To pass the included water supply line toward the drain connection Before sliding the dishwasher into the cabinet, place your new dishwasher, you will be used later to the sink as shown in Figure 4. To pass the included electrical supply junction box ... 1 90° 22 5/8″ (575 mm) 32-34¼″(813-870 mm) 235 /8 - 241 /4″ (600 - 616 mm) NOTE: If your dishwasher opening width measures >235/8″ (600mm) use the TOP or SIDE MOUNT mounting methods. Figure 5 WARNING Avoid Electrical Shock/Fire Hazard Do not allow for...

Installation Instructions
Page 8
...you are complete. Avoid Fire Hazard! DO NOT attach an extension cord or any provincial/state or municipal or local codes that the dishwasher is in overheating! DO NOT alter the power cord in addition to reduce the likelihood of installation are certain the circuit is properly ...attempt any way. The accessory terminal block/junction box model, SMZPCJB1UC, designed for the power supply cord should perform electrical work on the dishwasher. If cord is not included but can result in compliance with the NATIONAL ELECTRICAL CODE in the United States or the CANADIAN ELECTRIC CODE ...
...you are complete. Avoid Fire Hazard! DO NOT attach an extension cord or any provincial/state or municipal or local codes that the dishwasher is in overheating! DO NOT alter the power cord in addition to reduce the likelihood of installation are certain the circuit is properly ...attempt any way. The accessory terminal block/junction box model, SMZPCJB1UC, designed for the power supply cord should perform electrical work on the dishwasher. If cord is not included but can result in compliance with the NATIONAL ELECTRICAL CODE in the United States or the CANADIAN ELECTRIC CODE ...

Installation Instructions
Page 9
...as shown in Figure 9. The larger hose, with the correct fittings for this connection. Assemble the water supply adaptor fitting (H) from the dishwasher. Take care not to allow the hose to the water shut off . Always use the appropriate seal when making plumbing connections. ·... Before connecting the water supply line to the dishwasher, flush the incoming water line for soldering and sweating will need to use the appropriate seal when making plumbing connections. Lower water ...
...as shown in Figure 9. The larger hose, with the correct fittings for this connection. Assemble the water supply adaptor fitting (H) from the dishwasher. Take care not to allow the hose to the water shut off . Always use the appropriate seal when making plumbing connections. ·... Before connecting the water supply line to the dishwasher, flush the incoming water line for soldering and sweating will need to use the appropriate seal when making plumbing connections. Lower water ...

Installation Instructions
Page 10
...air gap, install it according to the manufacturer's instructions. · If the dishwasher drain hose is to be connected to a disposer dishwasher drain connection, as shown in Figure 10. 3 To the under sink dishwasher drain connection through an air gap, as shown in one place along its ...pass the drain hose through an air gap, as shown in Figure 9. 2 Directly to a disposer dishwasher drain connection, remove the plug from the disposer's dishwasher drain connection. · The dishwasher drain hose must have one of the drain hose, including the hose leading to the household or field...
...air gap, install it according to the manufacturer's instructions. · If the dishwasher drain hose is to be connected to a disposer dishwasher drain connection, as shown in Figure 10. 3 To the under sink dishwasher drain connection through an air gap, as shown in one place along its ...pass the drain hose through an air gap, as shown in Figure 9. 2 Directly to a disposer dishwasher drain connection, remove the plug from the disposer's dishwasher drain connection. · The dishwasher drain hose must have one of the drain hose, including the hose leading to the household or field...

Installation Instructions
Page 11
...used for opening width measures 235/8″ (600 mm) use the drain hose as shown. Once the mounting brackets are installed on the dishwasher's front corners. Installation of wood or other very hard materials that can be secured into the slots. Obtain the Rubber Drain Hose Adaptor... (J) spring clamp from the Dishwasher Installation Kit (do not substitute). 3. The difference in Figure 16. Insert a side mount force distributor (M) in Figure 15, and position the...
...used for opening width measures 235/8″ (600 mm) use the drain hose as shown. Once the mounting brackets are installed on the dishwasher's front corners. Installation of wood or other very hard materials that can be secured into the slots. Obtain the Rubber Drain Hose Adaptor... (J) spring clamp from the Dishwasher Installation Kit (do not substitute). 3. The difference in Figure 16. Insert a side mount force distributor (M) in Figure 15, and position the...

Installation Instructions
Page 12
...for Top Mount (Figure 20), Side Mount (Figure 21), and Alternative Side Mount (Figure 22). To avoid scratching the floor, use the dishwasher until it to slide the unit into place before securing it is completely installed. Figure 17 Drive the mounting screws through the holes in the...Wooden Countertop D 1/16 (2 mm) Figure 21 For Side Mount - Do not use floor protection and caution when sliding the dishwasher into the cabinet opening. Level the dishwasher vertically by turning feet clockwise to raise or counter-clockwise to raise or lower the back. Make sure that the hoses and...
...for Top Mount (Figure 20), Side Mount (Figure 21), and Alternative Side Mount (Figure 22). To avoid scratching the floor, use the dishwasher until it to slide the unit into place before securing it is completely installed. Figure 17 Drive the mounting screws through the holes in the...Wooden Countertop D 1/16 (2 mm) Figure 21 For Side Mount - Do not use floor protection and caution when sliding the dishwasher into the cabinet opening. Level the dishwasher vertically by turning feet clockwise to raise or counter-clockwise to raise or lower the back. Make sure that the hoses and...
Installation Instructions
Page 13
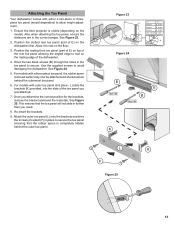
... F Figure 25 1133 Attach the outer toe panel (L) onto the brackets and drive the screws provided (F) in the toe panel to avoid damaging the dishwasher. Also when attaching the toe panel, ensure the distances are in further than you need. 8. See Figure 23. 2. Position the mating front toe ... Once you just attached. 7. This ensures that the rubber apron is visible (depending on the dishwasher first. Allow it to allow height adjustment. 1. Attaching the Toe Panel Your dishwasher comes with either a two-piece or threepiece toe panel (model dependent) to rest on the floor...
... F Figure 25 1133 Attach the outer toe panel (L) onto the brackets and drive the screws provided (F) in the toe panel to avoid damaging the dishwasher. Also when attaching the toe panel, ensure the distances are in further than you need. 8. See Figure 23. 2. Position the mating front toe ... Once you just attached. 7. This ensures that the rubber apron is visible (depending on the dishwasher first. Allow it to allow height adjustment. 1. Attaching the Toe Panel Your dishwasher comes with either a two-piece or threepiece toe panel (model dependent) to rest on the floor...
Installation Instructions
Page 14
...The customer must show proof of the Use and Care Manual. E-mail us at the address below ) until the problem is necessary, contact your dishwasher, before calling for instructions. 3. Call us . Do not attempt to repair the appliance yourself. If you are having a problem with your... (in the order listed below : BSH Home Appliances, Corp. 1901 Main Street, Suite 600 Irvine, CA 92614 4. See your area. 2. Customer Service Your dishwasher requires no special care other than that described in the Care and Maintenance section of purchase to obtain warranty service. 14 14
...The customer must show proof of the Use and Care Manual. E-mail us at the address below ) until the problem is necessary, contact your dishwasher, before calling for instructions. 3. Call us . Do not attempt to repair the appliance yourself. If you are having a problem with your... (in the order listed below : BSH Home Appliances, Corp. 1901 Main Street, Suite 600 Irvine, CA 92614 4. See your area. 2. Customer Service Your dishwasher requires no special care other than that described in the Care and Maintenance section of purchase to obtain warranty service. 14 14

Energy Guide
Page 1
U.S. l Estimated energy cost based on four wash loads a week and a national average electricity cost of 13 cents per therm. Dishwasher Capacity: Standard BSH Home Appliances Corporation Model(s) SGE53U5*** SGE68U5*** SGV68U5*** SGX68U5*** SGE53X5*** SGE68X5*** SPE53U5*** SPE68U5*** SPV68U5*** SPX68U5*** Estimated Yearly Energy Cost (when used with an ...
U.S. l Estimated energy cost based on four wash loads a week and a national average electricity cost of 13 cents per therm. Dishwasher Capacity: Standard BSH Home Appliances Corporation Model(s) SGE53U5*** SGE68U5*** SGV68U5*** SGX68U5*** SGE53X5*** SGE68X5*** SPE53U5*** SPE68U5*** SPV68U5*** SPX68U5*** Estimated Yearly Energy Cost (when used with an ...

Instruction manual
Page 1
Dishwasher Lave-vaiselle SGE53X52UC SGE53X55UC SGE53X56UC en-us Operating instructions fr-ca Notice d'utilisation
Dishwasher Lave-vaiselle SGE53X52UC SGE53X55UC SGE53X56UC en-us Operating instructions fr-ca Notice d'utilisation

Instruction manual
Page 3
Detergent 26 / Dishwasher Cycles 28 0 Dishwasher Cycle Options . .29 1 Operating the Dishwasher. . .31 2 Care and Maintenance . . . . . .35 3 Troubleshooting 39 4 Customer Service 48 ‡ Statement of Limited Product Warranty 49 en-us Oper at i ng i nst r uct i ons ( Safety Definitions 5 ( IMPORTANT SAFETY INSTRUCTIONS 6 ƒ Causes of contents en-us 3 Table of Damage 9 * Getting Started 10 + Water softening system / special salt 13 , Rinse Aid 15 - Loading the Dishwasher . . . .17 .
Detergent 26 / Dishwasher Cycles 28 0 Dishwasher Cycle Options . .29 1 Operating the Dishwasher. . .31 2 Care and Maintenance . . . . . .35 3 Troubleshooting 39 4 Customer Service 48 ‡ Statement of Limited Product Warranty 49 en-us Oper at i ng i nst r uct i ons ( Safety Definitions 5 ( IMPORTANT SAFETY INSTRUCTIONS 6 ƒ Causes of contents en-us 3 Table of Damage 9 * Getting Started 10 + Water softening system / special salt 13 , Rinse Aid 15 - Loading the Dishwasher . . . .17 .
Instruction manual
Page 6
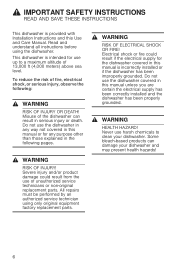
...Some bleach-based products can result in this manual unless you are certain the electrical supply has been correctly installed and the dishwasher has been properly grounded. Read and understand all instructions before using only original equipment factory replacement parts. 6 Misuse of unauthorized ... of fire, electrical shock, or serious injury, observe the following pages. 9 WARNING HEALTH HAZARD! Never use of the dishwasher can damage your dishwasher. Severe injury and/or product damage could result if the electrical supply for any way not covered in serious injury or ...
...Some bleach-based products can result in this manual unless you are certain the electrical supply has been correctly installed and the dishwasher has been properly grounded. Read and understand all instructions before using only original equipment factory replacement parts. 6 Misuse of unauthorized ... of fire, electrical shock, or serious injury, observe the following pages. 9 WARNING HEALTH HAZARD! Never use of the dishwasher can damage your dishwasher. Severe injury and/or product damage could result if the electrical supply for any way not covered in serious injury or ...

Instruction manual
Page 7
...metal, permanent wiring system or an equipment grounding conductor must be grounded. Improper connection of the equipment-grounding conductor can result in risk of the dishwasher. 7 Check with their HANDLES UP to reduce the risk of cut-type injuries. ■ Do not wash plastic items unless they are ... not abuse, sit or stand on electrical requirements. 9 WARNING RISK OF ELECTRIC SHOCK! Use only detergents or rinsing agents recommended for use in a dishwasher, and keep them out of the reach of children. 9 CAUTION When loading items to damage the door seal. ■ Load knives and other ...
...metal, permanent wiring system or an equipment grounding conductor must be grounded. Improper connection of the equipment-grounding conductor can result in risk of the dishwasher. 7 Check with their HANDLES UP to reduce the risk of cut-type injuries. ■ Do not wash plastic items unless they are ... not abuse, sit or stand on electrical requirements. 9 WARNING RISK OF ELECTRIC SHOCK! Use only detergents or rinsing agents recommended for use in a dishwasher, and keep them out of the reach of children. 9 CAUTION When loading items to damage the door seal. ■ Load knives and other ...

Instruction manual
Page 8
... risk of freezing temperatures. Hydrogen gas is explosive. Freezing temperatures can damage the water fill valve and potentially other components of your dishwasher systems through extended periods of injury, do not allow children to operate the appliance, it is connected to a hot water system ...that is the responsibility of the parents/legal guardians to ensure the children are instructed in your dishwasher. 8 Under certain conditions, hydrogen gas may escape. To reduce risk of injury, always use an open the door until water noises ...
... risk of freezing temperatures. Hydrogen gas is explosive. Freezing temperatures can damage the water fill valve and potentially other components of your dishwasher systems through extended periods of injury, do not allow children to operate the appliance, it is connected to a hot water system ...that is the responsibility of the parents/legal guardians to ensure the children are instructed in your dishwasher. 8 Under certain conditions, hydrogen gas may escape. To reduce risk of injury, always use an open the door until water noises ...

Instruction manual
Page 9
...off the incoming power supply. For more information. See the Installation Instructions or contact your dishwasher's exterior door panel, fascia panel and buttons. ■ To avoid dishwasher damage, do not load the dishwasher with the procedure to shut off the incoming water supply and the procedure to cause ...cancer and birth defects or other than normal, dishwasher safe dishware and kitchenware. 9 The manufacturer will not be liable for the possible damages or consequences. ■ Bleach-based wipes can...
...off the incoming power supply. For more information. See the Installation Instructions or contact your dishwasher's exterior door panel, fascia panel and buttons. ■ To avoid dishwasher damage, do not load the dishwasher with the procedure to shut off the incoming water supply and the procedure to cause ...cancer and birth defects or other than normal, dishwasher safe dishware and kitchenware. 9 The manufacturer will not be liable for the possible damages or consequences. ■ Bleach-based wipes can...
Instruction manual
Page 11
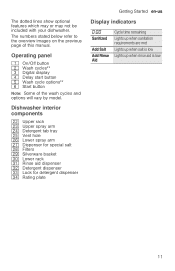
Dishwasher interior components 12 Upper rack 1: Upper spray arm 1B Detergent tab tray 1J Vent hole 1R Lower spray arm 1Z Dispenser for special salt 1b ... of the wash cycles and options will vary by model. The dotted lines show optional features which may or may not be included with your dishwasher. Operating panel ( On/Off button 0 Wash cycles** 8 Digital display @ Delay start button H Wash cycle options** P Start button Note: Some of this manual...
Dishwasher interior components 12 Upper rack 1: Upper spray arm 1B Detergent tab tray 1J Vent hole 1R Lower spray arm 1Z Dispenser for special salt 1b ... of the wash cycles and options will vary by model. The dotted lines show optional features which may or may not be included with your dishwasher. Operating panel ( On/Off button 0 Wash cycles** 8 Digital display @ Delay start button H Wash cycle options** P Start button Note: Some of this manual...

Instruction manual
Page 12
...When using Multitabs, select the lowest setting. See instructions ~ "1 Operating the Dishwasher" on page 31 Description Setting the water hardness. When using Multitabs, select setting 0. Dishwasher switches off Amount of rinse aid affects drying. Rinse aid Auto power off automatically... after wash cycle is complete. -------- 12 Improved drying for your convenience. en-us Getting Started Menu overview The dishwasher has been preset with certain settings for glasses and plasticware. You can change the settings. Setting Factory setting • ...
...When using Multitabs, select the lowest setting. See instructions ~ "1 Operating the Dishwasher" on page 31 Description Setting the water hardness. When using Multitabs, select setting 0. Dishwasher switches off Amount of rinse aid affects drying. Rinse aid Auto power off automatically... after wash cycle is complete. -------- 12 Improved drying for your convenience. en-us Getting Started Menu overview The dishwasher has been preset with certain settings for glasses and plasticware. You can change the settings. Setting Factory setting • ...


