
Installation Instructions
Page 4
...connected to a grounded metal, permanent wiring system, or an equipmentgrounding conductor must be used for soldering and sweating will damage the dishwasher's base and water inlet valve. If using copper tubing or other material for 15 amps. Handle with a fuse or breaker ... 2 Before installing the "L"-shaped supplied countertop mounting brackets (select models), decide which method will damage the mounting brackets and the dishwasher. Do not work on the appliance. The dishwasher is deenergized. Before filling a dishwasher from a system that has not been used to be done in...
...connected to a grounded metal, permanent wiring system, or an equipmentgrounding conductor must be used for soldering and sweating will damage the dishwasher's base and water inlet valve. If using copper tubing or other material for 15 amps. Handle with a fuse or breaker ... 2 Before installing the "L"-shaped supplied countertop mounting brackets (select models), decide which method will damage the mounting brackets and the dishwasher. Do not work on the appliance. The dishwasher is deenergized. Before filling a dishwasher from a system that has not been used to be done in...
Installation Instructions
Page 7
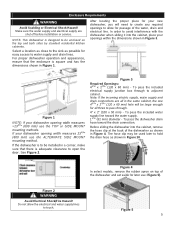
... water supply and drain connections are shut off before installation or service. To pass the dishwasher drain hose toward the water supply. 11/4Ǝ (32 mm) diameter - Figure 4 In select models, remove the rubber apron on the top and both sides by standard residential kitchen cabinetry.... Do not allow for your dishwasher opening width measures >235/8Ǝ (600 mm) use (Figure 5). Enclosure Requirements WARNING...
... water supply and drain connections are shut off before installation or service. To pass the dishwasher drain hose toward the water supply. 11/4Ǝ (32 mm) diameter - Figure 4 In select models, remove the rubber apron on the top and both sides by standard residential kitchen cabinetry.... Do not allow for your dishwasher opening width measures >235/8Ǝ (600 mm) use (Figure 5). Enclosure Requirements WARNING...
Installation Instructions
Page 13
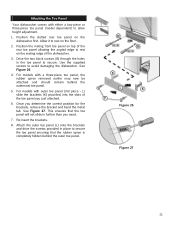
...toe panel (model dependent) to rest on top of the rear toe panel allowing the angled edge to allow height adjustment. 1. Attach the outer toe panel (L) onto the brackets and drive the screws provided in place to avoid damaging the dishwasher. Attaching the Toe Panel Your dishwasher comes with ... apron is completely hidden behind the outermost toe panel. 5. See Figure 26. 4. L) slide the brackets (K) provided, into the slots of the dishwasher. 3. See Figure 27. Figure 26 Figure 27 11 Position the slotted rear toe panel on the floor. 2. Use the supplied screws to secure ...
...toe panel (model dependent) to rest on top of the rear toe panel allowing the angled edge to allow height adjustment. 1. Attach the outer toe panel (L) onto the brackets and drive the screws provided in place to avoid damaging the dishwasher. Attaching the Toe Panel Your dishwasher comes with ... apron is completely hidden behind the outermost toe panel. 5. See Figure 26. 4. L) slide the brackets (K) provided, into the slots of the dishwasher. 3. See Figure 27. Figure 26 Figure 27 11 Position the slotted rear toe panel on the floor. 2. Use the supplied screws to secure ...
Installation Instructions
Page 14
...and Care Manual. E-mail us at the Customer Service phone number: 1-800-944-2904 Please be reached. Write us . Customer Service Your dishwasher requires no special care other than that described in the Care and Maintenance section of the problem x Daytime phone number where you can be ...sure to include (if you are writing), or have received, please take the following information: x Model number x Serial number x Date of original purchase x Date the problem originated x Explanation of the Use and Care Manual. If you are calling), ...
...and Care Manual. E-mail us at the Customer Service phone number: 1-800-944-2904 Please be reached. Write us . Customer Service Your dishwasher requires no special care other than that described in the Care and Maintenance section of the problem x Daytime phone number where you can be ...sure to include (if you are writing), or have received, please take the following information: x Model number x Serial number x Date of original purchase x Date the problem originated x Explanation of the Use and Care Manual. If you are calling), ...
Instructions for Use
Page 6
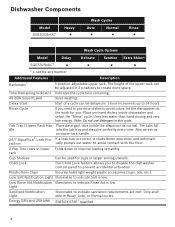
... indicate Rinse Aid is low. Uses less water than hand rinsing and very low energy. Tab Tray / Upper Rack Han- Dishwasher Components Model SGE53U5xUC* Heavy Wash Cycles Auto Normal Rinse Wash Cycle Options Model SGE53U5xUC* Delay Delicate Sanitize Extra Shine® * x can be delayed in 1-hour increments up to 24 hours. Low Rinse...
... indicate Rinse Aid is low. Uses less water than hand rinsing and very low energy. Tab Tray / Upper Rack Han- Dishwasher Components Model SGE53U5xUC* Heavy Wash Cycles Auto Normal Rinse Wash Cycle Options Model SGE53U5xUC* Delay Delicate Sanitize Extra Shine® * x can be delayed in 1-hour increments up to 24 hours. Low Rinse...
Instructions for Use
Page 25
... with this manual. Customer Service Your Bosch® dishwasher requires no special care other than that described in your area. 4 Write us: BSH Home Appliances Corporation 1901 Main Street, Suite 600 Irvine, CA 92614 Please be sure to include your model information as well as an explanation of...with the service you have received, please take the following steps until the problem is necessary, contact your dishwasher, before calling for warranty purposes. 23 You will find the model and serial number information on the label located on the edge of this manual. If you are having ...
... with this manual. Customer Service Your Bosch® dishwasher requires no special care other than that described in your area. 4 Write us: BSH Home Appliances Corporation 1901 Main Street, Suite 600 Irvine, CA 92614 Please be sure to include your model information as well as an explanation of...with the service you have received, please take the following steps until the problem is necessary, contact your dishwasher, before calling for warranty purposes. 23 You will find the model and serial number information on the label located on the edge of this manual. If you are having ...


