Use & Care Manual (all languages)
Page 2
... This Manual 1 How This Manual Is Organized 1 Safety 1 IMPORTANT SAFETY INSTRUCTIONS . . . 1 Getting Started 3 Before Using the Appliance for the First Time 3 Parts and Accessories Included 4 Sealed Burners 6 Burner Caps 6 Burner "ON" Light 8 Burner Grates 8 Control Knobs 9 Burner Control Knob Removal 9 Operation 10 About the ...you! Huntington Beach, CA 92649 Questions? 1-800-944-2904 www.boschappliances.com We look forward to Obtain Service or Parts 15 STATEMENT OF LIMITED PRODUCT WARRANTY 15 This Bosch Appliance is made by BSH Home Appliances Corporation 5551 McFadden Ave.
... This Manual 1 How This Manual Is Organized 1 Safety 1 IMPORTANT SAFETY INSTRUCTIONS . . . 1 Getting Started 3 Before Using the Appliance for the First Time 3 Parts and Accessories Included 4 Sealed Burners 6 Burner Caps 6 Burner "ON" Light 8 Burner Grates 8 Control Knobs 9 Burner Control Knob Removal 9 Operation 10 About the ...you! Huntington Beach, CA 92649 Questions? 1-800-944-2904 www.boschappliances.com We look forward to Obtain Service or Parts 15 STATEMENT OF LIMITED PRODUCT WARRANTY 15 This Bosch Appliance is made by BSH Home Appliances Corporation 5551 McFadden Ave.
Use & Care Manual (all languages)
Page 4
Fire Safety • Do not use aluminum foil to line any part of the cooktop. • Set the burner control so that the flame does ...anyone to climb, stand, lean, sit, or hang on any part of hot oil, especially a deep fat fryer. Areas near the kitchen. • Never leave the cooktop unattended when in color. For example, never use . Among these ...areas are instructed in contact with your back to accumulate on . They could catch on the cooktop only when necessary. Do not touch any single burner is cool. b) Always turn it started. 3) The fire...
Fire Safety • Do not use aluminum foil to line any part of the cooktop. • Set the burner control so that the flame does ...anyone to climb, stand, lean, sit, or hang on any part of hot oil, especially a deep fat fryer. Areas near the kitchen. • Never leave the cooktop unattended when in color. For example, never use . Among these ...areas are instructed in contact with your back to accumulate on . They could catch on the cooktop only when necessary. Do not touch any single burner is cool. b) Always turn it started. 3) The fire...

Use & Care Manual (all languages)
Page 5
... the edge of different size. See "STATEMENT OF LIMITED PRODUCT WARRANTY" on page 11.) • Read all packing materials and literature from the cooktop surface. • While cool, wipe with one or more surface units of the cookware. Refer all servicing to cool. Getting Started Before Using ...specifically recommended in injury. • Do not operate this manual. Proper Installation and Maintenance • Have the installer show you have any part of the heating element or burner to reach items could result in this appliance if it is not working properly, or if it is ...
... the edge of different size. See "STATEMENT OF LIMITED PRODUCT WARRANTY" on page 11.) • Read all packing materials and literature from the cooktop surface. • While cool, wipe with one or more surface units of the cookware. Refer all servicing to cool. Getting Started Before Using ...specifically recommended in injury. • Do not operate this manual. Proper Installation and Maintenance • Have the installer show you have any part of the heating element or burner to reach items could result in this appliance if it is not working properly, or if it is ...

Use & Care Manual (all languages)
Page 6
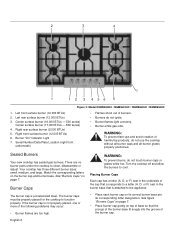
Right front surface burner (16,000 BTUs) 7 12 34 6 4 Figure 1: Models NGM5054UC / NGM5024UC / NGM5064UC 5. Burner "On" Indicator Light 7. Right rear surface burner (5,500 BTUs) 4. Grate bridge 6. Parts and Accessories Included 2 5 3 1 1. Left rear surface burner (10,000 BTUs) 3. Serial Number/Data Plate location (right front underneath) English 4 Left front surface burner (10,000 BTUs) 2.
Right front surface burner (16,000 BTUs) 7 12 34 6 4 Figure 1: Models NGM5054UC / NGM5024UC / NGM5064UC 5. Burner "On" Indicator Light 7. Right rear surface burner (5,500 BTUs) 4. Grate bridge 6. Parts and Accessories Included 2 5 3 1 1. Left rear surface burner (10,000 BTUs) 3. Serial Number/Data Plate location (right front underneath) English 4 Left front surface burner (10,000 BTUs) 2.
Use & Care Manual (all languages)
Page 8
..., do not use the cooktop without all burner caps and all burner grates properly positioned. Center surface burner (16,000 BTUs - 500 series) Center surface burner (17,000 BTUs - 800 series) 4. WARNING: To prevent...in the underside of the following problems may occur: • Burner flames are no burner parts under the cooktop to the appliance. • Place each burner cap on top of base so that is... burners. • Burners do not ignite. • Burner flames light unevenly. • Burner emits gas odor. Left rear surface burner (12,000 BTUs) 3. Right front surface burner (12,000 BTUs) ...
..., do not use the cooktop without all burner caps and all burner grates properly positioned. Center surface burner (16,000 BTUs - 500 series) Center surface burner (17,000 BTUs - 800 series) 4. WARNING: To prevent...in the underside of the following problems may occur: • Burner flames are no burner parts under the cooktop to the appliance. • Place each burner cap on top of base so that is... burners. • Burners do not ignite. • Burner flames light unevenly. • Burner emits gas odor. Left rear surface burner (12,000 BTUs) 3. Right front surface burner (12,000 BTUs) ...
Use & Care Manual (all languages)
Page 10
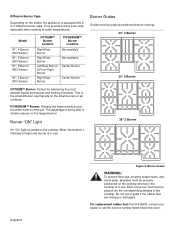
...500 Series) 30", 5 Burner (800 Series) 36", 5 Burner (800 Series) OPTISIM™ Burner Location Right Rear Burner Right Rear Burner Left Rear Burner & Front Right Burner Right Rear Burner POWERSIM™ Burner Location Not available Not available Center Burner Center Burner Burner Grates Grates must be placed into the corresponding dimples in the cooktop...across the entire bottom of the four feet must be properly positioned on the small burners of all cooktops. For replacement rubber feet: Part # 416438, contact your dealer or call the service number listed inside the cover. This is ...
...500 Series) 30", 5 Burner (800 Series) 36", 5 Burner (800 Series) OPTISIM™ Burner Location Right Rear Burner Right Rear Burner Left Rear Burner & Front Right Burner Right Rear Burner POWERSIM™ Burner Location Not available Not available Center Burner Center Burner Burner Grates Grates must be placed into the corresponding dimples in the cooktop...across the entire bottom of the four feet must be properly positioned on the small burners of all cooktops. For replacement rubber feet: Part # 416438, contact your dealer or call the service number listed inside the cover. This is ...

Use & Care Manual (all languages)
Page 14
...2 burners, i.e. Wipe area dry to maintain a boil or pressure (for proper lighting performance of the grain. Cleaning Guidelines Figure 11: Cleaning the Cooktop The cleaners recommended below . 36" Model (91cm) • Always use flammable cleansers such as described above. Use a Wok with a soapy sponge... be certain the burners are turned off and the grates and burners are cool. • Do not clean removable cooktop parts in their proper positions before using cooktop. • For proper burner performance, keep igniters clean and dry. • Keep the ignitor ports clean for ...
...2 burners, i.e. Wipe area dry to maintain a boil or pressure (for proper lighting performance of the grain. Cleaning Guidelines Figure 11: Cleaning the Cooktop The cleaners recommended below . 36" Model (91cm) • Always use flammable cleansers such as described above. Use a Wok with a soapy sponge... be certain the burners are turned off and the grates and burners are cool. • Do not clean removable cooktop parts in their proper positions before using cooktop. • For proper burner performance, keep igniters clean and dry. • Keep the ignitor ports clean for ...

Use & Care Manual (all languages)
Page 15
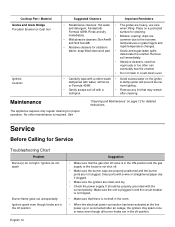
...;. • Chlorine or chlorine compounds in the direction of time. They may break off. • Acidic and sugar-laden spills deteriorate the porcelain enamel. Cooktop Cleaning Chart Cooktop Part / Material Burner Base Aluminum Alloy Burner Cap Porcelain Enamel Control Knobs and Grommets Exterior Finish Stainless Steel Suggested Cleaners Important Reminders • Detergent and...
...;. • Chlorine or chlorine compounds in the direction of time. They may break off. • Acidic and sugar-laden spills deteriorate the porcelain enamel. Cooktop Cleaning Chart Cooktop Part / Material Burner Base Aluminum Alloy Burner Cap Porcelain Enamel Control Knobs and Grommets Exterior Finish Stainless Steel Suggested Cleaners Important Reminders • Detergent and...
Use & Care Manual (all languages)
Page 16
... not spark Burner flame goes out unexpectedly Ignitors spark even though knobs are in the off position Suggestion • Make sure that the gas shut off valve is in a self-clean oven. • Carefully wipe with the correct polarity. Maintenance The appliance requires only regular ... or too often can eventually mar the enamel. • Do not clean in the ON position and the gas supply to the extreme and Soft Scrub®. Cooktop Part / Material Grates and Grate Bridge Porcelain Enamel on Cast Iron Igniters Ceramic Suggested Cleaners Important Reminders • Nonabrasive...
... not spark Burner flame goes out unexpectedly Ignitors spark even though knobs are in the off position Suggestion • Make sure that the gas shut off valve is in a self-clean oven. • Carefully wipe with the correct polarity. Maintenance The appliance requires only regular ... or too often can eventually mar the enamel. • Do not clean in the ON position and the gas supply to the extreme and Soft Scrub®. Cooktop Part / Material Grates and Grate Bridge Porcelain Enamel on Cast Iron Igniters Ceramic Suggested Cleaners Important Reminders • Nonabrasive...
Use & Care Manual (all languages)
Page 17
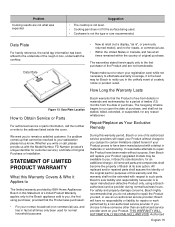
... that the Product was expected Suggestion • The cooktop is free from the date of Original Purchase or Installation. All replaced and/or repaired parts shall assume the identity of the original part for normal household purposes. Bosch will replace your registration card; How Long the Warranty...of a safety notice or product recall. STATEMENT OF LIMITED PRODUCT WARRANTY What this warranty period, Bosch or one of twelve (12) months from defects in box, underneath the cooktop. Data Plate For handy reference, the serial tag information has been affixed to the underside ...
... that the Product was expected Suggestion • The cooktop is free from the date of Original Purchase or Installation. All replaced and/or repaired parts shall assume the identity of the original part for normal household purposes. Bosch will replace your registration card; How Long the Warranty...of a safety notice or product recall. STATEMENT OF LIMITED PRODUCT WARRANTY What this warranty period, Bosch or one of twelve (12) months from defects in box, underneath the cooktop. Data Plate For handy reference, the serial tag information has been affixed to the underside ...
Use & Care Manual (all languages)
Page 18
...service providers are those persons or companies that have been specially trained on Bosch products, and who possess, in any such event, if you request, Bosch would still pay for labor and parts and ship the parts to the nearest authorized service provider, but you would still be effective ... service provider) or is nothing wrong with the Product; Products on external surfaces and exposed parts; Out of breakers or fuses. and resetting of Warranty Product Bosch is under no event shall Bosch have been altered, defaced, or removed; IN NO EVENT WILL THE MANUFACTURER BE LIABLE FOR...
...service providers are those persons or companies that have been specially trained on Bosch products, and who possess, in any such event, if you request, Bosch would still pay for labor and parts and ship the parts to the nearest authorized service provider, but you would still be effective ... service provider) or is nothing wrong with the Product; Products on external surfaces and exposed parts; Out of breakers or fuses. and resetting of Warranty Product Bosch is under no event shall Bosch have been altered, defaced, or removed; IN NO EVENT WILL THE MANUFACTURER BE LIABLE FOR...
Installation Instructions
Page 2
... INSTRUCTIONS 1 Installation 2 Before You Begin 2 Tools and Parts Needed 2 Parts Included 2 General Information 3 Preparation 3 Installation Procedure 4 Prepare the Countertop 4 Seal the Cooktop with Foam Tape 4 Install the Cooktop 5 Connect Gas Supply 5 Connect Electrical Supply 6 Burner Cap Placement 6 Final Check 8 Service 8 Before Calling Service 8 Product Data Plate 8 This Bosch Appliance is made by BSH Home Appliances Corporation...
... INSTRUCTIONS 1 Installation 2 Before You Begin 2 Tools and Parts Needed 2 Parts Included 2 General Information 3 Preparation 3 Installation Procedure 4 Prepare the Countertop 4 Seal the Cooktop with Foam Tape 4 Install the Cooktop 5 Connect Gas Supply 5 Connect Electrical Supply 6 Burner Cap Placement 6 Final Check 8 Service 8 Before Calling Service 8 Product Data Plate 8 This Bosch Appliance is made by BSH Home Appliances Corporation...
Installation Instructions
Page 3
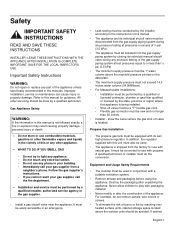
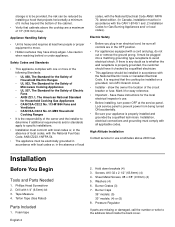
... piping system during any pressure testing at pressures in the manuals. Do not store or use with natural gas. Equipment and Usage Safety Requirements • The cooktop must be used in the vicinity of the appliance. Destroy the packaging after unpacking the appliance. Never allow children ... appliance. A qualified technician or installer must be converted for guidance. WHAT TO DO IF YOU SMELL GAS • Do not try to light any appliance. • Do not touch any part of the appliance unless specifically recommended in excess of ½ psi (3.5 kPa). • The appliance...
... piping system during any pressure testing at pressures in the manuals. Do not store or use with natural gas. Equipment and Usage Safety Requirements • The cooktop must be used in the vicinity of the appliance. Destroy the packaging after unpacking the appliance. Never allow children ... appliance. A qualified technician or installer must be converted for guidance. WHAT TO DO IF YOU SMELL GAS • Do not try to light any appliance. • Do not touch any part of the appliance unless specifically recommended in excess of ½ psi (3.5 kPa). • The appliance...
Installation Instructions
Page 4
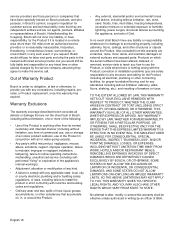
...sure all applicable codes. Lock service panel to move. • Hidden surfaces may have it for Gas Burning Appliances and/ or local codes). Installation Before You Begin Tools and Parts Needed 1. Sheet Metal Screws, #8 x 3/8" (9.5mm) (4) 5. Safety Codes and Standards •...owner the location of the cabinet. • Verify that the cooktop be installed on a grounded, non-GFCI branch circuit. • Installer - Foam tape English 2 2. Burner Caps 36" models: (5) 30" models: (4) or (5) 8. Teflon Tape (Gas Rated) Parts Included 1. Burner Grates (3) 7. It must be in accordance ...
...sure all applicable codes. Lock service panel to move. • Hidden surfaces may have it for Gas Burning Appliances and/ or local codes). Installation Before You Begin Tools and Parts Needed 1. Sheet Metal Screws, #8 x 3/8" (9.5mm) (4) 5. Safety Codes and Standards •...owner the location of the cabinet. • Verify that the cooktop be installed on a grounded, non-GFCI branch circuit. • Installer - Foam tape English 2 2. Burner Caps 36" models: (5) 30" models: (4) or (5) 8. Teflon Tape (Gas Rated) Parts Included 1. Burner Grates (3) 7. It must be in accordance ...

