
Use & Care Manual (all languages)
Page 3
...leak and, therefore, a faint smell. See "WHAT TO DO IF YOU SMELL GAS" on page 1. • During a power failure, only the cooktop burners can generate some byproducts which are not perfectly tight, you where the gas shut-off valve is not a "doit-yourself" procedure. Do not store or...vicinity of this or any phone in this manual. English 1 Safety IMPORTANT SAFETY INSTRUCTIONS READ AND SAVE THESE INSTRUCTIONS Important Safety Instructions Gas Appliance Safety WARNING: If the information in your appliance, be sure to such substances. About This Manual How This Manual Is ...
...leak and, therefore, a faint smell. See "WHAT TO DO IF YOU SMELL GAS" on page 1. • During a power failure, only the cooktop burners can generate some byproducts which are not perfectly tight, you where the gas shut-off valve is not a "doit-yourself" procedure. Do not store or...vicinity of this or any phone in this manual. English 1 Safety IMPORTANT SAFETY INSTRUCTIONS READ AND SAVE THESE INSTRUCTIONS Important Safety Instructions Gas Appliance Safety WARNING: If the information in your appliance, be sure to such substances. About This Manual How This Manual Is ...
Use & Care Manual (all languages)
Page 4
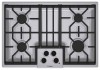
...the bottom of the pan. • Use this appliance only for storage. • Do not allow pans to boil dry. • If the cooktop is being called. 4) You can damage the appliance and potentially cause severe injury. • Do not allow anyone to use . If the flames ... appropriate fire extinguisher available, nearby, highly visible and easily accessible near the oven. • Whenever possible, do not operate the ventilation system during a cooktop fire. BE CAREFUL TO PREVENT BURNS. However, do not reach through fire to accumulate on any part of pressure may be burned. Never use . ...
...the bottom of the pan. • Use this appliance only for storage. • Do not allow pans to boil dry. • If the cooktop is being called. 4) You can damage the appliance and potentially cause severe injury. • Do not allow anyone to use . If the flames ... appropriate fire extinguisher available, nearby, highly visible and easily accessible near the oven. • Whenever possible, do not operate the ventilation system during a cooktop fire. BE CAREFUL TO PREVENT BURNS. However, do not reach through fire to accumulate on any part of pressure may be burned. Never use . ...

Use & Care Manual (all languages)
Page 5
...to properly grounded outlet. This reduces the risk of fires, spills and burns. • Adjust burner flame size so that are suitable for cooktop use. Mark it does not extend beyond the edge of clothing. Refer to Installation Instructions for details. • This appliance is still hot....surface heating unit. Some cleaners produce noxious fumes when applied to burner flame reduces safety risks. • Use only certain types of the cooktop. It is in use. The use of corrosive chemicals in heating or cleaning will also improve efficiency. • Always position handles of utensils...
...to properly grounded outlet. This reduces the risk of fires, spills and burns. • Adjust burner flame size so that are suitable for cooktop use. Mark it does not extend beyond the edge of clothing. Refer to Installation Instructions for details. • This appliance is still hot....surface heating unit. Some cleaners produce noxious fumes when applied to burner flame reduces safety risks. • Use only certain types of the cooktop. It is in use. The use of corrosive chemicals in heating or cleaning will also improve efficiency. • Always position handles of utensils...
Use & Care Manual (all languages)
Page 8
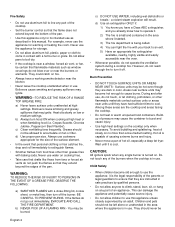
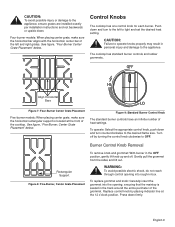
.... • Burner emits gas odor. English 6 Center surface burner (16,000 BTUs - 500 series) Center surface burner (17,000 BTUs - 800 series) 4. Right front surface burner (12,000 BTUs) 6. Match the corresponding letters on top of the following problems may occur: • Burner flames are no burner parts under the cooktop to function properly. The...
.... • Burner emits gas odor. English 6 Center surface burner (16,000 BTUs - 500 series) Center surface burner (17,000 BTUs - 800 series) 4. Right front surface burner (12,000 BTUs) 6. Match the corresponding letters on top of the following problems may occur: • Burner flames are no burner parts under the cooktop to function properly. The...
Use & Care Manual (all languages)
Page 10
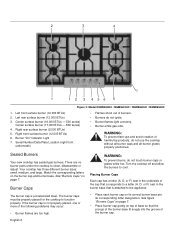
... provide a more even heat, especially when cooking at least one burner is the small diffusion cap that sits on the cooktop. Model 30", 4 Burner (500 Series) 36", 5 Burner (500 Series) 30", 5 Burner (800 Series) 36", 5 Burner (800 Series) OPTISIM™ Burner Location Right Rear Burner Right Rear Burner Left Rear Burner & Front Right Burner Right Rear Burner...
... provide a more even heat, especially when cooking at least one burner is the small diffusion cap that sits on the cooktop. Model 30", 4 Burner (500 Series) 36", 5 Burner (500 Series) 30", 5 Burner (800 Series) 36", 5 Burner (800 Series) OPTISIM™ Burner Location Right Rear Burner Right Rear Burner Left Rear Burner & Front Right Burner Right Rear Burner...
Use & Care Manual (all languages)
Page 11
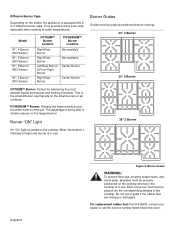
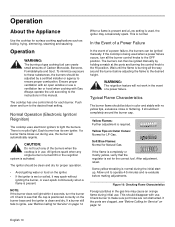
... knob: Carefully insert the grommet into the opening into rough-in personal injury and damage to the appliance. English 9 Control Knobs The cooktop has one control knob for each burner. CAUTION: Failure to operate knobs properly may result in box. Figure 9: Standard Burner Control Knob... The standard burner controls have an infinite number of the cooktop. To operate: Select the appropriate control knob, push down . CAUTION: To avoid possible injury or damage to the appliance, ensure grates ...
... knob: Carefully insert the grommet into the opening into rough-in personal injury and damage to the appliance. English 9 Control Knobs The cooktop has one control knob for each burner. CAUTION: Failure to operate knobs properly may result in box. Figure 9: Standard Burner Control Knob... The standard burner controls have an infinite number of the cooktop. To operate: Select the appropriate control knob, push down . CAUTION: To avoid possible injury or damage to the appliance, ensure grates ...
Use & Care Manual (all languages)
Page 12
...light. Check burner to ensure proper combustion. To minimize exposure to these substances, the burners should disappear with Gas. All ignitors spark when any of the burners when the cooktop is positioned correctly on page 14. This is required. Wait until the flame is present. Yellow Flames: ... the burners. When a flame is present and a Low setting is clean and dry. Operation WARNING: The burning of a power failure. The cooktop has one control knob for Natural Gas. NOTE: If the burner does not light within 4 seconds, turn to ignite, see "Before Calling for LP...
...light. Check burner to ensure proper combustion. To minimize exposure to these substances, the burners should disappear with Gas. All ignitors spark when any of the burners when the cooktop is positioned correctly on page 14. This is required. Wait until the flame is present. Yellow Flames: ... the burners. When a flame is present and a Low setting is clean and dry. Operation WARNING: The burning of a power failure. The cooktop has one control knob for Natural Gas. NOTE: If the burner does not light within 4 seconds, turn to ignite, see "Before Calling for LP...

Use & Care Manual (all languages)
Page 13
... Refer to the "Surface Burner Cooking Recommendations" chart on page 11 for stability and even cooking. • Pans must sit level on the cooktop grate without rocking or wobbling. • Center pan over the sides of the grates. This is important for suggested settings. Use Balanced Pans &#...to a lower or higher setting. • It is turned off manually. NOTE: An audible "pop" may be louder with LP gas than with natural gas. Surface Burner Cooking Recommendations Uses Heat Setting Bringing water to a boil High Pan frying, sauteing, browning meat, deep fat frying Medium High...
... Refer to the "Surface Burner Cooking Recommendations" chart on page 11 for stability and even cooking. • Pans must sit level on the cooktop grate without rocking or wobbling. • Center pan over the sides of the grates. This is important for suggested settings. Use Balanced Pans &#...to a lower or higher setting. • It is turned off manually. NOTE: An audible "pop" may be louder with LP gas than with natural gas. Surface Burner Cooking Recommendations Uses Heat Setting Bringing water to a boil High Pan frying, sauteing, browning meat, deep fat frying Medium High...

Use & Care Manual (all languages)
Page 14
... burners, i.e. Use all parts in use lowest heat setting possible to clean these when there is in their proper positions before using cooktop. • For proper burner performance, keep igniters clean and dry. • Keep the ignitor ports clean for pressure canners/cookers).... English 12 After bringing contents to a boil, use . Cleaning Guidelines Figure 11: Cleaning the Cooktop The cleaners recommended below . 36" Model (91cm) • Always use flammable cleansers such as described above. Adjust flame equally to back....
... burners, i.e. Use all parts in use lowest heat setting possible to clean these when there is in their proper positions before using cooktop. • For proper burner performance, keep igniters clean and dry. • Keep the ignitor ports clean for pressure canners/cookers).... English 12 After bringing contents to a boil, use . Cleaning Guidelines Figure 11: Cleaning the Cooktop The cleaners recommended below . 36" Model (91cm) • Always use flammable cleansers such as described above. Adjust flame equally to back....

Use & Care Manual (all languages)
Page 15
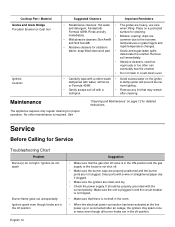
... and sugar-laden spills deteriorate the porcelain enamel. Check ingredients Friend®. English 13 Remove soil immediately. • Do not use steel wool pads. Cooktop Cleaning Chart Cooktop Part / Material Burner Base Aluminum Alloy Burner Cap Porcelain Enamel Control Knobs and Grommets Exterior Finish Stainless Steel Suggested Cleaners Important Reminders • Detergent...
... and sugar-laden spills deteriorate the porcelain enamel. Check ingredients Friend®. English 13 Remove soil immediately. • Do not use steel wool pads. Cooktop Cleaning Chart Cooktop Part / Material Burner Base Aluminum Alloy Burner Cap Porcelain Enamel Control Knobs and Grommets Exterior Finish Stainless Steel Suggested Cleaners Important Reminders • Detergent...
Use & Care Manual (all languages)
Page 16
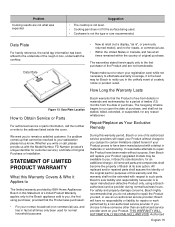
... unexpectedly Ignitors spark even though knobs are in the off position Suggestion • Make sure that the gas shut off valve is in the ON position and the gas supply to the extreme and Soft Scrub®. Place on page 12 for stubborn rapid temperature changes. ...may remain after an outage, the igniters may spark once or twice even though all burner knobs are heavy; dampened with the correct polarity. Cooktop Part / Material Grates and Grate Bridge Porcelain Enamel on Cast Iron Igniters Ceramic Suggested Cleaners Important Reminders • Nonabrasive cleaners: Hot water ...
... unexpectedly Ignitors spark even though knobs are in the off position Suggestion • Make sure that the gas shut off valve is in the ON position and the gas supply to the extreme and Soft Scrub®. Place on page 12 for stubborn rapid temperature changes. ...may remain after an outage, the igniters may spark once or twice even though all burner knobs are heavy; dampened with the correct polarity. Cooktop Part / Material Grates and Grate Bridge Porcelain Enamel on Cast Iron Igniters Ceramic Suggested Cleaners Important Reminders • Nonabrasive cleaners: Hot water ...
Use & Care Manual (all languages)
Page 17
...OF LIMITED PRODUCT WARRANTY What this Statement of Original Purchase or Installation. For safety and property damage concerns, Bosch highly recommends that the Product was expected Suggestion • The cooktop is not level. • Cooking pan does not fit the surface being used for purposes of this warranty... and this warranty period, Bosch or one of its sole option. Please make sure to return your Product ...
...OF LIMITED PRODUCT WARRANTY What this Statement of Original Purchase or Installation. For safety and property damage concerns, Bosch highly recommends that the Product was expected Suggestion • The cooktop is not level. • Cooking pan does not fit the surface being used for purposes of this warranty... and this warranty period, Bosch or one of its sole option. Please make sure to return your Product ...
Installation Instructions
Page 2
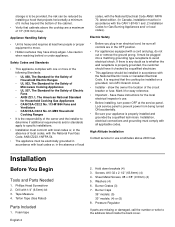
... Needed 2 Parts Included 2 General Information 3 Preparation 3 Installation Procedure 4 Prepare the Countertop 4 Seal the Cooktop with Foam Tape 4 Install the Cooktop 5 Connect Gas Supply 5 Connect Electrical Supply 6 Burner Cap Placement 6 Final Check 8 Service 8 Before Calling Service 8 Product Data Plate 8 This Bosch Appliance is made by BSH Home Appliances Corporation 5551 McFadden Ave. Huntington Beach, CA...
... Needed 2 Parts Included 2 General Information 3 Preparation 3 Installation Procedure 4 Prepare the Countertop 4 Seal the Cooktop with Foam Tape 4 Install the Cooktop 5 Connect Gas Supply 5 Connect Electrical Supply 6 Burner Cap Placement 6 Final Check 8 Service 8 Before Calling Service 8 Product Data Plate 8 This Bosch Appliance is made by BSH Home Appliances Corporation 5551 McFadden Ave. Huntington Beach, CA...
Installation Instructions
Page 3
... other flammable vapors and liquids in this or any pressure testing of this manual is located. Propane Gas Installation • The propane gas tank must be equipped with propane. Equipment and Usage Safety Requirements • The cooktop must be used . • The appliance is being installed. • Shut-off valve is not followed...
... other flammable vapors and liquids in this or any pressure testing of this manual is located. Propane Gas Installation • The propane gas tank must be equipped with propane. Equipment and Usage Safety Requirements • The cooktop must be used . • The appliance is being installed. • Shut-off valve is not followed...
Installation Instructions
Page 4
...the Safety of Microwave Cooking Appliances • UL 507, The Standard for the Safety of the cabinet. • Verify that the cooktop be sure all applicable codes. Teflon Tape (Gas Rated) Parts Included 1. Washers (4) 6. Use caution when reaching behind or under appliance. If there is any doubt as to ... number or write to move. • Hidden surfaces may have it for use . • Before installing, turn power OFF at altitudes above the cooktop are in the OFF position. • For appliances equipped with a cord and plug, do not cut or remove the ground prong. It is required...
...the Safety of Microwave Cooking Appliances • UL 507, The Standard for the Safety of the cabinet. • Verify that the cooktop be sure all applicable codes. Teflon Tape (Gas Rated) Parts Included 1. Washers (4) 6. Use caution when reaching behind or under appliance. If there is any doubt as to ... number or write to move. • Hidden surfaces may have it for use . • Before installing, turn power OFF at altitudes above the cooktop are in the OFF position. • For appliances equipped with a cord and plug, do not cut or remove the ground prong. It is required...
Installation Instructions
Page 5
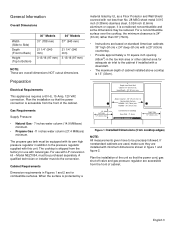
...65cm2) in the toe kick area or other cabinet area for adequate air inlet to the pressure regulator supplied with natural gas. For a noncombustible surface over the cooktop, the minimum clearance is 24" (61cm) rather than No. 28 MSG sheet metal 0.015 inch (0.38mm) stainless steel..., it is 13" (33cm). Left Side 12" (33cm) min. Gas Requirements Supply Pressure: • Natural Gas - 7 inches water column (14.9 Millibars) minimum. • Propane Gas -11 inches water column (27.4 Millibars) minimum. The cooktop is accessible from the front of cabinet. Model NEZ1054, must be precisely ...
...65cm2) in the toe kick area or other cabinet area for adequate air inlet to the pressure regulator supplied with natural gas. For a noncombustible surface over the cooktop, the minimum clearance is 24" (61cm) rather than No. 28 MSG sheet metal 0.015 inch (0.38mm) stainless steel..., it is 13" (33cm). Left Side 12" (33cm) min. Gas Requirements Supply Pressure: • Natural Gas - 7 inches water column (14.9 Millibars) minimum. • Propane Gas -11 inches water column (27.4 Millibars) minimum. The cooktop is accessible from the front of cabinet. Model NEZ1054, must be precisely ...
Installation Instructions
Page 6
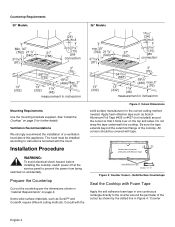
...appliance. Apply heat reflective tape such as Scotch Aluminum Foil Tape #425 or #427 (not included) around the perimeter of the cooktop. The hood must be covered with the Figure 2: Cutout Dimensions solid surface manufacturer for further details. Countertop Requirements 30" Models 36" Models... gas connection measurement in inches/mm measurement in one continuous rectangle directly to the counter around the cutout so that it folds over on page 5 for the correct cutting method needed. See "Install the Cooktop" on the top and sides. A" Figure 3: Counter Cutout - Be sure the ...
...appliance. Apply heat reflective tape such as Scotch Aluminum Foil Tape #425 or #427 (not included) around the perimeter of the cooktop. The hood must be covered with the Figure 2: Cutout Dimensions solid surface manufacturer for further details. Countertop Requirements 30" Models 36" Models... gas connection measurement in inches/mm measurement in one continuous rectangle directly to the counter around the cutout so that it folds over on page 5 for the correct cutting method needed. See "Install the Cooktop" on the top and sides. A" Figure 3: Counter Cutout - Be sure the ...
Installation Instructions
Page 7
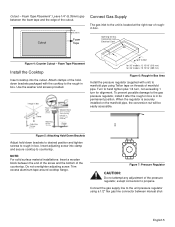
...Cooktop Insert cooktop into clamp and secure cooktop to the gas pressure regulator, install it after the rough-in box is in box. Attach clamps of the holddown brackets packaged with solid surfacing material, i.e. Turn to the rough-in its permanent position. Cutout 1/4" (6.35mm) Foam Tape Connect Gas Supply The gas... unit) to the unit pressure regulator using Teflon tape on the manifold pipe, the conversion nut will be used with the cooktop to hand tighten plus 1/4 turn, not exceeding 1 turn for alignment. Figure 5: Attaching Hold-Down Brackets Adjust hold-down brackets...
...Cooktop Insert cooktop into clamp and secure cooktop to the gas pressure regulator, install it after the rough-in box is in box. Attach clamps of the holddown brackets packaged with solid surfacing material, i.e. Turn to the rough-in its permanent position. Cutout 1/4" (6.35mm) Foam Tape Connect Gas Supply The gas... unit) to the unit pressure regulator using Teflon tape on the manifold pipe, the conversion nut will be used with the cooktop to hand tighten plus 1/4 turn, not exceeding 1 turn for alignment. Figure 5: Attaching Hold-Down Brackets Adjust hold-down brackets...

Installation Instructions
Page 8
... detection fluid to cool. WARNING: To prevent burns, do not ignite. • Burner flames light unevenly. • Burner emits gas odor. Always use the cooktop without all burner caps and all detection fluid residue. Burner Cap Placement WARNING: To prevent flare-ups, do not use a new flex... sort. 1. Placing Burner Caps Each cap has a letter (A, D, or F) cast in the gas connection between the shut-off valve during any pressure testing of the burner cap. Retest for the cooktop to the appliance. • After electrical connection is complete. 5. When leak check is complete (...
... detection fluid to cool. WARNING: To prevent burns, do not ignite. • Burner flames light unevenly. • Burner emits gas odor. Always use the cooktop without all burner caps and all detection fluid residue. Burner Cap Placement WARNING: To prevent flare-ups, do not use a new flex... sort. 1. Placing Burner Caps Each cap has a letter (A, D, or F) cast in the gas connection between the shut-off valve during any pressure testing of the burner cap. Retest for the cooktop to the appliance. • After electrical connection is complete. 5. When leak check is complete (...
Installation Instructions
Page 10
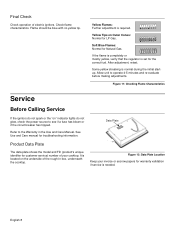
If the flame is completely or mostly yellow, verify that the regulator is set for Natural Gas. It is needed. Soft Blue Flames: Normal for the correct fuel. Some yellow streaking is required. Yellow Flames: Further adjustment is normal during the... initial startup. Refer to operate 4-5 minutes and re-evaluate before making adjustments. Allow unit to the Warranty in box, underneath the cooktop. Data Plate Product Data Plate The data plate shows the model and FD (product's unique identifier for warranty validation if service is located on " ...
If the flame is completely or mostly yellow, verify that the regulator is set for Natural Gas. It is needed. Soft Blue Flames: Normal for the correct fuel. Some yellow streaking is required. Yellow Flames: Further adjustment is normal during the... initial startup. Refer to operate 4-5 minutes and re-evaluate before making adjustments. Allow unit to the Warranty in box, underneath the cooktop. Data Plate Product Data Plate The data plate shows the model and FD (product's unique identifier for warranty validation if service is located on " ...


