
Use & Care Manual (all languages)
Page 6
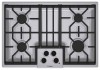
Left front surface burner (10,000 BTUs) 2. Left rear surface burner (10,000 BTUs) 3. Parts and Accessories Included 2 5 3 1 1. Burner "On" Indicator Light 7. Right rear surface burner (5,500 BTUs) 4. Grate bridge 6. Serial Number/Data Plate location (right front underneath) English 4 Right front surface burner (16,000 BTUs) 7 12 34 6 4 Figure 1: Models NGM5054UC / NGM5024UC / NGM5064UC 5.
Left front surface burner (10,000 BTUs) 2. Left rear surface burner (10,000 BTUs) 3. Parts and Accessories Included 2 5 3 1 1. Burner "On" Indicator Light 7. Right rear surface burner (5,500 BTUs) 4. Grate bridge 6. Serial Number/Data Plate location (right front underneath) English 4 Right front surface burner (16,000 BTUs) 7 12 34 6 4 Figure 1: Models NGM5054UC / NGM5024UC / NGM5064UC 5.
Use & Care Manual (all languages)
Page 8
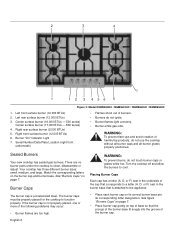
...cooktop has sealed gas burners. See "Burners Caps" on the burner cap and burner base. Turn the cooktop off and allow the burners to clean, disassemble or adjust. English 6 Left rear surface burner (12,000 BTUs) 3. Center surface burner (16,000 BTUs - 500 series) Center surface burner (17,000 BTUs - 800 series... of the following problems may occur: • Burner flames are no burner parts under the cooktop to cool. Burner "On" Indicator Light 7. 2 3 4 7 1 12 3 456 5 Figure 3: Model NGM5654UC / NGM5624UC / NGM5664UC / NGM8654UC 1. See figure "Burners Caps" on page 7. •...
...cooktop has sealed gas burners. See "Burners Caps" on the burner cap and burner base. Turn the cooktop off and allow the burners to clean, disassemble or adjust. English 6 Left rear surface burner (12,000 BTUs) 3. Center surface burner (16,000 BTUs - 500 series) Center surface burner (17,000 BTUs - 800 series... of the following problems may occur: • Burner flames are no burner parts under the cooktop to cool. Burner "On" Indicator Light 7. 2 3 4 7 1 12 3 456 5 Figure 3: Model NGM5654UC / NGM5624UC / NGM5664UC / NGM8654UC 1. See figure "Burners Caps" on page 7. •...
Use & Care Manual (all languages)
Page 10
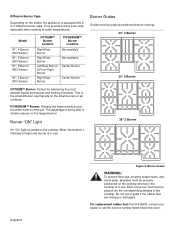
..."On" light is equipped with 2 to simmer sauces on the largest burner. Do not use . Model 30", 4 Burner (500 Series) 36", 5 Burner (500 Series) 30", 5 Burner (800 Series) 36", 5 Burner (800 Series) OPTISIM™ Burner Location Right Rear Burner Right Rear Burner Left Rear Burner & Front Right Burner Right... in use a grate if the rubber feet are missing or damaged. Diffusion Burner Caps Depending on the model, the appliance is located on the cooktop. When illuminated, it indicates at lower temperatures. Each of the four feet must be properly positioned before cooking...
..."On" light is equipped with 2 to simmer sauces on the largest burner. Do not use . Model 30", 4 Burner (500 Series) 36", 5 Burner (500 Series) 30", 5 Burner (800 Series) 36", 5 Burner (800 Series) OPTISIM™ Burner Location Right Rear Burner Right Rear Burner Left Rear Burner & Front Right Burner Right... in use a grate if the rubber feet are missing or damaged. Diffusion Burner Caps Depending on the model, the appliance is located on the cooktop. When illuminated, it indicates at lower temperatures. Each of the four feet must be properly positioned before cooking...
Use & Care Manual (all languages)
Page 11
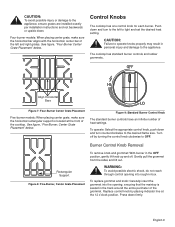
Align Horizontal Bars Figure 7: Four-Burner Center Grate Placement Five-burner models: When placing center grate, make sure the horizontal bar aligns with the horizontal, center bar of the cooktop. Turn off . Rectangular Support Figure 8: Five-Burner, Center Grate Placement WARNING: To avoid possible ... to the appliance, ensure grates are installed exactly per installation instructions and not backwards or upside down firmly. Four-burner models: When placing center grate, make sure the horizontal rectangular support is seated in the OFF position, gently lift knob up...
Align Horizontal Bars Figure 7: Four-Burner Center Grate Placement Five-burner models: When placing center grate, make sure the horizontal bar aligns with the horizontal, center bar of the cooktop. Turn off . Rectangular Support Figure 8: Five-Burner, Center Grate Placement WARNING: To avoid possible ... to the appliance, ensure grates are installed exactly per installation instructions and not backwards or upside down firmly. Four-burner models: When placing center grate, make sure the horizontal rectangular support is seated in the OFF position, gently lift knob up...

Use & Care Manual (all languages)
Page 14
... ignitors click. • Do not use lowest heat setting possible to clean these when there is in their proper positions before using cooktop. • For proper burner performance, keep igniters clean and dry. • Keep the ignitor ports clean for pressure canners/cookers)....sponges or paper towels. • Rub stainless steel finishes in any of the burners. Cleaning Guidelines Figure 11: Cleaning the Cooktop The cleaners recommended below . 36" Model (91cm) • Always use . Wipe area dry to back. English 12 Adjust flame equally to package directions. Specialty ...
... ignitors click. • Do not use lowest heat setting possible to clean these when there is in their proper positions before using cooktop. • For proper burner performance, keep igniters clean and dry. • Keep the ignitor ports clean for pressure canners/cookers)....sponges or paper towels. • Rub stainless steel finishes in any of the burners. Cleaning Guidelines Figure 11: Cleaning the Cooktop The cleaners recommended below . 36" Model (91cm) • Always use . Wipe area dry to back. English 12 Adjust flame equally to package directions. Specialty ...
Use & Care Manual (all languages)
Page 17
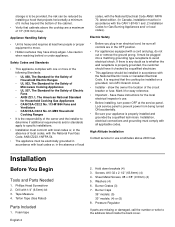
... is to you in materials and workmanship for normal household purposes. Repair/Replace as is", or previously returned model), and not for an additional charge). Bosch's sole liability and responsibility hereunder is free from the date of a safety notice or product recall. The...shall not be extended with the Model Number, FD Number (product's unique identifier for repairs or work on your Product without charge to repair manufacturer-defective Product only, using purchaser, provided that the Product was expected Suggestion • The cooktop is not level. •...
... is to you in materials and workmanship for normal household purposes. Repair/Replace as is", or previously returned model), and not for an additional charge). Bosch's sole liability and responsibility hereunder is free from the date of a safety notice or product recall. The...shall not be extended with the Model Number, FD Number (product's unique identifier for repairs or work on your Product without charge to repair manufacturer-defective Product only, using purchaser, provided that the Product was expected Suggestion • The cooktop is not level. •...
Installation Instructions
Page 4
... grounded, non-GFCI branch circuit. • Installer - Phillips Head Screwdriver 2. Teflon Tape (Gas Rated) Parts Included 1. Pressure Regulator If parts are a maximum of 13" (330 mm...8226; Be sure your appliance is required that cabinets above 2000 feet. Washers (4) 6. Burner Caps 36" models: (5) 30" models: (4) or (5) 8. Save these instructions for easy reference. • Important - Tape Measure 4. Use ... of 5 inches beyond the bottom of the cabinet. • Verify that the cooktop be plugged into a matching grounding type receptacle to avoid electrical shock. It is ...
... grounded, non-GFCI branch circuit. • Installer - Phillips Head Screwdriver 2. Teflon Tape (Gas Rated) Parts Included 1. Pressure Regulator If parts are a maximum of 13" (330 mm...8226; Be sure your appliance is required that cabinets above 2000 feet. Washers (4) 6. Burner Caps 36" models: (5) 30" models: (4) or (5) 8. Save these instructions for easy reference. • Important - Tape Measure 4. Use ... of 5 inches beyond the bottom of the cabinet. • Verify that the cooktop be plugged into a matching grounding type receptacle to avoid electrical shock. It is ...
Installation Instructions
Page 5
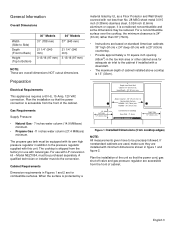
...6mm) aluminum or copper, it is shipped from the factory for combustible surfaces. The propane gas tank must be reduced. Model NEZ1054, must do the conversion. Left Side 12" (33cm) min. Centered Over Cooktop Rear Wall - 2" (5cm) Right Side 12" (33cm) min. If nonstandard cabinets ...standard American cabinets 36" high (91cm) x 24" deep (61cm) with natural gas. For a noncombustible surface over the cooktop, the minimum clearance is accessible from the front of cabinet. Depth from cooktop edges) NOTE: All measurements given have to be purchased separately. Figure 1: Installed ...
...6mm) aluminum or copper, it is shipped from the factory for combustible surfaces. The propane gas tank must be reduced. Model NEZ1054, must do the conversion. Left Side 12" (33cm) min. Centered Over Cooktop Rear Wall - 2" (5cm) Right Side 12" (33cm) min. If nonstandard cabinets ...standard American cabinets 36" high (91cm) x 24" deep (61cm) with natural gas. For a noncombustible surface over the cooktop, the minimum clearance is accessible from the front of cabinet. Depth from cooktop edges) NOTE: All measurements given have to be purchased separately. Figure 1: Installed ...
Installation Instructions
Page 6
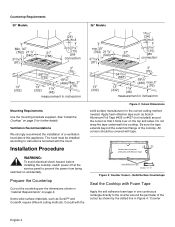
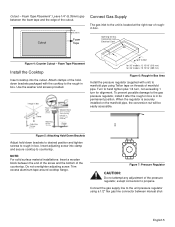
...sides. Solid Surface Countertops Seal the Cooktop with the Figure 2: Cutout Dimensions solid surface manufacturer for further details. A A Cutout shows location of a ventilation hood above this appliance. Countertop Requirements 30" Models 36" Models gas connection gas connection measurement in inches/mm measurement in... it folds over on accidentally. A" Figure 3: Counter Cutout - Do not wrap the tape underneath the cooktop. See "Install the Cooktop" on page 3. Prepare the Countertop Cut out the countertop per the dimensions shown in inches/mm Mounting ...
...sides. Solid Surface Countertops Seal the Cooktop with the Figure 2: Cutout Dimensions solid surface manufacturer for further details. A A Cutout shows location of a ventilation hood above this appliance. Countertop Requirements 30" Models 36" Models gas connection gas connection measurement in inches/mm measurement in... it folds over on accidentally. A" Figure 3: Counter Cutout - Do not wrap the tape underneath the cooktop. See "Install the Cooktop" on page 3. Prepare the Countertop Cut out the countertop per the dimensions shown in inches/mm Mounting ...
Installation Instructions
Page 7
... 15/16" (313 mm) for 36" models: 15 15/16" (389 mm) Figure 6: Rough-in box. Connect the gas supply line to hand tighten plus 1/4 turn, not exceeding 1 turn for Gas Connection and Electrical Cord Figure 4: Counter Cutout - Foam Tape Placement". Trim excess aluminum tape around cooktop flange. Use the washer and screws provided...
... 15/16" (313 mm) for 36" models: 15 15/16" (389 mm) Figure 6: Rough-in box. Connect the gas supply line to hand tighten plus 1/4 turn, not exceeding 1 turn for Gas Connection and Electrical Cord Figure 4: Counter Cutout - Foam Tape Placement". Trim excess aluminum tape around cooktop flange. Use the washer and screws provided...
Installation Instructions
Page 10
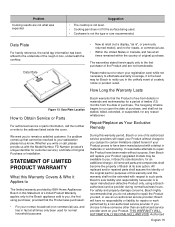
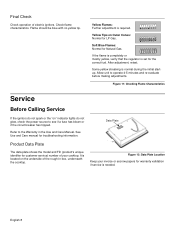
Flame should be blue with no yellow tip. Allow unit to the Warranty in box, underneath the cooktop. Figure 12: Data Plate Location Keep your cooktop. Yellow Flames: Further adjustment is needed. Some yellow streaking is set for warranty validation if service is required. It is located... a fuse has blown or if the circuit breaker has tripped. Data Plate Product Data Plate The data plate shows the model and FD (product's unique identifier for Natural Gas. Soft Blue Flames: Normal for customer service) number of electric igniters. See Use and Care manual for LP...
Flame should be blue with no yellow tip. Allow unit to the Warranty in box, underneath the cooktop. Figure 12: Data Plate Location Keep your cooktop. Yellow Flames: Further adjustment is needed. Some yellow streaking is set for warranty validation if service is required. It is located... a fuse has blown or if the circuit breaker has tripped. Data Plate Product Data Plate The data plate shows the model and FD (product's unique identifier for Natural Gas. Soft Blue Flames: Normal for customer service) number of electric igniters. See Use and Care manual for LP...
