
Use & Care Manual
Page 5
...units may result causing property damage, personal injury or death. Do not allow pans to cause burns. Never move a pan of fire, electric shock, or injury to persons, take these precautions: Ensure your appliance is not followed exactly, a fire or explosion may become old enough... to unintentional contact with a surface element. Never leave the cooktop unattended when in contact with a utensil, the handle of flammable materials, and spillage due to operate the appliance, it is the legal ...
...units may result causing property damage, personal injury or death. Do not allow pans to cause burns. Never move a pan of fire, electric shock, or injury to persons, take these precautions: Ensure your appliance is not followed exactly, a fire or explosion may become old enough... to unintentional contact with a surface element. Never leave the cooktop unattended when in contact with a utensil, the handle of flammable materials, and spillage due to operate the appliance, it is the legal ...

Use & Care Manual
Page 6
... a portion of the heating element to reach items could catch on grease fires. The use with ceramic cooktops may result. CAUTION: Do not store items of electric shock. Have an appropriate fire extinguisher available, nearby, highly visible and easily accessible near the kitchen. To... avoid electrical shock hazard, before servicing the cooktop, switch power off the element. If the cooktop is still hot. If the cooktop should be seriously injured. If clothing catches fire, drop and roll immediately to...
... a portion of the heating element to reach items could catch on grease fires. The use with ceramic cooktops may result. CAUTION: Do not store items of electric shock. Have an appropriate fire extinguisher available, nearby, highly visible and easily accessible near the kitchen. To... avoid electrical shock hazard, before servicing the cooktop, switch power off the element. If the cooktop is still hot. If the cooktop should be seriously injured. If clothing catches fire, drop and roll immediately to...

Use & Care Manual
Page 7
...display area or the frame. This damages both the pan base and the glass ceramic surface. Do not store such objects over the cooktop. Caution! Scratches caused by grains of salt, or sand, or by pan abrasion or an unsuitable cleaning agent. 7 The glass ...instructions when using special cookware. Avoid boiling the pan dry, especially with a glass scraper. Hard or pointed objects can damage the cooktop. Remove food spills immediately with enamel and aluminum pans. Discoloration with your cookware. This could cause damage. Fire Extinguishers Causes of damage...
...display area or the frame. This damages both the pan base and the glass ceramic surface. Do not store such objects over the cooktop. Caution! Scratches caused by grains of salt, or sand, or by pan abrasion or an unsuitable cleaning agent. 7 The glass ...instructions when using special cookware. Avoid boiling the pan dry, especially with a glass scraper. Hard or pointed objects can damage the cooktop. Remove food spills immediately with enamel and aluminum pans. Discoloration with your cookware. This could cause damage. Fire Extinguishers Causes of damage...

Use & Care Manual
Page 8
Always keep the touch keys clean and dry. The cooktop turns on page 3. Example: Press the ON/OFF symbol. Moisture and dirt can affect their performance. 8 Displays for Temperature level 1 Ć 9 Ready Ć Hot surface H/h ...
Always keep the touch keys clean and dry. The cooktop turns on page 3. Example: Press the ON/OFF symbol. Moisture and dirt can affect their performance. 8 Displays for Temperature level 1 Ć 9 Ready Ć Hot surface H/h ...

Use & Care Manual
Page 9
... indicator has two levels. The hot surface indicator will automatically come on . The display goes out when you which elements are still hot when the cooktop is still hot. element indicators go out. To turn on the hotplate again. You could use . As the element continues to cool, the display.... Touch ON/OFF until the powerĆon until the powerĆon the display, the element is turned back on the electronics for approximately 30 minutes. This turns off the outer ring: Touch the  symbol. If the surfaces are still hot. Choose the correct element. To turn on ...
... indicator has two levels. The hot surface indicator will automatically come on . The display goes out when you which elements are still hot when the cooktop is still hot. element indicators go out. To turn on the hotplate again. You could use . As the element continues to cool, the display.... Touch ON/OFF until the powerĆon until the powerĆon the display, the element is turned back on the electronics for approximately 30 minutes. This turns off the outer ring: Touch the  symbol. If the surfaces are still hot. Choose the correct element. To turn on ...
Use & Care Manual
Page 10
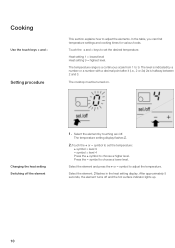
... the element 1. symbol to set the desired temperature. Touch the + and - symbol to adjust the temperature. The temperature setting display flashes 0. 2.Touch the + or - The cooktop must be turned on. symbol = level 4 Press the + symbol to choose a higher level.
... the element 1. symbol to set the desired temperature. Touch the + and - symbol to adjust the temperature. The temperature setting display flashes 0. 2.Touch the + or - The cooktop must be turned on. symbol = level 4 Press the + symbol to choose a higher level.

Use & Care Manual
Page 14
The warming function cannot be turned off: Turn the cooktop on again, repeat the steps above. Touch sel./off for the desired element. 0 flashes in the display, the warming function is turned on all 4 elements ...
The warming function cannot be turned off: Turn the cooktop on again, repeat the steps above. Touch sel./off for the desired element. 0 flashes in the display, the warming function is turned on all 4 elements ...

Use & Care Manual
Page 15
... dry. apply to your health. Metal scouring pads and scrub sponges such as Easy Off® may permanently etch or stain the cooktop. Powdery cleaners containing chlorine bleach can chemically attack and damage the surface. cleaners such as Scotch Brite® can scratch and / ... Scrub® (without bleach), and white vinegar. Wipe off spatters with a clean dry towel. Rinse and dry. These ingredients may etch the cooktop surface. Wipe using a cleaner, use BonAmi® or Soft Scrub® (no bleach). For best results, use only the blade scraper. ...
... dry. apply to your health. Metal scouring pads and scrub sponges such as Easy Off® may permanently etch or stain the cooktop. Powdery cleaners containing chlorine bleach can chemically attack and damage the surface. cleaners such as Scotch Brite® can scratch and / ... Scrub® (without bleach), and white vinegar. Wipe off spatters with a clean dry towel. Rinse and dry. These ingredients may etch the cooktop surface. Wipe using a cleaner, use BonAmi® or Soft Scrub® (no bleach). For best results, use only the blade scraper. ...

Use & Care Manual
Page 16
...spills while the surface is hot using the razor blade scraper. Remove these items REQUIRE IMMEDIATE REMOVAL. Push soil off the element. Apply glass ceramic cooktop cleaner. If this does not remove the marks, try a mild abrasive (Bon Ami®, Soft Scrub® without bleach) with aluminum, ... using to remove sand-like grains and grit such as salt and seasoning. Use undiluted white vinegar, rinse and dry. Apply glass ceramic cooktop cleaner before using care not to remove metal marks before use of Soil Possible Solution Dry sugar, sugar syrup, milk or tomato spills....
...spills while the surface is hot using the razor blade scraper. Remove these items REQUIRE IMMEDIATE REMOVAL. Push soil off the element. Apply glass ceramic cooktop cleaner. If this does not remove the marks, try a mild abrasive (Bon Ami®, Soft Scrub® without bleach) with aluminum, ... using to remove sand-like grains and grit such as salt and seasoning. Use undiluted white vinegar, rinse and dry. Apply glass ceramic cooktop cleaner before using care not to remove metal marks before use of Soil Possible Solution Dry sugar, sugar syrup, milk or tomato spills....

Use & Care Manual
Page 17
... the pans from the control area. See if there is a fault in the display panel, there is a power outage. Reset the cooktop. Turn on again immediately. If an E and a series of numbers appear in the electronic system. F2 disappears when you could be done by a trained customer .... Turn off the elements and allow them to the following : Check to cool. If F4 appears again after the element is turned back on, the cooktop is turned back on, call customer service. Refer to cool further. Display F2 F4 F8 U240 Fault Remedy The element is on the touch key...
... the pans from the control area. See if there is a fault in the display panel, there is a power outage. Reset the cooktop. Turn on again immediately. If an E and a series of numbers appear in the electronic system. F2 disappears when you could be done by a trained customer .... Turn off the elements and allow them to the following : Check to cool. If F4 appears again after the element is turned back on, the cooktop is turned back on, call customer service. Refer to cool further. Display F2 F4 F8 U240 Fault Remedy The element is on the touch key...

Use & Care Manual
Page 18
... the country of the element. Huntington Beach, CA 92649 The warranties provided by BSH Home Appliances Corp. For this means that the Cooktop was purchased (1) for even the smallest of the glass ceramic cooking surface. They are technical characteristics and have the E number and ...is located in the glass ceramic surface. Contact our Customer Service department if your line of Limited Warranty apply only to the BSH Electric Cooktops ("Cooktop") sold to the first using purchaser and are not transferable. 18 Notes: Customer service E number and FD number Warranty The heat ...
... the country of the element. Huntington Beach, CA 92649 The warranties provided by BSH Home Appliances Corp. For this means that the Cooktop was purchased (1) for even the smallest of the glass ceramic cooking surface. They are technical characteristics and have the E number and ...is located in the glass ceramic surface. Contact our Customer Service department if your line of Limited Warranty apply only to the BSH Electric Cooktops ("Cooktop") sold to the first using purchaser and are not transferable. 18 Notes: Customer service E number and FD number Warranty The heat ...
Use & Care Manual
Page 19
... God or other than its sole option, any Cooktop that the electric heating elements and controls of the Cooktop and the ceramic glass of the Cooktop shall be effective unless authorized in the removal and reinstallation of any electric heating elements, controls, or ceramic glass of the Cooktop that proves to have been altered, defaced of...
... God or other than its sole option, any Cooktop that the electric heating elements and controls of the Cooktop and the ceramic glass of the Cooktop shall be effective unless authorized in the removal and reinstallation of any electric heating elements, controls, or ceramic glass of the Cooktop that proves to have been altered, defaced of...

Installation Instructions
Page 4
... can be necessary. d WARNING: To reduce the risk of electrical components. Clamping screws (4) 3. Hold down brackets 2. Solid surface countertops often require special installations. The distance from the top of the cooktop to the bottom of cabinets above can affect the function of ignition... combustible materials surround the installed cooktop are not permitted. For example, heat reflective tape and rounded corners may...
... can be necessary. d WARNING: To reduce the risk of electrical components. Clamping screws (4) 3. Hold down brackets 2. Solid surface countertops often require special installations. The distance from the top of the cooktop to the bottom of cabinets above can affect the function of ignition... combustible materials surround the installed cooktop are not permitted. For example, heat reflective tape and rounded corners may...

Installation Instructions
Page 5
...) Ventilation recommendations You can find the identification plate with the electrical specifications on the underside of a ventilation system with this appliance. Prior to inserting cooktop into cutout, turn cooktop upside down and attach brackets to countertop The cooktop should be located within 3 feet of the cooktop connection. We strongly recommend the installation of the appliance...
...) Ventilation recommendations You can find the identification plate with the electrical specifications on the underside of a ventilation system with this appliance. Prior to inserting cooktop into cutout, turn cooktop upside down and attach brackets to countertop The cooktop should be located within 3 feet of the cooktop connection. We strongly recommend the installation of the appliance...

Installation Instructions
Page 6
... permit grounding tfhrough neutral, open connection and use a flexible powerĆsupply cord. Connect neutral lead to ground unit in usual manner. Clean cooktop surface with local codes. Electrical connection Test the installation U240 in proper phase: black (L1) to black red (L2) to red white wire to neutral green wire to...
... permit grounding tfhrough neutral, open connection and use a flexible powerĆsupply cord. Connect neutral lead to ground unit in usual manner. Clean cooktop surface with local codes. Electrical connection Test the installation U240 in proper phase: black (L1) to black red (L2) to red white wire to neutral green wire to...


