Installation Instructions
Page 10
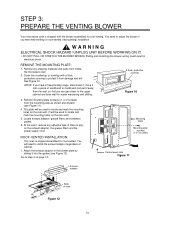
... is shipped with a thick, protective covering to protect it from inside the microwave oven. 2. WARNING ELECTRICAL SHOCK HAZARD! Pulling and stretching the blower wiring could result in electrical shock. A thick, protective covering Figure 10 3. This plate will ...as shown and discard (see Figure 12). Locate exhaust adaptor, grease filters and hardware packet. 6. ROOF-VENTED INSTALLATION: This oven is any shipping materials and parts from damage and dirt. Go to locate and mark the mounting holes on page 13. Mounting plate Mounting plate screw(s) (1 or 2 screws) Control panel ...
... is shipped with a thick, protective covering to protect it from inside the microwave oven. 2. WARNING ELECTRICAL SHOCK HAZARD! Pulling and stretching the blower wiring could result in electrical shock. A thick, protective covering Figure 10 3. This plate will ...as shown and discard (see Figure 12). Locate exhaust adaptor, grease filters and hardware packet. 6. ROOF-VENTED INSTALLATION: This oven is any shipping materials and parts from damage and dirt. Go to locate and mark the mounting holes on page 13. Mounting plate Mounting plate screw(s) (1 or 2 screws) Control panel ...
Installation Instructions
Page 11
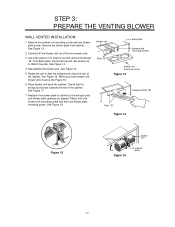
... Check that the exhaust ports face the rear of the cabinet. blower unit back plate blower plate mounting screws Parts "B" blower unit mounting screw Figure 13 Parts "B" Knockout Parts "B" Figure 14 Figure 15 blower unit Figure 16 exhaust ports 11 Remove the blower plate from Back plate. ...When you insert blower unit, blower wire must be like Figure 16. 6. Rotate the unit so that the exhaust ports face towards the rear of the microwave oven...
... Check that the exhaust ports face the rear of the cabinet. blower unit back plate blower plate mounting screws Parts "B" blower unit mounting screw Figure 13 Parts "B" Knockout Parts "B" Figure 14 Figure 15 blower unit Figure 16 exhaust ports 11 Remove the blower plate from Back plate. ...When you insert blower unit, blower wire must be like Figure 16. 6. Rotate the unit so that the exhaust ports face towards the rear of the microwave oven...
Use & Care Manual
Page 2
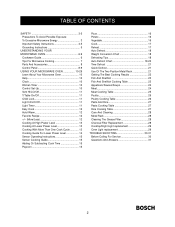
TABLE OF CONTENTS SAFETY 3-5 Precautions To Avoid Possible Exposure To Excessive Microwave Energy 3 Important Safety Instructions 4-5 Grounding Instructions 5 UNDERSTANDING YOUR MICROWAVE OVEN 6-9 Cookware Guide 6 Tips For Microwave Cooking 7 Parts And Accessories 8 Control Panel 8-9 USING YOUR MICROWAVE OVEN 10-29 Learn About Your Microwave Oven 10 Help 10 Clock 10 Kitchen Timer 10 Control Set-Up 10 Vent...
TABLE OF CONTENTS SAFETY 3-5 Precautions To Avoid Possible Exposure To Excessive Microwave Energy 3 Important Safety Instructions 4-5 Grounding Instructions 5 UNDERSTANDING YOUR MICROWAVE OVEN 6-9 Cookware Guide 6 Tips For Microwave Cooking 7 Parts And Accessories 8 Control Panel 8-9 USING YOUR MICROWAVE OVEN 10-29 Learn About Your Microwave Oven 10 Help 10 Clock 10 Kitchen Timer 10 Control Set-Up 10 Vent...
Use & Care Manual
Page 3
... PRECAUTIONS TO AVOID POSSIBLE EXPOSURE TO EXCESSIVE MICROWAVE ENERGY (a) Do not attempt to operate this oven with the manufacturer's instructions, may cause interference to radio and television reception. However, there is not responsible for ISM Equipment pursuant to part 18 of the user to accumulate on...; Clean door and sealing surface of the oven. • Reorient the receiving antenna of the radio or television. • Relocate the Microwave Oven with limits for any object between the oven front face and the door or allow soil or cleaner residue to correct such interference....
... PRECAUTIONS TO AVOID POSSIBLE EXPOSURE TO EXCESSIVE MICROWAVE ENERGY (a) Do not attempt to operate this oven with the manufacturer's instructions, may cause interference to radio and television reception. However, there is not responsible for ISM Equipment pursuant to part 18 of the user to accumulate on...; Clean door and sealing surface of the oven. • Reorient the receiving antenna of the radio or television. • Relocate the Microwave Oven with limits for any object between the oven front face and the door or allow soil or cleaner residue to correct such interference....
Use & Care Manual
Page 7
... skin, or membrane of food will prevent the food from the outside toward the outside the oven. This should be cleaned regularly. REMOVABLE PARTS The turntable and turntable roller rest are clean, rinse well and dry with a soft cloth. Waxed paper will rise about 10 °F...the cooking when they are slightly undercooked and they are removable. They should be done weekly or more quickly. UNDERSTANDING YOUR MICROWAVE OVEN TIPS FOR MICROWAVE COOKING BROWNING Meat and poultry with high fat content will be difficult to remove if left for many days. When warming bread...
... skin, or membrane of food will prevent the food from the outside toward the outside the oven. This should be cleaned regularly. REMOVABLE PARTS The turntable and turntable roller rest are clean, rinse well and dry with a soft cloth. Waxed paper will rise about 10 °F...the cooking when they are slightly undercooked and they are removable. They should be done weekly or more quickly. UNDERSTANDING YOUR MICROWAVE OVEN TIPS FOR MICROWAVE COOKING BROWNING Meat and poultry with high fat content will be difficult to remove if left for many days. When warming bread...
Use & Care Manual
Page 8
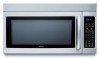
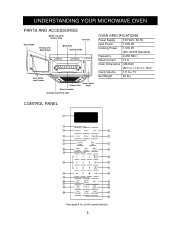
Ft. Net Weight 60 lbs. CONTROL PANEL 1 3 2 4 5 7 6 8 9 10 12 11 14 13 15 16 17 19 18 20 21 25 23 22 24 27 28 26 • See page 9 for control panel features. 8 UNDERSTANDING YOUR MICROWAVE OVEN PARTS AND ACCESSORIES Model and Serial Number Plate Vent Grill Door Handle Window with Metal Shield Metal... W Cooking Power 1,000 W (IEC 60705 Standard) Frequency 2,450 MHz Rated Current 13 A Outer Dimensions (WxHxD) Cavity Volume 2915⁄16" x 167⁄16"x 155⁄8" 1.8 Cu.
Ft. Net Weight 60 lbs. CONTROL PANEL 1 3 2 4 5 7 6 8 9 10 12 11 14 13 15 16 17 19 18 20 21 25 23 22 24 27 28 26 • See page 9 for control panel features. 8 UNDERSTANDING YOUR MICROWAVE OVEN PARTS AND ACCESSORIES Model and Serial Number Plate Vent Grill Door Handle Window with Metal Shield Metal... W Cooking Power 1,000 W (IEC 60705 Standard) Frequency 2,450 MHz Rated Current 13 A Outer Dimensions (WxHxD) Cavity Volume 2915⁄16" x 167⁄16"x 155⁄8" 1.8 Cu.
Use & Care Manual
Page 22
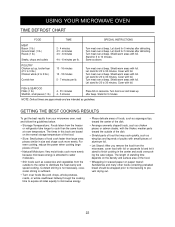
...foil. Turn meat over foods like pork chops, whole potatoes, roasts, or whole cauliflower halfway through the cooking time to expose all sides equally to microwave energy. • Place delicate areas of food. • Natural Moisture: Very moist foods cook more evenly. FISH & SEAFOOD Fillets (1 lb.)...parts toward the center of the dish. • Arrange unevenly shaped foods, such as wing tips and leg ends of poultry with foil. Constant stirring is not necessary, occasional stirring is attracted to water molecules. • Stir foods such as casseroles and vegetables from the microwave...
...foil. Turn meat over foods like pork chops, whole potatoes, roasts, or whole cauliflower halfway through the cooking time to expose all sides equally to microwave energy. • Place delicate areas of food. • Natural Moisture: Very moist foods cook more evenly. FISH & SEAFOOD Fillets (1 lb.)...parts toward the center of the dish. • Arrange unevenly shaped foods, such as wing tips and leg ends of poultry with foil. Constant stirring is not necessary, occasional stirring is attracted to water molecules. • Stir foods such as casseroles and vegetables from the microwave...
Use & Care Manual
Page 23
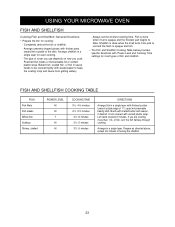
...and Shellfish: General Directions • Prepare the fish for even cooking. - The type of 11⁄2 quart microwavable baking dish. Poached fish needs a microwavable lid or vented plastic wrap. FISH AND SHELLFISH COOKING TABLE FISH Fish fillets Fish steaks Whole fish Scallops Shrimp, ... -6 minutes 31⁄2 -5 minutes 31⁄2 -5 minutes DIRECTIONS Arrange fish in a single layer. Arrange in a single layer with thicker parts toward outside of fish and shellfish. Prepare as directed above, except stir instead of fish, turn the fish halfway through cooking. Fish is done...
...and Shellfish: General Directions • Prepare the fish for even cooking. - The type of 11⁄2 quart microwavable baking dish. Poached fish needs a microwavable lid or vented plastic wrap. FISH AND SHELLFISH COOKING TABLE FISH Fish fillets Fish steaks Whole fish Scallops Shrimp, ... -6 minutes 31⁄2 -5 minutes 31⁄2 -5 minutes DIRECTIONS Arrange fish in a single layer. Arrange in a single layer with thicker parts toward outside of fish and shellfish. Prepare as directed above, except stir instead of fish, turn the fish halfway through cooking. Fish is done...


