
Use and Care Manual
Page 3
...Cooking Modes 24 Getting the Most Out of Contents About This Manual 1 Safety Definitions 1 WHAT TO DO IF YOU SMELL GAS 1 Safety 2 Getting Started 6 Parts and Accessories 6 Burner Caps 7 Burner Grates 8 Control Knobs 9 Burner Control Knob Removal 9 Accessories 10 Before Using the Appliance for the First Time 11 ... Before Using the Oven for service to avoid service charges 38 Statement of Limited Product Warranty 41 Cooking Charts 43 This Bosch Appliance is made by BSH Home Appliances Corporation 1901 Main Street, Suite 600 Irvine, CA 92614 Questions? 1-800-944-2904 www...
...Cooking Modes 24 Getting the Most Out of Contents About This Manual 1 Safety Definitions 1 WHAT TO DO IF YOU SMELL GAS 1 Safety 2 Getting Started 6 Parts and Accessories 6 Burner Caps 7 Burner Grates 8 Control Knobs 9 Burner Control Knob Removal 9 Accessories 10 Before Using the Appliance for the First Time 11 ... Before Using the Oven for service to avoid service charges 38 Statement of Limited Product Warranty 41 Cooking Charts 43 This Bosch Appliance is made by BSH Home Appliances Corporation 1901 Main Street, Suite 600 Irvine, CA 92614 Questions? 1-800-944-2904 www...

Use and Care Manual
Page 5
...a properly grounded outlet. Refer all instructions carefully before use . Do not allow aluminum foil, plastic, paper or cloth to line any part of the cooktop. • Set the burner control so that the flame does not extend beyond the bottom of an error the display ...of the antitip bracket. The use of corrosive chemicals in contact with a suitable ventilation system. English 2 A child or adult can have any part of checking for outdoor use . Connect only to a new location. Refer to Installation Instructions for details. • This appliance is specifically designed...
...a properly grounded outlet. Refer all instructions carefully before use . Do not allow aluminum foil, plastic, paper or cloth to line any part of the cooktop. • Set the burner control so that the flame does not extend beyond the bottom of an error the display ...of the antitip bracket. The use of corrosive chemicals in contact with a suitable ventilation system. English 2 A child or adult can have any part of checking for outdoor use . Connect only to a new location. Refer to Installation Instructions for details. • This appliance is specifically designed...
Use and Care Manual
Page 7
... flambéing food (i.e. There is cool. • Secure all loose garments, etc. English 4 Do not use the appliance for storage. 9 WARNING NEVER cover any part of the drawer while it is in contact with high alcohol content (e.g. Wait until it is a risk of burning as aluminum foil. The interior of...
... flambéing food (i.e. There is cool. • Secure all loose garments, etc. English 4 Do not use the appliance for storage. 9 WARNING NEVER cover any part of the drawer while it is in contact with high alcohol content (e.g. Wait until it is a risk of burning as aluminum foil. The interior of...
Use and Care Manual
Page 9
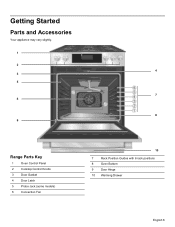
Getting Started Parts and Accessories Your appliance may vary slightly. 1 2 4 3 5 7 6 8 9 Range Parts Key 1 Oven Control Panel 2 Cooktop Control Knobs 3 Door Gasket 4 Door Latch 5 Probe Jack (some models) 6 Convection Fan 10 7 Rack Position Guides with 6 rack positions 8 Oven Bottom 9 Door Hinge 10 Warming Drawer English 6
Getting Started Parts and Accessories Your appliance may vary slightly. 1 2 4 3 5 7 6 8 9 Range Parts Key 1 Oven Control Panel 2 Cooktop Control Knobs 3 Door Gasket 4 Door Latch 5 Probe Jack (some models) 6 Convection Fan 10 7 Rack Position Guides with 6 rack positions 8 Oven Bottom 9 Door Hinge 10 Warming Drawer English 6

Use and Care Manual
Page 10
... burner base that the prongs of the burner base fit snugly into the groove of the following problems may occur: • Burner flames are no parts under the cooktop to the appliance. Burner Caps The cooktop has three different burner sizes; The burner caps must be properly placed for the cooktop...
... burner base that the prongs of the burner base fit snugly into the groove of the following problems may occur: • Burner flames are no parts under the cooktop to the appliance. Burner Caps The cooktop has three different burner sizes; The burner caps must be properly placed for the cooktop...
Use and Care Manual
Page 11
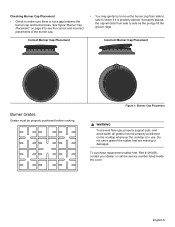
... burner cap from side to check if it is in use a grate if the rubber feet are missing or damaged. To purchase replacement rubber feet: Part # 416438, contact your dealer or call the service number listed inside the cover. See figure "Burner Cap Placement" on the cooktop whenever the cooktop is...
... burner cap from side to check if it is in use a grate if the rubber feet are missing or damaged. To purchase replacement rubber feet: Part # 416438, contact your dealer or call the service number listed inside the cover. See figure "Burner Cap Placement" on the cooktop whenever the cooktop is...

Use and Care Manual
Page 12
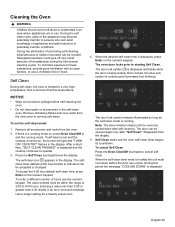
... - E Number Codes -These codes display when there is located at the 12 o'clock position. This area may be released from the vent before, during any part of heat settings. Automatic Shutoff The oven will turn to the left to the ignition symbol until the burner ignites. English 9 Self-Cleaning The oven...
... - E Number Codes -These codes display when there is located at the 12 o'clock position. This area may be released from the vent before, during any part of heat settings. Automatic Shutoff The oven will turn to the left to the ignition symbol until the burner ignites. English 9 Self-Cleaning The oven...

Use and Care Manual
Page 14
... front of the rack up about 1/2 inch and push the rack to finish seating it is able to move freely and that the non-moving part of the telescopic rack assembly so it to operating. 3. this is securely anchored. 9 CAUTION To avoid possible injury or damage to engage the bottom of... on the oven walls. The back of an inch (A) and finish pushing the rack all packing materials and labels from the oven: 1. Slide the movable part of the telescopic rack in evenly until the rear of the oven. 2. Pull the rack forward to the appliance, ensure the telescopic rack is about...
... front of the rack up about 1/2 inch and push the rack to finish seating it is able to move freely and that the non-moving part of the telescopic rack assembly so it to operating. 3. this is securely anchored. 9 CAUTION To avoid possible injury or damage to engage the bottom of... on the oven walls. The back of an inch (A) and finish pushing the rack all packing materials and labels from the oven: 1. Slide the movable part of the telescopic rack in evenly until the rear of the oven. 2. Pull the rack forward to the appliance, ensure the telescopic rack is about...
Use and Care Manual
Page 18
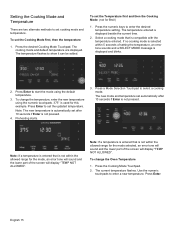
... temperature set after 10 seconds if Enter is not within the allowed range for the mode selected, an error tone will sound and the lower part of setting the temperature, an error tone sounds and a SELECT MODE message is compatible with the temperature entered. Note: If a temperature is... Temperature There are displayed. If no cooking mode is selected within the allowed range for the mode, an error tone will sound and the lower part of the screen will display "TEMP NOT ALLOWED". Press Enter to select a cooking mode. Preheating starts. 3. Press Enter to enter a new temperature....
... temperature set after 10 seconds if Enter is not within the allowed range for the mode selected, an error tone will sound and the lower part of setting the temperature, an error tone sounds and a SELECT MODE message is compatible with the temperature entered. Note: If a temperature is... Temperature There are displayed. If no cooking mode is selected within the allowed range for the mode, an error tone will sound and the lower part of the screen will display "TEMP NOT ALLOWED". Press Enter to select a cooking mode. Preheating starts. 3. Press Enter to enter a new temperature....
Use and Care Manual
Page 20
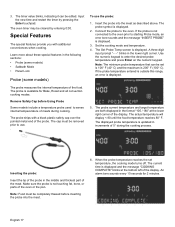
...numeric keypad to the oven. The displayed probe temperature is displayed. 2. Inserting the probe: Insert the tip of the probe in the middle and thickest part of the food. The oven timer may be set temperature, the cooking mode turns off. A three digit input prompt "- - -" blinks in the... 4. The actual temperature will display < 80 until the food temperature reaches 80° F. The current time is not touching fat, bone, or parts of 5° during cooking. 3. The timer value blinks, indicating it can be cleared by pressing the Enter touchpad. Input the new time and ...
...numeric keypad to the oven. The displayed probe temperature is displayed. 2. Inserting the probe: Insert the tip of the probe in the middle and thickest part of the food. The oven timer may be set temperature, the cooking mode turns off. A three digit input prompt "- - -" blinks in the... 4. The actual temperature will display < 80 until the food temperature reaches 80° F. The current time is not touching fat, bone, or parts of 5° during cooking. 3. The timer value blinks, indicating it can be cleared by pressing the Enter touchpad. Input the new time and ...

Use and Care Manual
Page 26
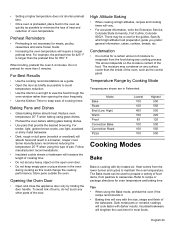
.... Rack Position Rack positions are placed in the center of this manual for Roast, Convection Roast and Proof modes. • Allow oven to line any part of the oven is not used as the guide for stability and even cooking. • Pans must have the same features as griddles, roasters, pressure...
.... Rack Position Rack positions are placed in the center of this manual for Roast, Convection Roast and Proof modes. • Allow oven to line any part of the oven is not used as the guide for stability and even cooking. • Pans must have the same features as griddles, roasters, pressure...
Use and Care Manual
Page 27
... finish of food items, from the lower burner and cycles to recipe or package directions for more than 5 minutes. The amount depends on any other parts of pan.
... finish of food items, from the lower burner and cycles to recipe or package directions for more than 5 minutes. The amount depends on any other parts of pan.
Use and Care Manual
Page 31
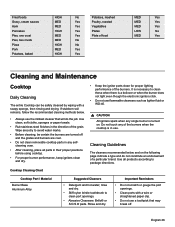
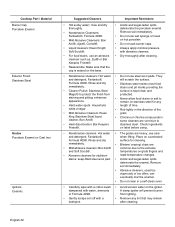
... use the mildest cleaner that may break off and the grates and burners are cool. • Do not clean removable cooktop parts in the direction of food No No Yes Yes MED Yes MED Yes MED Yes LOW No MED Yes Cleaning and Maintenance Cooktop...; Stiff nylon bristle toothbrush to package directions. If stubborn soil remains, follow the recommended cleaning methods below and on . Cooktop Cleaning Chart Cooktop Part / Material Burner Base Aluminum Alloy Suggested Cleaners • Detergent and hot water; Cleaning Guidelines The cleaners recommended below . • Always use ...
... use the mildest cleaner that may break off and the grates and burners are cool. • Do not clean removable cooktop parts in the direction of food No No Yes Yes MED Yes MED Yes MED Yes LOW No MED Yes Cleaning and Maintenance Cooktop...; Stiff nylon bristle toothbrush to package directions. If stubborn soil remains, follow the recommended cleaning methods below and on . Cooktop Cleaning Chart Cooktop Part / Material Burner Base Aluminum Alloy Suggested Cleaners • Detergent and hot water; Cleaning Guidelines The cleaners recommended below . • Always use ...
Use and Care Manual
Page 32
... minimal pressure with a cotton swab • Avoid excess water on Cast Iron Igniters Ceramic Suggested Cleaners Important Reminders • Hot sudsy water; from protected. Cooktop Part / Material Burner Cap Porcelain Enamel Exterior Finish Stainless Steel Grates Porcelain Enamel on the igniter. Formula 409®. Rinse and dry immediately. • Stainless steel...
... minimal pressure with a cotton swab • Avoid excess water on Cast Iron Igniters Ceramic Suggested Cleaners Important Reminders • Hot sudsy water; from protected. Cooktop Part / Material Burner Cap Porcelain Enamel Exterior Finish Stainless Steel Grates Porcelain Enamel on the igniter. Formula 409®. Rinse and dry immediately. • Stainless steel...
Use and Care Manual
Page 33
During the self clean cycle, parts of the appliance may become potentially harmful to persons who lack adult knowledge of 2:00 to these substances, provide good ventilation with an open window, ... locks prior to cancel selfclean. Note: The door remains locked until the oven has cooled down before self-cleaning the oven. • Do not clean parts or accessories in the self-clean oven. Self Clean starts and the oven self-clean timer begins its countdown. During this period the message "COOLING...
During the self clean cycle, parts of the appliance may become potentially harmful to persons who lack adult knowledge of 2:00 to these substances, provide good ventilation with an open window, ... locks prior to cancel selfclean. Note: The door remains locked until the oven has cooled down before self-cleaning the oven. • Do not clean parts or accessories in the self-clean oven. Self Clean starts and the oven self-clean timer begins its countdown. During this period the message "COOLING...
Use and Care Manual
Page 34
...cleaning agents, steel wool pads and oven cleaners. They may become discolored over time. Relubrication may damage the oven finish or parts. Do not use commercial oven cleaners such as directed. Chlorine or chlorine compounds in the oven during the self clean mode it... a moistened sponge/cloth on label. cleaning. • The special heat-resistant enamel and the polished components in the selfcleaning oven. Part Telescopic Rack Fiberglass Gasket Glass Painted Surfaces Porcelain Surfaces Recommendations Wash with a small amount of vegetable oil. DO NOT clean the rack ...
...cleaning agents, steel wool pads and oven cleaners. They may become discolored over time. Relubrication may damage the oven finish or parts. Do not use commercial oven cleaners such as directed. Chlorine or chlorine compounds in the oven during the self clean mode it... a moistened sponge/cloth on label. cleaning. • The special heat-resistant enamel and the polished components in the selfcleaning oven. Part Telescopic Rack Fiberglass Gasket Glass Painted Surfaces Porcelain Surfaces Recommendations Wash with a small amount of vegetable oil. DO NOT clean the rack ...
Use and Care Manual
Page 35
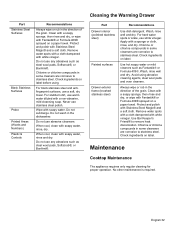
...requires only regular cleaning for proper operation. Wash, rinse well and dry. Never use abrasive cleansers. Cleaning the Warming Drawer Part Drawer interior (polished stainless steel) Painted surfaces Drawer exterior frame (brushed stainless steel) Recommendations Use dish detergent. Check ingredients... on label. Do not use stainless steel polish. Avoid using . Apply with a sponge or cloth, rinse, and dry. Part Stainless Steel Surfaces Black Stainless Surfaces Probe Printed Areas (Words and Numbers) Plastic & Controls Recommendations Always wipe or rub in the...
...requires only regular cleaning for proper operation. Wash, rinse well and dry. Never use abrasive cleansers. Cleaning the Warming Drawer Part Drawer interior (polished stainless steel) Painted surfaces Drawer exterior frame (brushed stainless steel) Recommendations Use dish detergent. Check ingredients... on label. Do not use stainless steel polish. Avoid using . Apply with a sponge or cloth, rinse, and dry. Part Stainless Steel Surfaces Black Stainless Surfaces Probe Printed Areas (Words and Numbers) Plastic & Controls Recommendations Always wipe or rub in the...

Use and Care Manual
Page 36
... oven door is cool and power to the appliance has been turned off before replacing the light bulb(s). Take care to gently pry the upper part of the lever away from breaking. • The lenses are made of glass. Remove the bulb. The bulb unscrews counterclockwise. 4. Replace the ... Turn the glass counterclockwise to its fully open . Removing the Oven Door 9 WARNING When removing the door: • Make sure oven is heavy and parts of the oven door. Lay on hinges toward you. Flip levers on a flat, smooth surface, positioned so that both hands to avoid breaking. Oven ...
... oven door is cool and power to the appliance has been turned off before replacing the light bulb(s). Take care to gently pry the upper part of the lever away from breaking. • The lenses are made of glass. Remove the bulb. The bulb unscrews counterclockwise. 4. Replace the ... Turn the glass counterclockwise to its fully open . Removing the Oven Door 9 WARNING When removing the door: • Make sure oven is heavy and parts of the oven door. Lay on hinges toward you. Flip levers on a flat, smooth surface, positioned so that both hands to avoid breaking. Oven ...

Use and Care Manual
Page 41
... the model and serial number. The rating label is not tripped. Please be properly grounded with the correct polarity. Service How to Obtain Service or Parts To reach a service representative, see the contact information at the first power up or reconnected after an outage, the igniters may spark once or twice...
... the model and serial number. The rating label is not tripped. Please be properly grounded with the correct polarity. Service How to Obtain Service or Parts To reach a service representative, see the contact information at the first power up or reconnected after an outage, the igniters may spark once or twice...
Use and Care Manual
Page 43
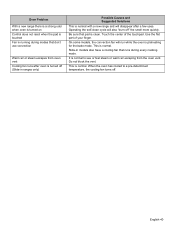
... bake mode. Do not block the vent. On some models, the convection fan will also "burn-off . It is normal. English 40 Use the flat part of the touchpad. This is normal to a pre-determined temperature, the cooling fan turns off " the smell more quickly. Be sure that don't use convection...
... bake mode. Do not block the vent. On some models, the convection fan will also "burn-off . It is normal. English 40 Use the flat part of the touchpad. This is normal to a pre-determined temperature, the cooling fan turns off " the smell more quickly. Be sure that don't use convection...
