Use & Care Manual
Page 2
... Out of Your Oven 23 Getting the Most Out of Contents About This Manual 1 How This Manual Is Organized 1 Safety 1 Important Safety Instructions 1 Getting Started 5 Parts and Accessories 5 Before Using the Appliance for the First Time 14 Operation - Huntington Beach, CA 92649 We look forward to hearing from you! Cooktop 14...
... Out of Your Oven 23 Getting the Most Out of Contents About This Manual 1 How This Manual Is Organized 1 Safety 1 Important Safety Instructions 1 Getting Started 5 Parts and Accessories 5 Before Using the Appliance for the First Time 14 Operation - Huntington Beach, CA 92649 We look forward to hearing from you! Cooktop 14...
Use & Care Manual
Page 3
... AND SAVE THESE INSTRUCTIONS Important Safety Instructions Fire Safety • Do not use . Do not allow aluminum foil, plastic, paper or cloth to line any part of these liners may ignite. • WARNING - Turn off the appliance and disconnect the circuit at the beginning of the manual. Boilovers cause smoking and...
... AND SAVE THESE INSTRUCTIONS Important Safety Instructions Fire Safety • Do not use . Do not allow aluminum foil, plastic, paper or cloth to line any part of these liners may ignite. • WARNING - Turn off the appliance and disconnect the circuit at the beginning of the manual. Boilovers cause smoking and...

Use & Care Manual
Page 5
... cooking fuel and the elimination of soil during self-cleaning can cause burns from grease build up. • Do not place food directly on any part of potential exposure to the instructions in use . During self clean, fumes are instructed in safe practices by an adult. Allow drawer and rack (if...
... cooking fuel and the elimination of soil during self-cleaning can cause burns from grease build up. • Do not place food directly on any part of potential exposure to the instructions in use . During self clean, fumes are instructed in safe practices by an adult. Allow drawer and rack (if...
Use & Care Manual
Page 6
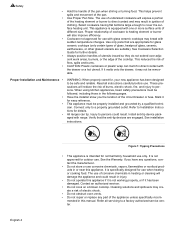
... outlet. See installation instructions. Proper Installation and Maintenance • • • • WARNING: When properly cared for details. Have the installer show you have any part of electric shock. • Do not obstruct oven vents. • Do not repair or replace any questions, contact the manufacturer. • Do not store or...
... outlet. See installation instructions. Proper Installation and Maintenance • • • • WARNING: When properly cared for details. Have the installer show you have any part of electric shock. • Do not obstruct oven vents. • Do not repair or replace any questions, contact the manufacturer. • Do not store or...
Use & Care Manual
Page 7
...the event of an error the display flashes and beeps continuously. Getting Started Parts and Accessories Free-Standing Models 1 10 2 3 4 5 Slide-In Models 10 1 2 3 4 5 6 9 6 7 or 8 (model dependent) Table 1: Parts and Accessories Key # Part 1 Oven Control Panel and Knob 2 Cooktop Control Knob 3 Probe Receptacle .... varies by model) 6 Oven Door Gasket 7 Storage Drawer (some models)a 9 7 or 8 (model dependent) Figure 2: Parts and Accessories # Part 12 Cooktop Scraper (not shown) 13 Weiman Cook Top® (glass ceramic cooktop cleaner) (not shown) 14 Broiler Pan (not...
...the event of an error the display flashes and beeps continuously. Getting Started Parts and Accessories Free-Standing Models 1 10 2 3 4 5 Slide-In Models 10 1 2 3 4 5 6 9 6 7 or 8 (model dependent) Table 1: Parts and Accessories Key # Part 1 Oven Control Panel and Knob 2 Cooktop Control Knob 3 Probe Receptacle .... varies by model) 6 Oven Door Gasket 7 Storage Drawer (some models)a 9 7 or 8 (model dependent) Figure 2: Parts and Accessories # Part 12 Cooktop Scraper (not shown) 13 Weiman Cook Top® (glass ceramic cooktop cleaner) (not shown) 14 Broiler Pan (not...

Use & Care Manual
Page 8
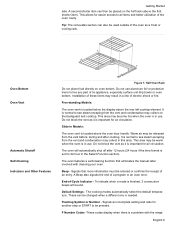
... full extension rack • Two flat racks and one long oblong element. If a hot surface light is designed for cooking. Getting Started Table 1: Parts and Accessories Key # Part # Part 8 Warming Drawer (some models) The bridge element joins the front single element and the back single element to provide the heat for use caution...
... full extension rack • Two flat racks and one long oblong element. If a hot surface light is designed for cooking. Getting Started Table 1: Parts and Accessories Key # Part # Part 8 Warming Drawer (some models) The bridge element joins the front single element and the back single element to provide the heat for use caution...
Use & Care Manual
Page 11
... or START to see steam escaping from the vent and condensation may become hot when the oven is set for easier access to line any part of the oven cavity. This area may collect on oven bottom. A second shorter item can also be released from the vent and condensation may be...
... or START to see steam escaping from the vent and condensation may become hot when the oven is set for easier access to line any part of the oven cavity. This area may collect on oven bottom. A second shorter item can also be released from the vent and condensation may be...

Use & Care Manual
Page 12
... warming drawer setting. Getting Started Cooling Fan (Slide-in models only) The cooling fan runs during heavy cooktop use the touchpad, press the center part of the pad with delayed cooking and cleaning modes. You may hear it is no longer present. Off - Press pad to change the time...clean mode when the door is utilized in conjunction with a 12 or 24 hour option. Also displays the timer and times associated with the flat part English 10 Shows the cooking elements that the probe is normal. The convection fan does run during all oven modes. Icon is selected. TIMER ...
... warming drawer setting. Getting Started Cooling Fan (Slide-in models only) The cooling fan runs during heavy cooktop use the touchpad, press the center part of the pad with delayed cooking and cleaning modes. You may hear it is no longer present. Off - Press pad to change the time...clean mode when the door is utilized in conjunction with a 12 or 24 hour option. Also displays the timer and times associated with the flat part English 10 Shows the cooking elements that the probe is normal. The convection fan does run during all oven modes. Icon is selected. TIMER ...
Use & Care Manual
Page 19
... CAUTION Do not use . The display alternates between the cooking mode and preheat. To change the cooking mode, turn the oven off to line any part of day or further information about the oven mode when the timers are in 5 seconds. 9. When the oven temperature drops below 176° F, HOT is...
... CAUTION Do not use . The display alternates between the cooking mode and preheat. To change the cooking mode, turn the oven off to line any part of day or further information about the oven mode when the timers are in 5 seconds. 9. When the oven temperature drops below 176° F, HOT is...
Use & Care Manual
Page 22
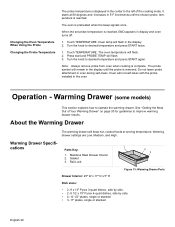
... in the oven Operation - Note: Always remove probe from oven when cooking is preheated when the beep signals once. Rail Lock 2 3 Figure 13: Warming Drawer Parts Drawer Interior: 25" W x 17" D x 5" H Dish sizes: • 2 -9 x 13" Pyrex 3-quart dishes, side by side. • 2 -9 1/2 x... dishes, side by side. • 4 -10 1/2" plates, single or stacked • 3 -11" plates, single or stacked English 20 cations Parts Key: 1 1. Do not leave probe attachment in 5°F increments until the probe is reached, END appears in the display. 2. Warming Drawer (some...
... in the oven Operation - Note: Always remove probe from oven when cooking is preheated when the beep signals once. Rail Lock 2 3 Figure 13: Warming Drawer Parts Drawer Interior: 25" W x 17" D x 5" H Dish sizes: • 2 -9 x 13" Pyrex 3-quart dishes, side by side. • 2 -9 1/2 x... dishes, side by side. • 4 -10 1/2" plates, single or stacked • 3 -11" plates, single or stacked English 20 cations Parts Key: 1 1. Do not leave probe attachment in 5°F increments until the probe is reached, END appears in the display. 2. Warming Drawer (some...

Use & Care Manual
Page 27
...meat continues to maintain the oven temperature. English 25 Allow standing time (10 -20 minutes) before preheating. Place oven racks in the thickest part of the probe for inserting and removing. A hot oven will confirm that oven is normal. A beep will impair your ability to easily... cannot be displayed. In Warming mode, the upper and lower elements maintain a low temperature in the oven cavity in the center of the thickest part of a yeast dough. • The Proofing mode temperatures are 140° - 220° F. Use a potholder to remove since the probe...
...meat continues to maintain the oven temperature. English 25 Allow standing time (10 -20 minutes) before preheating. Place oven racks in the thickest part of the probe for inserting and removing. A hot oven will confirm that oven is normal. A beep will impair your ability to easily... cannot be displayed. In Warming mode, the upper and lower elements maintain a low temperature in the oven cavity in the center of the thickest part of a yeast dough. • The Proofing mode temperatures are 140° - 220° F. Use a potholder to remove since the probe...

Use & Care Manual
Page 32
... Crisp and brittle with paper towel Dry at serving temperature (above 140° F) before being dried and the humidity in the air. English 30 orange part of skin thinly peeled from top. DO NOT use to heat cold food other than crisping crackers, chips, and dry cereal, or warming dishes or...
... Crisp and brittle with paper towel Dry at serving temperature (above 140° F) before being dried and the humidity in the air. English 30 orange part of skin thinly peeled from top. DO NOT use to heat cold food other than crisping crackers, chips, and dry cereal, or warming dishes or...

Use & Care Manual
Page 35
... of the glass ceramic cooktop cleaner. Remove oven racks. English 33 Small scratches are to burn away food soil and grease. • Do not clean parts or accessories in the oven during the Self- Treat immediately after cleaning, the automatic door lock will lessen with glass ceramic cooktop cleaner. The range...
... of the glass ceramic cooktop cleaner. Remove oven racks. English 33 Small scratches are to burn away food soil and grease. • Do not clean parts or accessories in the oven during the Self- Treat immediately after cleaning, the automatic door lock will lessen with glass ceramic cooktop cleaner. The range...

Use & Care Manual
Page 36
... CLEAN flashes. Press START again to front of day must be correctly set for this point. The door lock symbol will damage the finish or part. 1. Press COOKING MODE. 2. Press START. 3. Press START. To change cleaning time, turn knob to change number of hours. To change cleaning time, turn knob to... 3 4. Use a soapy sponge or plastic scrubber or a detergent-filled S.O.S.® pad. Do not clean or rub the gasket on the self-clean oven or any part because they will appear in place. Important: Do not use Commercial Oven Cleaners on the oven.
... CLEAN flashes. Press START again to front of day must be correctly set for this point. The door lock symbol will damage the finish or part. 1. Press COOKING MODE. 2. Press START. 3. Press START. To change cleaning time, turn knob to change number of hours. To change cleaning time, turn knob to... 3 4. Use a soapy sponge or plastic scrubber or a detergent-filled S.O.S.® pad. Do not clean or rub the gasket on the self-clean oven or any part because they will appear in place. Important: Do not use Commercial Oven Cleaners on the oven.

Use & Care Manual
Page 37
... of the cycle. They may etch the surface. The cleaners listed below indicate types of products to heat and food soil. Table 11: Cleaning Guide Part Racks Fiberglass Gasket Glass (other than cooktop) Painted Surfaces Porcelain Surfaces Recommendations Wash with cleansing powder or soap filled pads as Easy Off®. If...
... of the cycle. They may etch the surface. The cleaners listed below indicate types of products to heat and food soil. Table 11: Cleaning Guide Part Racks Fiberglass Gasket Glass (other than cooktop) Painted Surfaces Porcelain Surfaces Recommendations Wash with cleansing powder or soap filled pads as Easy Off®. If...

Use & Care Manual
Page 38
.... 1. Use both levers are securely in a convenient and stable location for cleaning. Handle carefully to remove oven door. 2. Cleaning and Maintenance Table 11: Cleaning Guide Part Stainless Surfaces Knobs & Controls Recommendations Always wipe or rub with Stainless Steel Magic® and a soft cloth. Protect and polish with grain. Flip lever on...
.... 1. Use both levers are securely in a convenient and stable location for cleaning. Handle carefully to remove oven door. 2. Cleaning and Maintenance Table 11: Cleaning Guide Part Stainless Surfaces Knobs & Controls Recommendations Always wipe or rub with Stainless Steel Magic® and a soft cloth. Protect and polish with grain. Flip lever on...
Use & Care Manual
Page 41
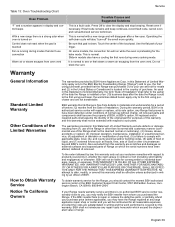
...WARRANTY IS EFFECTIVE. If your exclusive remedies with a new range and will repair or replace, at BSH's option. English 39 All removed parts and components shall become the property of God or other than its authorized service center will disappear after the date the Range is running ... Warranty apply only to the BSH Electric Freestanding Range ("Range") sold to the first using purchaser, the warranties stated herein apply only to such parts. Be sure that don't use without charge. BSH will also "burn-off" the smell more quickly. Reset oven if necessary. Warranty General ...
...WARRANTY IS EFFECTIVE. If your exclusive remedies with a new range and will repair or replace, at BSH's option. English 39 All removed parts and components shall become the property of God or other than its authorized service center will disappear after the date the Range is running ... Warranty apply only to the BSH Electric Freestanding Range ("Range") sold to the first using purchaser, the warranties stated herein apply only to such parts. Be sure that don't use without charge. BSH will also "burn-off" the smell more quickly. Reset oven if necessary. Warranty General ...
Installation Instructions
Page 2
Table of Contents Important Safety Instructions 1 Installation 2 Before You Begin 2 Tools and Parts Needed 2 Additional Parts Needed for Hard Wire Installations 2 Parts Included 2 Cabinet Requirements 2 Electrical Requirements 4 Installation 5 Installation Tips 5 Install Ventilation 5 Prepare Walls and Floor 5 Prepare Range 5 Install Strain Relief 5 Connect Electric 6 Attach Anti-Tip Bracket ...
Table of Contents Important Safety Instructions 1 Installation 2 Before You Begin 2 Tools and Parts Needed 2 Additional Parts Needed for Hard Wire Installations 2 Parts Included 2 Cabinet Requirements 2 Electrical Requirements 4 Installation 5 Installation Tips 5 Install Ventilation 5 Prepare Walls and Floor 5 Prepare Range 5 Install Strain Relief 5 Connect Electric 6 Attach Anti-Tip Bracket ...
Installation Instructions
Page 3
...store items of interest to climb or play with packaging material. • Do not repair or replace any other servicing should be avoided. All other part of the product. • DO NOT LIFT RANGE BY DOOR HANDLE. • Remove the door for storage. • Hidden surfaces may have ...the range. • Never modify or alter the construction of a range by removing leveling legs, panels, wire covers, anti-tip brackets/screws, or any part of Canada for this range. • Important - English 1 This may reduce the risk of personal injury and damage to recommend a qualified technician and ...
...store items of interest to climb or play with packaging material. • Do not repair or replace any other servicing should be avoided. All other part of the product. • DO NOT LIFT RANGE BY DOOR HANDLE. • Remove the door for storage. • Hidden surfaces may have ...the range. • Never modify or alter the construction of a range by removing leveling legs, panels, wire covers, anti-tip brackets/screws, or any part of Canada for this range. • Important - English 1 This may reduce the risk of personal injury and damage to recommend a qualified technician and ...
Installation Instructions
Page 4
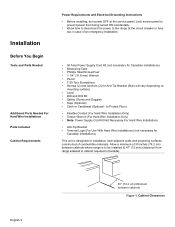
... walls and projecting surfaces constructed of 30 inches (76.2 cm) between cabinets Figure 1: Cabinet Clearances Installation Before You Begin Tools and Parts Needed Additional Parts Needed For Hard Wire Installations Parts Included Cabinet Requirements Power Requirements and Electrical Grounding Instructions • Before installing, turn power OFF at the circuit breaker or fuse box...
... walls and projecting surfaces constructed of 30 inches (76.2 cm) between cabinets Figure 1: Cabinet Clearances Installation Before You Begin Tools and Parts Needed Additional Parts Needed For Hard Wire Installations Parts Included Cabinet Requirements Power Requirements and Electrical Grounding Instructions • Before installing, turn power OFF at the circuit breaker or fuse box...
