Use & Care Manual
Page 2
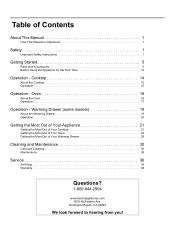
... Getting the Most Out of Your Cooktop 21 Getting the Most Out of Your Oven 23 Getting the Most Out of Contents About This Manual 1 How This Manual Is Organized 1 Safety 1 Important Safety Instructions 1 Getting Started 5 Parts and Accessories 5 Before Using the Appliance for the First Time 14 Operation - Oven 16 About...
... Getting the Most Out of Your Cooktop 21 Getting the Most Out of Your Oven 23 Getting the Most Out of Contents About This Manual 1 How This Manual Is Organized 1 Safety 1 Important Safety Instructions 1 Getting Started 5 Parts and Accessories 5 Before Using the Appliance for the First Time 14 Operation - Oven 16 About...
Use & Care Manual
Page 3
...; Always have a working smoke detector near the burners or elements. Boilovers cause smoking and greasy spillovers may result in a risk of the manual. For example, never use the appliance for storage. • Do not allow pans to read this appliance only for its intended use aluminum... foil or protective liners to the Important Safety Instructions located at the circuit breaker box. • Use this manual. Do not allow aluminum foil, plastic, paper or cloth to clean and maintain your range. • The Service section includes troubleshooting tips...
...; Always have a working smoke detector near the burners or elements. Boilovers cause smoking and greasy spillovers may result in a risk of the manual. For example, never use the appliance for storage. • Do not allow pans to read this appliance only for its intended use aluminum... foil or protective liners to the Important Safety Instructions located at the circuit breaker box. • Use this manual. Do not allow aluminum foil, plastic, paper or cloth to clean and maintain your range. • The Service section includes troubleshooting tips...

Use & Care Manual
Page 5
... the cooktop only when necessary. Children and pets should never be left alone or unattended in the area where the appliance is in use this manual. • Do not clean the appliance while it does not hang loose, and do not wear loose fitting clothing or hanging garments, such as overheating...
... the cooktop only when necessary. Children and pets should never be left alone or unattended in the area where the appliance is in use this manual. • Do not clean the appliance while it does not hang loose, and do not wear loose fitting clothing or hanging garments, such as overheating...
Use & Care Manual
Page 6
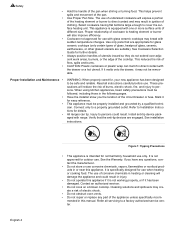
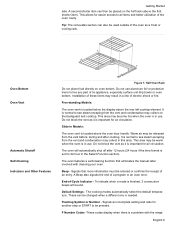
... not be safe and reliable. English 4 Figure 1: Tipping Precautions • This appliance is intended for use corrosive chemicals, vapors, flammables or nonfood products in this manual. If you the location of the circuit breaker or fuse. Cleaning solutions and spillovers may create a risk of electric shock. • Do not obstruct oven...
... not be safe and reliable. English 4 Figure 1: Tipping Precautions • This appliance is intended for use corrosive chemicals, vapors, flammables or nonfood products in this manual. If you the location of the circuit breaker or fuse. Cleaning solutions and spillovers may create a risk of electric shock. • Do not obstruct oven...
Use & Care Manual
Page 11
... of the oven as it is set for air circulation. End-of an entry. These can also be pressed. Beep - English 9 Signals that eliminates the manual labor involved with the range.
... of the oven as it is set for air circulation. End-of an entry. These can also be pressed. Beep - English 9 Signals that eliminates the manual labor involved with the range.
Use & Care Manual
Page 16
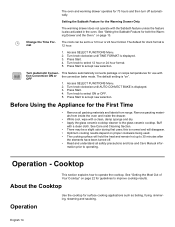
... can be a slight odor during first uses; OFF 1. Before Using the Appliance for the First Time • Remove all safety precautions and Use and Care Manual infor- See Care and Cleaning Section. • There may be set to select ON or OFF. 5. Access SELECT FUNCTIONS Menu. 2. Press Start. 4. Turn knob to...
... can be a slight odor during first uses; OFF 1. Before Using the Appliance for the First Time • Remove all safety precautions and Use and Care Manual infor- See Care and Cleaning Section. • There may be set to select ON or OFF. 5. Access SELECT FUNCTIONS Menu. 2. Press Start. 4. Turn knob to...
Use & Care Manual
Page 19
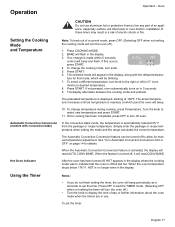
.... 2. To select a different temperature, turn knob. 5. See "Turn Automatic Convection Conversion ON or OFF" on in use aluminum foil or protective liners to allow for manual temperature adjustment. When the oven temperature drops below 176° F, HOT is activated, the display will turn the oven off to line any part of...
.... 2. To select a different temperature, turn knob. 5. See "Turn Automatic Convection Conversion ON or OFF" on in use aluminum foil or protective liners to allow for manual temperature adjustment. When the oven temperature drops below 176° F, HOT is activated, the display will turn the oven off to line any part of...

Use & Care Manual
Page 28
... recipe temperature when setting the mode and the range calculates the correct temperature. See "Turn Automatic Convection Conversion ON or OFF" on page 14 for manual temperature adjustment. It can be used to side on multiple racks. mends holding hot food at once For Best Results: • Reduce recipe temperature by...
... recipe temperature when setting the mode and the range calculates the correct temperature. See "Turn Automatic Convection Conversion ON or OFF" on page 14 for manual temperature adjustment. It can be used to side on multiple racks. mends holding hot food at once For Best Results: • Reduce recipe temperature by...
Use & Care Manual
Page 29
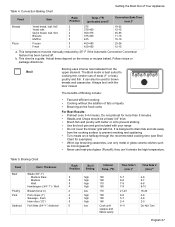
... easily Do Not Turn English 27 Table 4: Convection Baking Chart Getting the Most Out of meat (1" or less), poultry and fish. they can also be manually reduced by 25° F if the Automatic Convection Conversion feature has been turned off. It is a guide. b. This temperature must be used to cooking thin...
... easily Do Not Turn English 27 Table 4: Convection Baking Chart Getting the Most Out of meat (1" or less), poultry and fish. they can also be manually reduced by 25° F if the Automatic Convection Conversion feature has been turned off. It is a guide. b. This temperature must be used to cooking thin...

Use & Care Manual
Page 35
... the cooktop. Small scratches are smooth, clean, and dry before opening the door to remove metal marks before using pans with bases that eliminates the manual labor involved with Self-Clean. In time, small scratches will lessen with a dampened paper towel. Rinse and dry. rinse thoroughly and dry. Apply glass ceramic...
... the cooktop. Small scratches are smooth, clean, and dry before opening the door to remove metal marks before using pans with bases that eliminates the manual labor involved with Self-Clean. In time, small scratches will lessen with a dampened paper towel. Rinse and dry. rinse thoroughly and dry. Apply glass ceramic...

Use & Care Manual
Page 40
...if hinge is proper electrical power to boil. See "Boiling Water" on page 22 for rack positions, cooking times and pan selection. Review manual instructions when setting clock, timer, or Self-Clean. Make sure there is bent. Refer to oven. Adjust oven calibration if necessary (see ... recommended rack position. Refer to provide accurate results. The oven is consistently too brown or too light. However, the temperature can be manually reduced by 25°F. See "Change the Oven Temperature Offset" on page 13. If the Automatic Convection Conversion Feature is not working ...
...if hinge is proper electrical power to boil. See "Boiling Water" on page 22 for rack positions, cooking times and pan selection. Review manual instructions when setting clock, timer, or Self-Clean. Make sure there is bent. Refer to oven. Adjust oven calibration if necessary (see ... recommended rack position. Refer to provide accurate results. The oven is consistently too brown or too light. However, the temperature can be manually reduced by 25°F. See "Change the Oven Temperature Offset" on page 13. If the Automatic Convection Conversion Feature is not working ...
Installation Instructions
Page 3
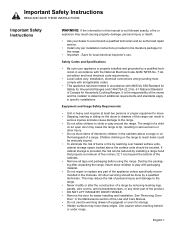
... Household Cooking Ranges. English 1 Important Safety Instructions READ AND SAVE THESE INSTRUCTIONS Important Safety Instructions WARNING: If the information in this manual is not followed exactly, a fire or explosion may result causing property damage, personal injury or death. • Ask your appliance...a qualified technician. This may reduce the risk of personal injury and damage to determine if additional requirements and standards apply in the manuals. Equipment and Usage Safety Requirements • Unit is the responsibility of the product. • DO NOT LIFT RANGE BY DOOR ...
... Household Cooking Ranges. English 1 Important Safety Instructions READ AND SAVE THESE INSTRUCTIONS Important Safety Instructions WARNING: If the information in this manual is not followed exactly, a fire or explosion may result causing property damage, personal injury or death. • Ask your appliance...a qualified technician. This may reduce the risk of personal injury and damage to determine if additional requirements and standards apply in the manuals. Equipment and Usage Safety Requirements • Unit is the responsibility of the product. • DO NOT LIFT RANGE BY DOOR ...
Installation Instructions
Page 7
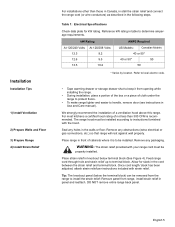
... recommended. Once cord length/ slack has been adjusted, attach strain relief per instructions included with the hood. English 5 Reference kW rating in Use and Care manual). Remove any packaging. Place strain relief in the following steps. Installation Installation Tips 1) Install Ventilation 2) Prepare Walls and Floor 3) Prepare Range 4) Install Strain Relief For...
... recommended. Once cord length/ slack has been adjusted, attach strain relief per instructions included with the hood. English 5 Reference kW rating in Use and Care manual). Remove any packaging. Place strain relief in the following steps. Installation Installation Tips 1) Install Ventilation 2) Prepare Walls and Floor 3) Prepare Range 4) Install Strain Relief For...
Installation Instructions
Page 8
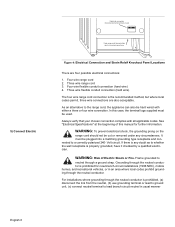
... wire flexible conduit connection (hard wire) The four wire range cord connection is properly grounded, have it checked by a qualified electrician. Volt circuit. In this manual for new branch-circuit installations (1996 NEC), mobile homes, and recreational vehicles, or in usual manner English 6 WARNING: To prevent electrical shock, the grounding prong...
... wire flexible conduit connection (hard wire) The four wire range cord connection is properly grounded, have it checked by a qualified electrician. Volt circuit. In this manual for new branch-circuit installations (1996 NEC), mobile homes, and recreational vehicles, or in usual manner English 6 WARNING: To prevent electrical shock, the grounding prong...
Installation Instructions
Page 12
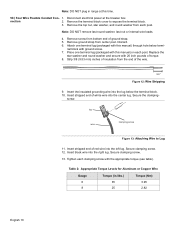
... cover to Lug 11. Note: DO NOT plug in ./lbs.) Torque (Nm) 6 35 3.95 8 25 2.82 English 10 Place one terminal lug (packaged with this manual) on each post. Remove ground strap from the end of the wire. 3/8 " Figure 12: Wire Stripping 9. Disconnect electrical power at this...
... cover to Lug 11. Note: DO NOT plug in ./lbs.) Torque (Nm) 6 35 3.95 8 25 2.82 English 10 Place one terminal lug (packaged with this manual) on each post. Remove ground strap from the end of the wire. 3/8 " Figure 12: Wire Stripping 9. Disconnect electrical power at this...
Installation Instructions
Page 13
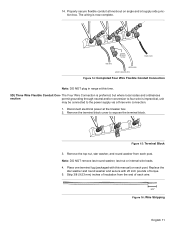
... black wire red wire white wire green ground wire Figure 14: Completed Four Wire Flexible Conduit Connection Note: DO NOT plug in range at this manual) on angle and at supply side junction box. Figure 15: Terminal Block 3. Remove the top nut, star washer, and round washer from the end of...
... black wire red wire white wire green ground wire Figure 14: Completed Four Wire Flexible Conduit Connection Note: DO NOT plug in range at this manual) on angle and at supply side junction box. Figure 15: Terminal Block 3. Remove the top nut, star washer, and round washer from the end of...

Installation Instructions
Page 15
... as described in tipping of the range. tip bracket. Turn on an open door), failure to take this precaution could result in Use and Care Manual. • A risk of tip-over . 4. Carefully tip range forward to plug into position ensuring that the Anti-Tip Device is properly reengaged when the range...
... as described in tipping of the range. tip bracket. Turn on an open door), failure to take this precaution could result in Use and Care Manual. • A risk of tip-over . 4. Carefully tip range forward to plug into position ensuring that the Anti-Tip Device is properly reengaged when the range...

Installation Instructions
Page 16
Service Data Tag CAUTION: If the display flashes and beeps, the polarity of the manual . Please be reversed. Open the drawer to Step 5Connect Electric. The data tag is on the appliance. English 14 Immediately switch off power at the front of the wiring may be prepared to provide the information from the data tag on the appliance frame near the drawer. Reversed polarity can damage the range and can result in electrical shock hazard. To reach a service representative, see the contact information at the breaker and return to view it.
Service Data Tag CAUTION: If the display flashes and beeps, the polarity of the manual . Please be reversed. Open the drawer to Step 5Connect Electric. The data tag is on the appliance. English 14 Immediately switch off power at the front of the wiring may be prepared to provide the information from the data tag on the appliance frame near the drawer. Reversed polarity can damage the range and can result in electrical shock hazard. To reach a service representative, see the contact information at the breaker and return to view it.


