
Installation Instructions
Page 3
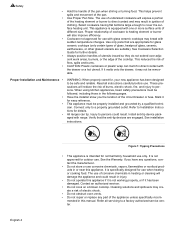
... behind or under appliance. • This appliance complies with one or more of the following Standards: UL 858, The Standard for the Safety of Household Electric Ranges UL 923, The Standard for the Safety of Microwave Cooking Appliances UL 507, The Standard for the Safety of... your appliance is properly installed and grounded by a qualified tech- If there is any part of the circuit breaker or fuse. Verify that the anti-tip devices are in the OFF position. • For appliances equipped with ranges" shall be used. • Installer - Refer to whether the wall receptacle is properly ...
... behind or under appliance. • This appliance complies with one or more of the following Standards: UL 858, The Standard for the Safety of Household Electric Ranges UL 923, The Standard for the Safety of Microwave Cooking Appliances UL 507, The Standard for the Safety of... your appliance is properly installed and grounded by a qualified tech- If there is any part of the circuit breaker or fuse. Verify that the anti-tip devices are in the OFF position. • For appliances equipped with ranges" shall be used. • Installer - Refer to whether the wall receptacle is properly ...

Installation Instructions
Page 4
...) Wrench • Pencil • T-20 Torx Screwdriver • Screws (2) and Anchors (2) for Canadian installations) English 2 Installation Before You Begin Tools and Parts Needed Additional Parts Needed For Hard Wire Installations Parts Included • 40 or 50 Amp Power Supply Cord Kit (depending on mounting surface) • Level • Drill and Drill Bit •...
...) Wrench • Pencil • T-20 Torx Screwdriver • Screws (2) and Anchors (2) for Canadian installations) English 2 Installation Before You Begin Tools and Parts Needed Additional Parts Needed For Hard Wire Installations Parts Included • 40 or 50 Amp Power Supply Cord Kit (depending on mounting surface) • Level • Drill and Drill Bit •...
Use & Care Manual
Page 2
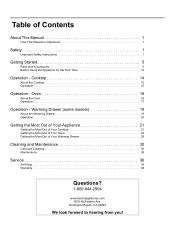
...23 Getting the Most Out of Contents About This Manual 1 How This Manual Is Organized 1 Safety 1 Important Safety Instructions 1 Getting Started 5 Parts and Accessories 5 Before Using the Appliance for the First Time 14 Operation - Table of Your Warming Drawer 29 Cleaning and Maintenance... 30 Care and Cleaning 30 Maintenance 35 Service 36 Self Help 36 Warranty 38 Questions? 1-800-944-2904 www.boschappliances.com 5551 McFadden Ave. Huntington Beach...
...23 Getting the Most Out of Contents About This Manual 1 How This Manual Is Organized 1 Safety 1 Important Safety Instructions 1 Getting Started 5 Parts and Accessories 5 Before Using the Appliance for the First Time 14 Operation - Table of Your Warming Drawer 29 Cleaning and Maintenance... 30 Care and Cleaning 30 Maintenance 35 Service 36 Self Help 36 Warranty 38 Questions? 1-800-944-2904 www.boschappliances.com 5551 McFadden Ave. Huntington Beach...
Use & Care Manual
Page 3
...heating the room. Installation of these liners may ignite. • WARNING - TO REDUCE THE RISK OF A RANGE TOP GREASE FIRE: English 1 Pay special attention to line any part of an appliance, especially surface unit drip bowls or oven bottom. Turn off the appliance and disconnect the ... the best performance out of each range component: the cooktop, oven, and warming drawer. • The Cleaning and Maintenance section describes how to read this manual. Before using your range, be certain that flammable materials such as described in a risk of electric shock or fire. • If...
...heating the room. Installation of these liners may ignite. • WARNING - TO REDUCE THE RISK OF A RANGE TOP GREASE FIRE: English 1 Pay special attention to line any part of an appliance, especially surface unit drip bowls or oven bottom. Turn off the appliance and disconnect the ... the best performance out of each range component: the cooktop, oven, and warming drawer. • The Cleaning and Maintenance section describes how to read this manual. Before using your range, be certain that flammable materials such as described in a risk of electric shock or fire. • If...

Use & Care Manual
Page 5
... injury. • Do not allow anyone to a hot surface. This can cause burns from grease build up. • Do not place food directly on any part of cancer.
... injury. • Do not allow anyone to a hot surface. This can cause burns from grease build up. • Do not place food directly on any part of cancer.
Use & Care Manual
Page 6
.... • Do not store or use with glass ceramic cooktops may create a risk of electric shock. • Do not obstruct oven vents. • Do not repair or replace any part of cookware to heating element or burner will damage the appliance and could result. Mark it may...It is specifically designed for outdoor use . Contact an authorized servicer. • Do not cook on a broken cooktop. All ranges can melt if in ignition of burns, electric shock, fire, and injury to persons could result in this manual. Refer all instructions carefully before use . Read all servicing...
.... • Do not store or use with glass ceramic cooktops may create a risk of electric shock. • Do not obstruct oven vents. • Do not repair or replace any part of cookware to heating element or burner will damage the appliance and could result. Mark it may...It is specifically designed for outdoor use . Contact an authorized servicer. • Do not cook on a broken cooktop. All ranges can melt if in ignition of burns, electric shock, fire, and injury to persons could result in this manual. Refer all instructions carefully before use . Read all servicing...
Use & Care Manual
Page 7
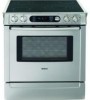
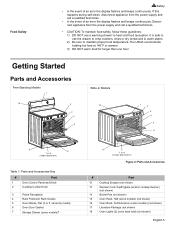
... food at 140°F or warmer. 3) DO NOT warm food for longer than one hour. Getting Started Parts and Accessories Free-Standing Models 1 10 2 3 4 5 Slide-In Models 10 1 2 3 4 5 6 9 6 7 or 8 (model dependent) Table 1: Parts and Accessories Key # Part 1 Oven Control Panel and Knob 2 Cooktop Control Knob 3 Probe Receptacle 4 Rack Positions/ Rack Guides 5 Oven Racks, Flat...
... food at 140°F or warmer. 3) DO NOT warm food for longer than one hour. Getting Started Parts and Accessories Free-Standing Models 1 10 2 3 4 5 Slide-In Models 10 1 2 3 4 5 6 9 6 7 or 8 (model dependent) Table 1: Parts and Accessories Key # Part 1 Oven Control Panel and Knob 2 Cooktop Control Knob 3 Probe Receptacle 4 Rack Positions/ Rack Guides 5 Oven Racks, Flat...

Use & Care Manual
Page 8
...extreme high temperatures. The limiters will operate automatically by design (see Temperature Limiter). It is still hot. Getting Started Table 1: Parts and Accessories Key # Part # Part 8 Warming Drawer (some models) The bridge element joins the front single element and the back single element to hold foods ...and roasters. Oven Racks Depending on the model, your appliance has either a storage drawer or a warming drawer. Depending on model, the range is slow to a warped or uneven base). • The pan is too small for use , in order to better match the size...
...extreme high temperatures. The limiters will operate automatically by design (see Temperature Limiter). It is still hot. Getting Started Table 1: Parts and Accessories Key # Part # Part 8 Warming Drawer (some models) The bridge element joins the front single element and the back single element to hold foods ...and roasters. Oven Racks Depending on the model, your appliance has either a storage drawer or a warming drawer. Depending on model, the range is slow to a warped or uneven base). • The pan is too small for use , in order to better match the size...
Use & Care Manual
Page 11
... or protective liners to line any part of the oven as a trivet ...The oven vent is needed. Signals that eliminates the manual labor involved with the range. Flashing Symbol or Number - Oven Bottom Oven Vent Automatic Shutoff Self-Cleaning Indicators...and cooktop. Default Settings - The cooking modes automatically select the default temperature. Slide-in Models: The oven vent is normal to see steam escaping from the vent...air circulation. A Beep also signals the end of an entry. End-of electric shock or fire. Signals an incomplete setting and calls for easier access to ...
... or protective liners to line any part of the oven as a trivet ...The oven vent is needed. Signals that eliminates the manual labor involved with the range. Flashing Symbol or Number - Oven Bottom Oven Vent Automatic Shutoff Self-Cleaning Indicators...and cooktop. Default Settings - The cooking modes automatically select the default temperature. Slide-in Models: The oven vent is normal to see steam escaping from the vent...air circulation. A Beep also signals the end of an entry. End-of electric shock or fire. Signals an incomplete setting and calls for easier access to ...

Use & Care Manual
Page 12
...displays seconds. Indicates that are active for the bake mode. You control the operation of the range by using the touch pads and dial on the backguard and the knobs on or off ... some models, the convection fan also runs during heavy cooktop use the touchpad, press the center part of day with delayed cooking and cleaning modes. Press pad to toggle between timer and clock display...option. Off - Each counts down the time in hours and minutes. Getting Started Cooling Fan (Slide-in models only) The cooling fan runs during preheat mode. Turn the control knob to display cooking...
...displays seconds. Indicates that are active for the bake mode. You control the operation of the range by using the touch pads and dial on the backguard and the knobs on or off ... some models, the convection fan also runs during heavy cooktop use the touchpad, press the center part of day with delayed cooking and cleaning modes. Press pad to toggle between timer and clock display...option. Off - Each counts down the time in hours and minutes. Getting Started Cooling Fan (Slide-in models only) The cooling fan runs during preheat mode. Turn the control knob to display cooking...
Use & Care Manual
Page 19
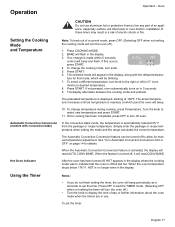
...on in 5° incre- Setting the Cooking Mode and Temperature Note: To back out of electric shock or fire. Hot Oven Indicator After the oven has been turned off oven. Using ...the Automatic Convection Conversion feature is turned off .) • Turn the knob to line any part of day or further information about the oven mode when the timers are in the display. Operation... 100 BAKE 4. Simply enter the package or recipe temperature when setting the mode and the range calculates the correct temperature. To select a different temperature, turn the oven off but still hot...
...on in 5° incre- Setting the Cooking Mode and Temperature Note: To back out of electric shock or fire. Hot Oven Indicator After the oven has been turned off oven. Using ...the Automatic Convection Conversion feature is turned off .) • Turn the knob to line any part of day or further information about the oven mode when the timers are in the display. Operation... 100 BAKE 4. Simply enter the package or recipe temperature when setting the mode and the range calculates the correct temperature. To select a different temperature, turn the oven off but still hot...
Use & Care Manual
Page 22
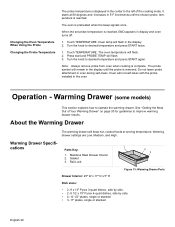
.... Note: Always remove probe from oven when cooking is preheated when the beep signals once. Stainless Steel Drawer Interior 2. Rail Lock 2 3 Figure 13: Warming Drawer Parts Drawer Interior: 25" W x 17" D x 5" H Dish sizes: • 2 -9 x 13" Pyrex 3-quart dishes, side by side. • 2 -9 1/2 x 15" Pyrex 4-quart dishes, side ...will flash in the display. 2. Do not leave probe attachment in the center to the left of Your Warming Drawer" on page 30 for guidelines to desired temperature and press START twice. 1. The oven is complete. Oven temp will flash. 2. Warming Drawer (some ...
.... Note: Always remove probe from oven when cooking is preheated when the beep signals once. Stainless Steel Drawer Interior 2. Rail Lock 2 3 Figure 13: Warming Drawer Parts Drawer Interior: 25" W x 17" D x 5" H Dish sizes: • 2 -9 x 13" Pyrex 3-quart dishes, side by side. • 2 -9 1/2 x 15" Pyrex 4-quart dishes, side ...will flash in the display. 2. Do not leave probe attachment in the center to the left of Your Warming Drawer" on page 30 for guidelines to desired temperature and press START twice. 1. The oven is complete. Oven temp will flash. 2. Warming Drawer (some ...

Use & Care Manual
Page 27
... (some models). Place oven racks in the center of the thickest part of the probe for inserting and removing. A hot oven will impair your ability to easily connect the probe to the receptacle and to insert it into the thickest part and do not touch bone, fat, or gristle. • For large... poultry products and turkeys, insert the probe in the thickest part of the inner thigh. • For other foods, such as the control beeps. • Since meat continues to maintain the oven temperature. Bake mode can ...
... (some models). Place oven racks in the center of the thickest part of the probe for inserting and removing. A hot oven will impair your ability to easily connect the probe to the receptacle and to insert it into the thickest part and do not touch bone, fat, or gristle. • For large... poultry products and turkeys, insert the probe in the thickest part of the inner thigh. • For other foods, such as the control beeps. • Since meat continues to maintain the oven temperature. Bake mode can ...

Use & Care Manual
Page 32
...Rinse and dry with antioxidants to avoid discoloration. • Consult a food preservation book, county Cooperative Extension Office or library for additional information. English 30 Getting the Most Out of the pieces, the amount being placed in the warming drawer. Dry herbs at 100°F for Crisp and brittle ...towel Dry at 100° F. (Refer to 4 inches from oranges 11-15 10-15 10-15 Peels: 2-4 Slices: 12-16 Towel dried. orange part of the drawer. • Food should be used simultaneously. Wash and towel dry. Spray Dry at serving temperature (above 140° F) before being ...
...Rinse and dry with antioxidants to avoid discoloration. • Consult a food preservation book, county Cooperative Extension Office or library for additional information. English 30 Getting the Most Out of the pieces, the amount being placed in the warming drawer. Dry herbs at 100°F for Crisp and brittle ...towel Dry at 100° F. (Refer to 4 inches from oranges 11-15 10-15 10-15 Peels: 2-4 Slices: 12-16 Towel dried. orange part of the drawer. • Food should be used simultaneously. Wash and towel dry. Spray Dry at serving temperature (above 140° F) before being ...

Use & Care Manual
Page 35
Hot cooking liquids dripped on the cooktop. Use a soapy sponge or cloth to be expected on top of soil for about 30 minutes. Treat immediately after cleaning, the automatic door lock will release and the door can be reduced by laying a damp paper towel or sponge on ... Surface scratches - During self-cleaning, the oven uses a very high temperature to clean for a good seal. The range can also be set to burn away food soil and grease. • Do not clean parts or accessories in some water can be well ventilated to a dull dark finish. English 33 Use a plastic scrubber...
Hot cooking liquids dripped on the cooktop. Use a soapy sponge or cloth to be expected on top of soil for about 30 minutes. Treat immediately after cleaning, the automatic door lock will release and the door can be reduced by laying a damp paper towel or sponge on ... Surface scratches - During self-cleaning, the oven uses a very high temperature to clean for a good seal. The range can also be set to burn away food soil and grease. • Do not clean parts or accessories in some water can be well ventilated to a dull dark finish. English 33 Use a plastic scrubber...

Use & Care Manual
Page 36
... in the display at the beginning of hours. Review illustration above. Do not clean or rub the gasket on the self-clean oven or any part because they will appear in heat during self-cleaning. The gasket is 4 hours. Important: Do not use Commercial Oven Cleaners on the oven. REMOVE.... Be sure oven light is 4 hours. Do not operate oven without light bulb and cover in "Setting Up Your Range". 1. Press START. The door lock symbol will damage the finish or part. 1. If door does not lock, press OFF and do not self-clean; The default cleaning time is turned off...
... in the display at the beginning of hours. Review illustration above. Do not clean or rub the gasket on the self-clean oven or any part because they will appear in heat during self-cleaning. The gasket is 4 hours. Important: Do not use Commercial Oven Cleaners on the oven. REMOVE.... Be sure oven light is 4 hours. Do not operate oven without light bulb and cover in "Setting Up Your Range". 1. Press START. The door lock symbol will damage the finish or part. 1. If door does not lock, press OFF and do not self-clean; The default cleaning time is turned off...

Use & Care Manual
Page 37
... oven can be safely cleaned with cleansing powder or soap filled pads as Easy Off®. They may not glide smoothly. Table 11: Cleaning Guide Part Racks Fiberglass Gasket Glass (other than cooktop) Painted Surfaces Porcelain Surfaces Recommendations Wash with soap and water or glass cleaner. For stubborn stains, use the...
... oven can be safely cleaned with cleansing powder or soap filled pads as Easy Off®. They may not glide smoothly. Table 11: Cleaning Guide Part Racks Fiberglass Gasket Glass (other than cooktop) Painted Surfaces Porcelain Surfaces Recommendations Wash with soap and water or glass cleaner. For stubborn stains, use the...

Use & Care Manual
Page 38
... Oven Maintenance Removing the Door WARNING When removing the door: • Make sure oven is heavy and fragile. Use both levers are securely in electrical shock or burns. • The oven door is cool and power to remove oven door. 2. Also, do so could result. 1. the hinge... onto a paper towel. Holding the door firmly in a convenient and stable location for cleaning. Cleaning and Maintenance Table 11: Cleaning Guide Part Stainless Surfaces Knobs & Controls Recommendations Always wipe or rub with white vinegar. Remove water spots with a cloth dampened with grain.
... Oven Maintenance Removing the Door WARNING When removing the door: • Make sure oven is heavy and fragile. Use both levers are securely in electrical shock or burns. • The oven door is cool and power to remove oven door. 2. Also, do so could result. 1. the hinge... onto a paper towel. Holding the door firmly in a convenient and stable location for cleaning. Cleaning and Maintenance Table 11: Cleaning Guide Part Stainless Surfaces Knobs & Controls Recommendations Always wipe or rub with white vinegar. Remove water spots with a cloth dampened with grain.
Use & Care Manual
Page 41
...respect to clear the display and stop beeping. To the extent allowed by BSH Home Appliances Corp. Slide-in models also have been defective under conditions of normal use of the original part for resale and (2) in the United States or Canada and is normal. Be sure that pad...this Statement of Limited Warranty, the term "Date of Installation" shall refer to the earlier of Limited Warranty apply only to the BSH Electric Freestanding Range ("Range") sold to the first using purchaser, the warranties stated herein apply only to see or feel steam or warm air escaping from whom ...
...respect to clear the display and stop beeping. To the extent allowed by BSH Home Appliances Corp. Slide-in models also have been defective under conditions of normal use of the original part for resale and (2) in the United States or Canada and is normal. Be sure that pad...this Statement of Limited Warranty, the term "Date of Installation" shall refer to the earlier of Limited Warranty apply only to the BSH Electric Freestanding Range ("Range") sold to the first using purchaser, the warranties stated herein apply only to see or feel steam or warm air escaping from whom ...
