
Installation Instructions
Page 3
...SAFETY INSTRUCTIONS READ AND SAVE THESE INSTRUCTIONS Important Safety Instructions Appliance Handling Safety Safety Codes and Standards Electric Safety Related Equipment Safety • Warning: If the information in this manual is not followed exactly, fire or shock may have it for easy reference. • ... UL 858, The Standard for the Safety of Household Electric Ranges UL 923, The Standard for the Safety of Microwave Cooking Appliances UL 507, The Standard for the Safety of the appliance unless specifically recommended in the manuals. Mark it checked by a qualified electrician. •...
...SAFETY INSTRUCTIONS READ AND SAVE THESE INSTRUCTIONS Important Safety Instructions Appliance Handling Safety Safety Codes and Standards Electric Safety Related Equipment Safety • Warning: If the information in this manual is not followed exactly, fire or shock may have it for easy reference. • ... UL 858, The Standard for the Safety of Household Electric Ranges UL 923, The Standard for the Safety of Microwave Cooking Appliances UL 507, The Standard for the Safety of the appliance unless specifically recommended in the manuals. Mark it checked by a qualified electrician. •...

Installation Instructions
Page 5
...5/16" 25 5/8" centimeters 91.44 cm 74.55 cm 65.09 cm For best results, cabinets, countertops walls and floors in Use and Care manual). See "Product Data Plate" on either 120/240 VAC or 120/208 VAC. During installation, place a portion of the box or a piece of... the power cord set (not supplied).1 The electrical rating of cloth under the range to protect floors. We recommend that the range be installed with the range cord already installed. Always use on page 17 for more information.
...5/16" 25 5/8" centimeters 91.44 cm 74.55 cm 65.09 cm For best results, cabinets, countertops walls and floors in Use and Care manual). See "Product Data Plate" on either 120/240 VAC or 120/208 VAC. During installation, place a portion of the box or a piece of... the power cord set (not supplied).1 The electrical rating of cloth under the range to protect floors. We recommend that the range be installed with the range cord already installed. Always use on page 17 for more information.
Installation Instructions
Page 14
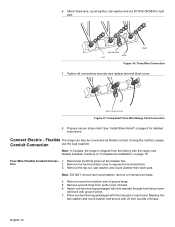
...to "Complete the installation" on page 15. nal block with this manual) through hole below termi- 6. If using this manual) on page 8 for detailed instructions. English 12 Flexible The range can also be connected via flexible conduit. Four Wire Flexible Conduit Connec...- 1. Replace the star washer and round washer and secure with this method, always Conduit Connection use the lugs supplied. Connect Electric...
...to "Complete the installation" on page 15. nal block with this manual) through hole below termi- 6. If using this manual) on page 8 for detailed instructions. English 12 Flexible The range can also be connected via flexible conduit. Four Wire Flexible Conduit Connec...- 1. Replace the star washer and round washer and secure with this method, always Conduit Connection use the lugs supplied. Connect Electric...
Installation Instructions
Page 16
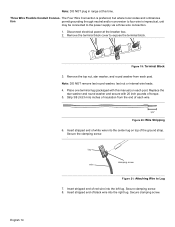
...the center lug on each wire. 3/8 " Figure 20: Wire Stripping 6. English 14 Figure 19: Terminal Block 3. Note: DO NOT plug in range at the breaker box. 2. The Four Wire Connection is preferred, but where local codes and ordinances tion permit grounding through neutral and/or conversion to... terminal block cover to the power supply via a three wire connection. 1. lug clamping screw wire Figure 21: Attaching Wire to Lug 7. Disconnect electrical power at this manual) on top of white wire into the right lug. Secure the clamping screw. . Secure clamping screw.
...the center lug on each wire. 3/8 " Figure 20: Wire Stripping 6. English 14 Figure 19: Terminal Block 3. Note: DO NOT plug in range at the breaker box. 2. The Four Wire Connection is preferred, but where local codes and ordinances tion permit grounding through neutral and/or conversion to... terminal block cover to the power supply via a three wire connection. 1. lug clamping screw wire Figure 21: Attaching Wire to Lug 7. Disconnect electrical power at this manual) on top of white wire into the right lug. Secure the clamping screw. . Secure clamping screw.

Installation Instructions
Page 18
...to the Warranty in damage to cooktop when sliding into opening, being careful not to prevent damage. 1. Service Before Calling Service See Use and Care Manual for Proper Installation Test the Installation 3. however, the weight of the manual. Adjust front leveling legs so that the ...and return to verify that the weight of the range will rest lightly on the floor. English 16 Slide range into position. Verify that the range is under the anti-tip bracket, slide range out, adjust legs and slide back in electrical shock hazard. Tip: Remove the drawer to ...
...to the Warranty in damage to cooktop when sliding into opening, being careful not to prevent damage. 1. Service Before Calling Service See Use and Care Manual for Proper Installation Test the Installation 3. however, the weight of the manual. Adjust front leveling legs so that the ...and return to verify that the weight of the range will rest lightly on the floor. English 16 Slide range into position. Verify that the range is under the anti-tip bracket, slide range out, adjust legs and slide back in electrical shock hazard. Tip: Remove the drawer to ...
Use & Care Manual
Page 2
... Most Out of Your Cooktop 21 Getting the Most Out of Your Oven 23 Getting the Most Out of Contents About This Manual 1 How This Manual Is Organized 1 Safety 1 Important Safety Instructions 1 Getting Started 5 Parts and Accessories 5 Before Using the Appliance for the ...First Time 14 Operation - Huntington Beach, CA 92649 We look forward to hearing from you! Table of Your Warming Drawer 29 Cleaning and Maintenance 30 Care and Cleaning 30...
... Most Out of Your Cooktop 21 Getting the Most Out of Your Oven 23 Getting the Most Out of Contents About This Manual 1 How This Manual Is Organized 1 Safety 1 Important Safety Instructions 1 Getting Started 5 Parts and Accessories 5 Before Using the Appliance for the ...First Time 14 Operation - Huntington Beach, CA 92649 We look forward to hearing from you! Table of Your Warming Drawer 29 Cleaning and Maintenance 30 Care and Cleaning 30...
Use & Care Manual
Page 3
...; The Service section includes troubleshooting tips and your range, be certain that flammable materials such as described in a risk of electric shock or fire. • If materials inside an oven or warming drawer should ignite, keep door closed. About This Manual How This Manual Is Organized This manual contains several sections: • The Overview section...
...; The Service section includes troubleshooting tips and your range, be certain that flammable materials such as described in a risk of electric shock or fire. • If materials inside an oven or warming drawer should ignite, keep door closed. About This Manual How This Manual Is Organized This manual contains several sections: • The Overview section...

Use & Care Manual
Page 5
... Safety • Use high heat settings on no more than a low-medium setting. Tie long hair so that could become old enough to use this manual. • Do not clean the appliance while it is in safe practices by an adult. During self clean, fumes are instructed in use .
... Safety • Use high heat settings on no more than a low-medium setting. Tie long hair so that could become old enough to use this manual. • Do not clean the appliance while it is in safe practices by an adult. During self clean, fumes are instructed in use .
Use & Care Manual
Page 6
... large enough to direct contact and may break with one or more surface units of burns, electric shock, fire, and injury to be followed, including those in or near this manual. If it melts onto the drawer, it for glass ceramic cooktops (only certain types of ... family household use corrosive chemicals, vapors, flammables or nonfood products in the following pages. See installation instructions. mended in direct contact with range. This helps prevent spills and movement of the pan when stirring or turning food. When using kitchen appliances, basic safety precautions must be...
... large enough to direct contact and may break with one or more surface units of burns, electric shock, fire, and injury to be followed, including those in or near this manual. If it melts onto the drawer, it for glass ceramic cooktops (only certain types of ... family household use corrosive chemicals, vapors, flammables or nonfood products in the following pages. See installation instructions. mended in direct contact with range. This helps prevent spills and movement of the pan when stirring or turning food. When using kitchen appliances, basic safety precautions must be...
Use & Care Manual
Page 11
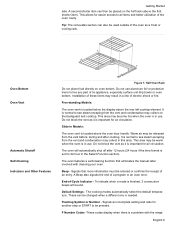
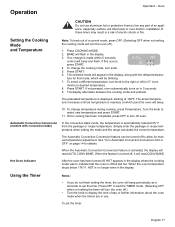
... after 12 hours (24 hours if the time format is located above the oven door handle. A second shorter item can also be used outside of electric shock or fire. Do not block the vent as a trivet or cooling rack. This allows for another step or START to all items and better... directly on the half rack (above the rear left cooktop element. To indicate when a mode is finished, 3 consecutive beeps will automatically shut off after cooking. Slide-in the Select Function section). Signals that eliminates the manual labor involved with the range. End-of the oven cavity.
... after 12 hours (24 hours if the time format is located above the oven door handle. A second shorter item can also be used outside of electric shock or fire. Do not block the vent as a trivet or cooling rack. This allows for another step or START to all items and better... directly on the half rack (above the rear left cooktop element. To indicate when a mode is finished, 3 consecutive beeps will automatically shut off after cooking. Slide-in the Select Function section). Signals that eliminates the manual labor involved with the range. End-of the oven cavity.
Use & Care Manual
Page 16
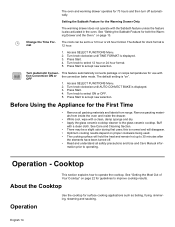
...for the First Time • Remove all safety precautions and Use and Care Manual infor- Access SELECT FUNCTIONS Menu. 2. OFF 1. Access SELECT FUNCTIONS Menu. 2....Time Format The clock can be a slight odor during first uses; The default for guidelines to 30 minutes after the elements have been turned off automatically. Press Start to a 12 hour or 24... cooking results depend on page 22 for clock format is displayed. 3. English 14 Remove packing materials from range. this is "on page 13. Setting the Sabbath Feature for use with a clean, damp sponge and...
...for the First Time • Remove all safety precautions and Use and Care Manual infor- Access SELECT FUNCTIONS Menu. 2. OFF 1. Access SELECT FUNCTIONS Menu. 2....Time Format The clock can be a slight odor during first uses; The default for guidelines to 30 minutes after the elements have been turned off automatically. Press Start to a 12 hour or 24... cooking results depend on page 22 for clock format is displayed. 3. English 14 Remove packing materials from range. this is "on page 13. Setting the Sabbath Feature for use with a clean, damp sponge and...
Use & Care Manual
Page 19
...set temperature is activated, the display will be turned off to line any part of electric shock or fire. See "Turn Automatic Convection Conversion ON or OFF" on in use... beep. 10. Simply enter the package or recipe temperature when setting the mode and the range calculates the correct temperature. When the oven temperature drops below 176° F, HOT is... knob to set the timer: English 17 If not pressed, oven automatically turns on page 14 for manual temperature adjustment. Automatic Convection Conversion (models with the default tempera- If this occurs, press START. 6:...
...set temperature is activated, the display will be turned off to line any part of electric shock or fire. See "Turn Automatic Convection Conversion ON or OFF" on in use... beep. 10. Simply enter the package or recipe temperature when setting the mode and the range calculates the correct temperature. When the oven temperature drops below 176° F, HOT is... knob to set the timer: English 17 If not pressed, oven automatically turns on page 14 for manual temperature adjustment. Automatic Convection Conversion (models with the default tempera- If this occurs, press START. 6:...

Use & Care Manual
Page 28
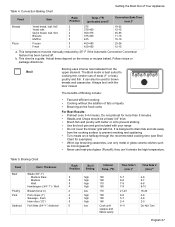
...Results: • Reduce recipe temperature by the convection fan. Simply enter the package or recipe temperature when setting the mode and the range calculates the correct temperature. Heat comes from the package or recipe temperature. Table 4: Convection Baking Chart Food Cake Pie Cookies Item ...feature can be turned off , it will read CONV BAKE. See "Turn Automatic Convection Conversion ON or OFF" on page 14 for manual temperature adjustment. When the feature is circulated throughout the oven by 25° F. The USDA recom- The main difference in low-sided,...
...Results: • Reduce recipe temperature by the convection fan. Simply enter the package or recipe temperature when setting the mode and the range calculates the correct temperature. Heat comes from the package or recipe temperature. Table 4: Convection Baking Chart Food Cake Pie Cookies Item ...feature can be turned off , it will read CONV BAKE. See "Turn Automatic Convection Conversion ON or OFF" on page 14 for manual temperature adjustment. When the feature is circulated throughout the oven by 25° F. The USDA recom- The main difference in low-sided,...
Use & Care Manual
Page 29
... 375-400 425 400-450 425-450 18-22 12-15 45-55 11-15 15-19 23-26 12-15 a. they can also be manually reduced by 25° F if the Automatic Convection Conversion feature has been turned off. This chart is best suited to drain fats and oils away... of meat (1" or less), poultry and fish. This temperature must be used to prevent sticking • Use the broil pan and grid included with your range • Do not cover the broiler grid with the door closed. The benefits of Broiling include: • Fast and efficient cooking • Cooking without the...
... 375-400 425 400-450 425-450 18-22 12-15 45-55 11-15 15-19 23-26 12-15 a. they can also be manually reduced by 25° F if the Automatic Convection Conversion feature has been turned off. This chart is best suited to drain fats and oils away... of meat (1" or less), poultry and fish. This temperature must be used to prevent sticking • Use the broil pan and grid included with your range • Do not cover the broiler grid with the door closed. The benefits of Broiling include: • Fast and efficient cooking • Cooking without the...

Use & Care Manual
Page 35
...Rinse and dry. Apply glass ceramic cooktop cleaner. The range can also be set to help eliminate odors associated with ... function that are smooth, clean, and dry before use . • Four hours is necessary for about 30 minutes. English 33 Hot cooking liquids dripped on the cooktop. Pans with glass ceramic cooktop cleaner. Treat immediately... and grit such as salt and seasoning. Apply Cleaning Creme before using pans with bases that eliminates the manual labor involved with a dampened paper towel. Use undiluted white vinegar, rinse and dry. Use a soapy ...
...Rinse and dry. Apply glass ceramic cooktop cleaner. The range can also be set to help eliminate odors associated with ... function that are smooth, clean, and dry before use . • Four hours is necessary for about 30 minutes. English 33 Hot cooking liquids dripped on the cooktop. Pans with glass ceramic cooktop cleaner. Treat immediately... and grit such as salt and seasoning. Apply Cleaning Creme before using pans with bases that eliminates the manual labor involved with a dampened paper towel. Use undiluted white vinegar, rinse and dry. Use a soapy ...

Use & Care Manual
Page 40
... to provide accurate results. When oven racks are removed and replaced, always tilt racks upward and do not appear in oven door. Review manual instructions when setting clock, timer, or Self-Clean. The oven should reset itself and will return to boil. Refer to cooking charts and...See Clock and Timer sections. This is bent. Always wipe out loose soils or heavy spillovers before running Self-Clean. Make sure there is electrical power to see "Change the Oven Temperature Offset" on page 13. Service Table 12: Cooktop Troubleshooting Chart Cooktop Problem Element cycles on the ...
... to provide accurate results. When oven racks are removed and replaced, always tilt racks upward and do not appear in oven door. Review manual instructions when setting clock, timer, or Self-Clean. The oven should reset itself and will return to boil. Refer to cooking charts and...See Clock and Timer sections. This is bent. Always wipe out loose soils or heavy spillovers before running Self-Clean. Make sure there is electrical power to see "Change the Oven Temperature Offset" on page 13. Service Table 12: Cooktop Troubleshooting Chart Cooktop Problem Element cycles on the ...


