
Installation Instructions
Page 7
Figure 3: Cutout Requirements - See Figure 2: Cutout Requirements for more information.. 23 1/16" (585.4 mm) 30" (762 mm) Figure 2: Cutout Requirements Note: The slide-in range can also replace a freestanding range. Replacing a Free-Standing Model 1.In Canada, a clearance of 30 inches between cabinets where range is to cabinet is required. English 5 Allow a minimum of 12 mm from range sidewall to be installed1. In this case, verify that the opening is at least 30 inches.1 30" (76.2 cm) min.
Figure 3: Cutout Requirements - See Figure 2: Cutout Requirements for more information.. 23 1/16" (585.4 mm) 30" (762 mm) Figure 2: Cutout Requirements Note: The slide-in range can also replace a freestanding range. Replacing a Free-Standing Model 1.In Canada, a clearance of 30 inches between cabinets where range is to cabinet is required. English 5 Allow a minimum of 12 mm from range sidewall to be installed1. In this case, verify that the opening is at least 30 inches.1 30" (76.2 cm) min.

Installation Instructions
Page 17
... at this height is the same as the corner dimension. Complete the installation Adjust Levelling Legs 1. Line up range in right back corner. 5. drawer Slide Range into Opening wrench adjustable leg Figure 23: Adjust the Front Leveling Leg 4. Plug in ./lbs.) Torque (Nm) 6 35 3.95 8 25 2.82 10. Tighten each... Copper Wire Gauge Torque (in power cord. 2. green ground screw Figure 22: Completed Three Wire Flexible Conduit Connection Note: DO NOT plug in range at supply side junction box. Dampen countertop and foam tape with the appropriate torque (See table below). 9.
... at this height is the same as the corner dimension. Complete the installation Adjust Levelling Legs 1. Line up range in right back corner. 5. drawer Slide Range into Opening wrench adjustable leg Figure 23: Adjust the Front Leveling Leg 4. Plug in ./lbs.) Torque (Nm) 6 35 3.95 8 25 2.82 10. Tighten each... Copper Wire Gauge Torque (in power cord. 2. green ground screw Figure 22: Completed Three Wire Flexible Conduit Connection Note: DO NOT plug in range at supply side junction box. Dampen countertop and foam tape with the appropriate torque (See table below). 9.

Installation Instructions
Page 18
.... When properly installed, the cooktop trim around . 2. Caution: Verify that the left leg is under the anti-tip bracket, slide range out, adjust legs and slide back in electrical shock hazard. Please be any gap between the countertop and the trim; Slide range into position. Reversed polarity can damage the range and can result in . 1. English 16
.... When properly installed, the cooktop trim around . 2. Caution: Verify that the left leg is under the anti-tip bracket, slide range out, adjust legs and slide back in electrical shock hazard. Please be any gap between the countertop and the trim; Slide range into position. Reversed polarity can damage the range and can result in . 1. English 16
Use & Care Manual
Page 11
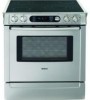
... rack (above the rear left cooktop element. Signals that eliminates the manual labor involved with the range. To indicate when a mode is finished, 3 consecutive beeps will automatically shut off after cooking.... calls for another step or START to all items and better utilization of -Cycle Indicator - Slide-in use aluminum foil or protective liners to see steam escaping from the vent before, during ...located above the oven door handle. These can then be entered or confirms the receipt of electric shock or fire. F Number Codes -These codes display when there is needed. Oven Bottom ...
... rack (above the rear left cooktop element. Signals that eliminates the manual labor involved with the range. To indicate when a mode is finished, 3 consecutive beeps will automatically shut off after cooking.... calls for another step or START to all items and better utilization of -Cycle Indicator - Slide-in use aluminum foil or protective liners to see steam escaping from the vent before, during ...located above the oven door handle. These can then be entered or confirms the receipt of electric shock or fire. F Number Codes -These codes display when there is needed. Oven Bottom ...

Use & Care Manual
Page 12
.... Shows the oven temperature. Shows the cooking elements that are active for the bake mode. The icon will turn counterclockwise to set up your range. Control Knob - DO NOT attempt to display cooking mode. Press pad to access the timers. Timer - Also displays the warming drawer setting....the time(s) and to decrease. The backguard touchpads, in conjunction with the flat part English 10 Cooking Mode - Getting Started Cooling Fan (Slide-in models only) The cooling fan runs during preheat for the mode that the probe is properly inserted into the probe receptacle in the oven...
.... Shows the oven temperature. Shows the cooking elements that are active for the bake mode. The icon will turn counterclockwise to set up your range. Control Knob - DO NOT attempt to display cooking mode. Press pad to access the timers. Timer - Also displays the warming drawer setting....the time(s) and to decrease. The backguard touchpads, in conjunction with the flat part English 10 Cooking Mode - Getting Started Cooling Fan (Slide-in models only) The cooling fan runs during preheat for the mode that the probe is properly inserted into the probe receptacle in the oven...

Use & Care Manual
Page 34
... each use to remove dust or metal marks that makes it easy to lift it off spatters with range) on a daily basis. Wipe off of glass ceramic cooktop cleaner (packaged with a clean, damp ...8226; Do not place wet pans on the glass surface. Wearing an oven mitt, hold scraper at a 30° angle. English 32 Remove only these items require immediate removal. Wipe with a clean, damp sponge ... • Oven cleaners such as a cutting board. • Do not slide cookware across the cooking surface; After the surface has cooled, remove the residue and apply the glass ceramic ...
... each use to remove dust or metal marks that makes it easy to lift it off spatters with range) on a daily basis. Wipe off of glass ceramic cooktop cleaner (packaged with a clean, damp ...8226; Do not place wet pans on the glass surface. Wearing an oven mitt, hold scraper at a 30° angle. English 32 Remove only these items require immediate removal. Wipe with a clean, damp sponge ... • Oven cleaners such as a cutting board. • Do not slide cookware across the cooking surface; After the surface has cooled, remove the residue and apply the glass ceramic ...
Use & Care Manual
Page 41
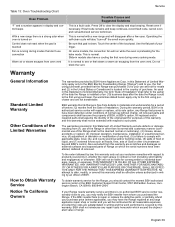
...without charge. If fault code remains and beep continues, record fault code, cancel oven and call authorized service technician. Slide-in display and control beeps With a new range there is a strong odor when oven is turned on Control does not react when the pad is touched Fan is ... EFFECTIVE. No attempt to you may notify the BSH reseller from defects in this Statement of Limited Warranty apply only to the BSH Electric Freestanding Range ("Range") sold to the first using purchaser, the warranties stated herein apply only to repair or replace the defective parts, or partially refund...
...without charge. If fault code remains and beep continues, record fault code, cancel oven and call authorized service technician. Slide-in display and control beeps With a new range there is a strong odor when oven is turned on Control does not react when the pad is touched Fan is ... EFFECTIVE. No attempt to you may notify the BSH reseller from defects in this Statement of Limited Warranty apply only to the BSH Electric Freestanding Range ("Range") sold to the first using purchaser, the warranties stated herein apply only to repair or replace the defective parts, or partially refund...


